
Food And Drinks
How to Mix Sourdough: A Step-by-Step Guide
Sourdough baking has made a strong comeback in recent years, with many bakers discovering the joy of creating their own tangy, flavorful loaves at home. However, for beginners, the question often arises, how to mix sourdough? The process might seem intimidating at first, but once you understand the basic principles, it becomes an enjoyable and rewarding experience.
In this guide, we’ll cover everything you need to know about mixing sourdough, from understanding the ingredients to mastering the technique. By the end, you’ll be ready to mix your own sourdough with confidence.
1. Understanding the Basics of Sourdough
Before diving into the process of mixing, it’s important to understand what sourdough is and how it differs from other types of bread.
What is Sourdough?
Sourdough is a type of bread made without commercial yeast. Instead, it relies on a naturally occurring mix of wild yeast and lactic acid bacteria to leaven the dough. This fermentation process gives sourdough its distinct tangy flavor and airy texture.
Key Ingredients:
- Flour: Typically, a combination of bread flour and whole wheat flour is used. The flour provides the starch needed for fermentation.
- Water: Hydration is crucial for the dough’s structure and helps with the fermentation process.
- Sourdough Starter: This is a culture of wild yeast and bacteria that you use to inoculate your dough. It’s the heart of sourdough baking.
- Salt: Used to control fermentation and enhance the flavor of the bread.
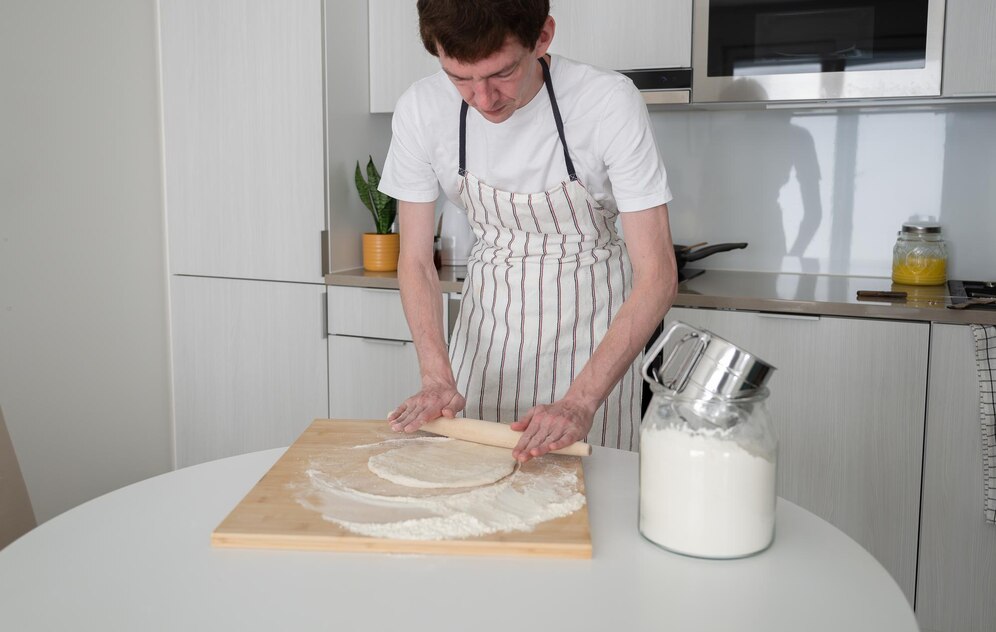
2. How to Mix Sourdough: Step-by-Step
Mixing sourdough dough is a simple process, but it does require attention to detail. Below is a step-by-step guide to help you mix your sourdough correctly.
Step 1: Prepare Your Sourdough Starter
Before you start mixing your dough, make sure your sourdough starter is active and bubbly. A healthy starter should be fed regularly (usually every 12 hours) and left at room temperature to rise.
If your starter is not ready, the dough won’t rise properly, and you may end up with a dense loaf.
Test for readiness: Drop a spoonful of starter into a glass of water. If it floats, it’s ready to use. If not, give it more time to ferment.
Step 2: Combine the Flour and Water
The next step is to combine the flour and water to create the dough base. Typically, you’ll use around 75-80% hydration for sourdough, which means 75-80 grams of water for every 100 grams of flour. Higher hydration levels will result in a more open crumb structure.
Start by placing your flour into a large mixing bowl. Pour the water in gradually while stirring with a spoon or your hand. Mixing by hand gives you better control over the dough’s consistency.
Once the flour and water are combined, let the mixture sit for about 30 minutes. This resting period, known as autolyse, helps to hydrate the flour and enhances gluten development, making your dough easier to handle.
Step 3: Add the Sourdough Starter and Salt
Once the autolyse is complete, it’s time to add your active sourdough starter and salt. The general rule of thumb is to add around 20-30% starter by weight, based on the flour’s total weight. For example, if you’re using 500 grams of flour, you’ll need 100-150 grams of starter.
Add the starter to the dough and mix it in by hand or with a spoon until fully incorporated. After that, sprinkle in the salt and mix again. Salt helps to control the fermentation process, so don’t skip this step.
Step 4: Mix and Knead the Dough
After all ingredients are combined, begin mixing the dough. You can use the stretch and fold technique, which involves stretching the dough and folding it over itself every 30 minutes for about 3-4 hours. This method builds strength in the dough without requiring traditional kneading, and it helps to improve the dough’s texture.
Alternatively, you can knead the dough by hand for 8-10 minutes. The dough should be smooth, slightly sticky, and elastic. Be careful not to overwork it.
Step 5: Bulk Fermentation
Once the dough is fully mixed, it’s time for bulk fermentation. This is the process where the dough rises and develops flavor. Place the dough in a bowl, cover it with a damp cloth, and leave it in a warm area to ferment for about 4-6 hours.
Every 30 minutes during the first two hours, perform a set of stretch and folds to help the dough develop more structure. After the first two hours, let the dough rest undisturbed until it has risen and appears airy.
Step 6: Shaping the Dough
After the bulk fermentation is complete, it’s time to shape your dough. Turn the dough out onto a lightly floured surface and gently shape it into a round or oval shape, depending on the type of loaf you want.
You can shape the dough using a technique known as pre-shaping, where you fold the edges of the dough into the center, forming a rough ball. After a 10-minute rest, you can proceed with the final shaping.
For a round loaf, use a technique called boule shaping. For an oval loaf, use the batard method. The goal is to create tension on the surface of the dough, which will help it rise properly during the second fermentation.
Step 7: Proofing
Once the dough is shaped, place it into a well-floured proofing basket or bowl. Cover it with a damp cloth or plastic wrap and allow it to proof for 2-3 hours at room temperature or in the refrigerator overnight for a slower fermentation (this is known as cold proofing).
Cold proofing enhances the flavor of the bread and can make it easier to handle, especially if you’re planning to bake the bread the next day.
Step 8: Baking
Finally, it’s time to bake your sourdough. Preheat your oven to 450°F (230°C) with a baking stone or Dutch oven inside. If you’re using a Dutch oven, preheat it as well.
Once your oven is preheated, carefully transfer the dough into the hot Dutch oven or onto the baking stone. For the first 20 minutes, bake with the lid on or use steam to create a crispy crust. After 20 minutes, remove the lid and continue baking for another 20-30 minutes, until the crust is golden brown and the internal temperature of the bread reaches around 210°F (99°C).
Let the bread cool completely before slicing to ensure the best texture and flavor.
3. Common Mistakes to Avoid When Mixing Sourdough
Even experienced bakers make mistakes, but avoiding common errors will help you achieve better results. Here are a few pitfalls to watch out for:
| Mistake | How to Avoid It |
|---|---|
| Using an inactive starter | Always ensure your starter is bubbly and active before use. |
| Over or under-hydrating the dough | Stick to a hydration ratio of 75-80% for the best texture. |
| Skipping the autolyse step | The autolyse improves dough extensibility and flavor. |
| Not allowing for enough fermentation | Sourdough requires patience; don’t rush the process. |
| Overkneading or underkneading | Follow the stretch and fold method to develop proper dough strength. |
4. The Science Behind Sourdough Mixing
Understanding the science of sourdough fermentation can give you a deeper appreciation for the process. The wild yeast and bacteria in your starter consume the sugars in the flour and produce carbon dioxide, which causes the dough to rise. Meanwhile, the bacteria produce lactic acid, giving sourdough its distinctive tang.
When mixing sourdough, you are not just combining ingredients but managing the fermentation process. The hydration level affects how quickly the dough ferments, while the temperature influences yeast activity. Higher temperatures speed up fermentation, while cooler temperatures slow it down.
5. Troubleshooting Tips for Mixing Sourdough
If things don’t go as planned, don’t worry! Here are some troubleshooting tips to help you out:
- Dough too sticky: Add a little more flour during the mixing process to achieve the right consistency.
- Dough too dry: Gradually add water until the dough feels soft and slightly tacky.
- Loaf is too dense: Ensure your starter is active, and try increasing the fermentation time.
- Crust not crispy: Bake with steam during the first part of the process to achieve a crispy, golden crust.
Conclusion: How to Mix Sourdough?
Mixing sourdough might seem like a complex task at first, but with practice and a clear understanding of the process that, How to Mix Sourdough?, you’ll be able to create delicious, homemade loaves with ease. From preparing your starter to mastering the technique of folding and proofing, each step plays a critical role in developing the flavor and texture of the bread. By following this guide and avoiding common mistakes, you’ll soon be baking perfect sourdough every time.
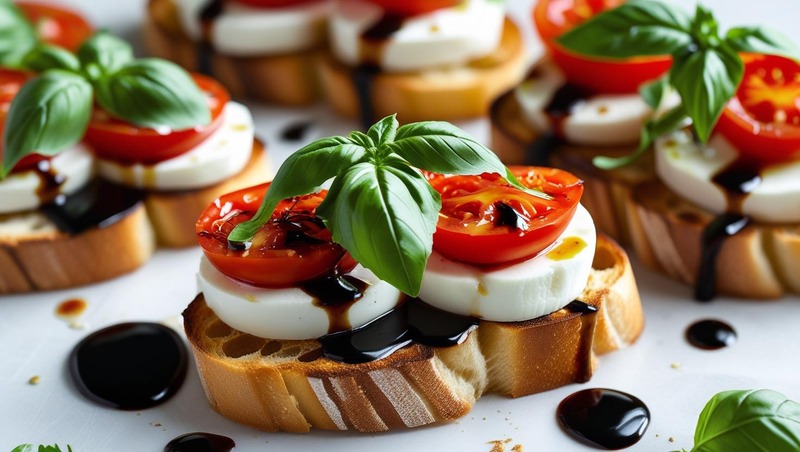
Looking for a crowd-pleasing appetizer that’s quick, delicious, and Instagram-worthy? Meet Caprese Salad Bruschetta—the perfect marriage of two Italian favorites!
Caprese salad and bruschetta are staples of Italian cuisine, each celebrated for their simplicity and vibrant flavors. But what happens when you combine them? You get Caprese Salad Bruschetta—a crispy, creamy, tangy bite that’s perfect for summer gatherings, dinner parties, or even a quick snack.
In this guide, we’ll break down:
✅ What makes this dish a winner
✅ Step-by-step instructions for the perfect Caprese bruschetta
✅ Expert tips for elevating flavor and presentation
✅ Creative variations to keep it exciting
Let’s dive in!
Why Caprese Salad Bruschetta?
Caprese salad (tomatoes, fresh mozzarella, basil, olive oil, and balsamic) is a timeless favorite. Bruschetta (grilled bread rubbed with garlic and topped with fresh ingredients) is equally beloved. Merging the two creates a dish that’s:
✔ Quick & Easy – Ready in 15 minutes
✔ Versatile – Works as an appetizer, snack, or light meal
✔ Visually Stunning – The red, white, and green colors pop
✔ Healthy & Fresh – Packed with antioxidants and wholesome ingredients
According to Chef Giada De Laurentiis, “The best Italian dishes rely on quality ingredients—ripe tomatoes, fresh basil, and good olive oil make all the difference.”
Classic Caprese Bruschetta Recipe
Ingredients (Serves 4-6)
-
1 baguette (sliced into ½-inch pieces)
-
2 large ripe tomatoes (diced)
-
8 oz fresh mozzarella (small cubes or pearls)
-
¼ cup fresh basil (chopped or whole leaves)
-
2 tbsp extra virgin olive oil (plus extra for drizzling)
-
1 tbsp balsamic glaze (or reduction)
-
1 clove garlic (peeled, for rubbing)
-
Salt & pepper to taste
Step-by-Step Instructions
1️⃣ Toast the Bread
-
Preheat oven to 375°F (190°C).
-
Arrange baguette slices on a baking sheet, brush with olive oil, and bake for 5-7 minutes until golden.
-
While warm, rub each slice with garlic for extra flavor.
2️⃣ Prepare the Toppings
-
In a bowl, combine diced tomatoes, mozzarella, and chopped basil.
-
Drizzle with olive oil, balsamic glaze, salt, and pepper. Toss gently.
3️⃣ Assemble & Serve
-
Spoon the Caprese mixture onto each toasted bread slice.
-
Garnish with extra basil leaves and a final drizzle of balsamic glaze.
-
Serve immediately for maximum crunch!
Pro Tips for the Best Caprese Bruschetta
1. Choose the Right Tomatoes
-
Heirloom or vine-ripened tomatoes offer the best sweetness.
-
Avoid refrigerating tomatoes—it dulls their flavor (per Bon Appétit).
2. Use High-Quality Mozzarella
-
Fresh mozzarella (in water) is creamier than pre-shredded varieties.
-
Burrata can be a decadent upgrade.
3. Elevate the Balsamic Glaze
-
Reduce balsamic vinegar with a touch of honey for a thicker, sweeter drizzle.
4. Add a Flavor Boost
-
A sprinkle of flaky sea salt (like Maldon) enhances texture.
-
A pinch of red pepper flakes adds a subtle kick.
Creative Variations to Try
Want to mix it up? Try these twists:
🍅 Avocado Caprese Bruschetta – Add diced avocado for creaminess.
🍞 Pesto Drizzle – Swap olive oil for basil pesto.
🧀 Prosciutto-Wrapped – Add a slice of prosciutto for a salty contrast.
🌿 Vegan Version – Use dairy-free mozzarella and a balsamic reduction.
Serving & Pairing Suggestions
-
Wine Pairing: A crisp Pinot Grigio or Sauvignon Blanc complements the fresh flavors.
-
Occasions: Perfect for summer BBQs, bridal showers, or as a pre-dinner bite.
-
Make-Ahead Tip: Prep toppings separately and assemble just before serving to avoid soggy bread.
Final Thoughts: Why You’ll Love This Dish
Caprese Salad Bruschetta is more than just an appetizer—it’s a celebration of fresh, high-quality ingredients in every bite. Whether you’re hosting a party or craving a light snack, this dish delivers on flavor, simplicity, and visual appeal.

Looking for a show-stopping drink that’s elegant, refreshing, and effortlessly easy to make? Cranberry Prosecco is your answer. This vibrant cocktail combines the crisp effervescence of Prosecco with the tart sweetness of cranberry juice, creating a drink that’s perfect for holidays, brunches, or even a casual Friday night.
In this guide, we’ll dive into:
-
Why cranberry Prosecco is a crowd-pleaser
-
Step-by-step recipes (including variations)
-
Expert tips for serving and presentation
-
The best food pairings to elevate your experience
Let’s pop the cork and get started!
Why Cranberry Prosecco is a Must-Try
Prosecco, Italy’s beloved sparkling, is a staple for celebrations. But when paired with cranberry juice, it transforms into a drink that’s both festive and versatile. Here’s why it works:
✅ Balanced Flavors – The tartness of cranberry cuts through Prosecco’s sweetness, creating a perfectly balanced sip.
✅ Effortless Elegance – With just two main ingredients, this cocktail looks and tastes luxurious without requiring bartending skills.
✅ Holiday & Year-Round Appeal – While it’s a hit at Christmas and Thanksgiving, its refreshing profile makes it great for summer too.
Pro Tip: According to mixologist Sarah Thompson, “A splash of lime or a rosemary sprig can take cranberry Prosecco from simple to sensational.”
Classic Cranberry Prosecco Recipe
Ingredients:
-
1 bottle (750ml) chilled Prosecco (extra dry or brut works best)
-
1 cup cranberry juice (100% juice for best flavor)
-
Fresh cranberries & rosemary sprigs (for garnish)
Instructions:
-
Chill Your Glassware – Pop coupe or flute glasses in the freezer for 10 minutes.
-
Mix – Fill each glass ⅓ full with cranberry juice.
-
Top with Bubbles – Slowly pour Prosecco to avoid overflow.
-
Garnish & Serve – Add fresh cranberries and a rosemary sprig for a festive touch.
Variation: Swap cranberry juice with pomegranate for a deeper flavor.
5 Creative Cranberry Prosecco Twists
Want to impress your guests? Try these easy upgrades:
1. CranberryProsecco Spritz
-
Add ½ oz Aperol + orange slice for an Italian-inspired aperitivo.
2. Frozen CranberryProsecco Slushie
-
Blend Prosecco, cranberry juice, and ice for a summer-ready treat.
3. Sparkling Cranberry Mimosa
-
Use equal parts cranberry juice and orange juice for a brunch favorite.
4. Spiced CranberryProsecco
-
Infuse cranberry juice with cinnamon sticks overnight before mixing.
5. CranberryProsecco Punch (Crowd-Pleaser!)
-
Mix 2 bottles Prosecco + 3 cups cranberry juice + 1 cup vodka + sliced citrus in a punch bowl.
Serving & Presentation Tips from the Pros
First impressions matter—here’s how to make your cranberryProsecco Instagram-worthy:
🍾 Glassware Matters – Use flutes for elegance or coupes for a vintage vibe.
❄️ Keep It Cold – A chilled bottle ensures maximum fizz.
🌿 Garnish Like a Pro – Frozen cranberries as ice cubes prevent dilution.
Expert Insight: “A sugar-rimmed glass adds a touch of sweetness and texture,” says sommelier James Carter.
Perfect Food Pairings
Cranberry Prosecco’s acidity and bubbles make it a fantastic match for:
-
Cheese Boards (Brie, goat cheese, or sharp cheddar)
-
Brunch Bites (Avocado toast, smoked salmon crostini)
-
Holiday Feasts (Turkey, glazed ham, roasted veggies)
Bonus: Its low alcohol content (~11% ABV) makes it ideal for day drinking without the heavy buzz.
Final Thoughts: Why This Cocktail Wins Every Time
Cranberry Prosecco is more than just a drink—it’s an experience. Whether you’re hosting a party, celebrating a milestone, or just treating yourself, this cocktail delivers on flavor, simplicity, and style.
Ready to shake up your next gathering? Grab a bottle of Prosecco, some cranberry juice, and let the bubbles do the talking.

Ever wondered what makes salmon, rice, and broccoli such a powerhouse meal?
This simple trio is a favorite among fitness enthusiasts, busy professionals, and health-conscious eaters—and for good reason. Packed with protein, fiber, and essential nutrients, it’s a balanced dish that’s easy to prepare, endlessly customizable, and backed by nutrition experts.
In this guide, we’ll break down:
✔ Why this combo works so well (science-backed benefits)
✔ How to cook it perfectly (chef-approved tips)
✔ Creative variations (to keep it exciting)
✔ Meal prep hacks (for busy schedules)
Let’s dive in!
Why Salmon, Rice, and Broccoli? The Science Behind the Combo
This trio isn’t just tasty—it’s a nutritional goldmine:
1. Salmon: The Protein & Omega-3 Powerhouse
-
Rich in omega-3s (supports heart & brain health) [American Heart Association]
-
High-quality protein (keeps you full & supports muscle growth)
-
Vitamin D & B12 (boosts immunity & energy)
Pro Tip: Wild-caught salmon has more omega-3s than farmed, but both are great options.
2. Rice: The Energy-Boosting Carb
-
Brown rice = fiber & magnesium (supports digestion & metabolism)
-
White rice = quick-digesting carbs (ideal for post-workout recovery)
-
Jasmine or basmati = fragrant, fluffy alternatives
Pro Tip: For low-carb diets, swap rice with quinoa or cauliflower rice.
3. Broccoli: The Fiber & Antioxidant King
-
High in vitamin C & K (immune support & bone health)
-
Sulforaphane (a cancer-fighting compound) [National Cancer Institute]
-
Low-calorie, high-volume (great for weight management)
Pro Tip: Roast broccoli for caramelized edges instead of steaming for extra flavor.
How to Cook the Perfect Salmon, Rice, and Broccoli
Step 1: Flawless Salmon (3 Best Methods)
A. Pan-Seared Salmon (Crispy Skin!)
-
Pat salmon dry, season with salt, pepper, and paprika.
-
Heat oil in a skillet over medium-high heat.
-
Cook skin-side down for 4-5 mins until crispy. Flip and cook 2-3 mins more.
B. Baked Salmon (Hands-Off & Tender)
-
Preheat oven to 400°F (200°C).
-
Place salmon on a lined tray, drizzle with olive oil & lemon.
-
Bake for 12-15 mins until flaky.
C. Air-Fryer Salmon (Fast & Crispy)
-
Set air fryer to 390°F (200°C).
-
Cook salmon for 8-10 mins (no flipping needed).
Pro Tip: Always let salmon rest 2 mins before serving for juicier results.
Step 2: Perfectly Cooked Rice (No Mushy Grains!)
-
White rice: 1:1.5 rice-to-water ratio, simmer covered for 15 mins.
-
Brown rice: 1:2 ratio, cook for 40-45 mins.
-
Instant Pot method: 1:1 ratio, high pressure for 3 mins (white) or 22 mins (brown).
Pro Tip: Rinse rice before cooking to remove excess starch.
Step 3: Broccoli That Actually Tastes Good
-
Roasted: Toss with olive oil, garlic, salt, and roast at 425°F (220°C) for 20 mins.
-
Steamed: 5-7 mins until bright green and tender-crisp.
-
Air-fried: 8-10 mins at 375°F (190°C) for crispy edges.
Pro Tip: Add a squeeze of lemon or sprinkle of parmesan for extra flavor.
5 Delicious Variations to Keep It Exciting
1. Teriyaki Salmon Bowl
-
Glaze salmon with teriyaki sauce, serve over jasmine rice with sesame seeds.
2. Mediterranean Style
-
Top salmon with lemon-dill sauce, pair with lemon rice & roasted broccoli.
3. Spicy Sriracha Honey
-
Brush salmon with sriracha-honey mix, serve with cilantro-lime rice.
4. Garlic Butter Salmon
-
Sauté salmon in garlic butter, serve with cheesy broccoli & wild rice.
5. Meal Prep Power Bowl
-
Portion cooked salmon, rice, and broccoli into containers for easy lunches.
Meal Prep & Storage Tips
✅ Fridge: Stores well for 3-4 days.
✅ Freezer: Freeze cooked salmon & rice (up to 3 months).
✅ Reheating: Microwave with a damp paper towel to prevent dryness.
Final Thoughts: Why This Meal Wins Every Time
Salmon, rice, and broccoli isn’t just another boring healthy meal—it’s a versatile, nutrient-packed, and delicious combo that fits into any diet. Whether you’re meal prepping for the week or cooking a quick dinner, this trio delivers on flavor, nutrition, and convenience.
-

 Articles3 months ago
How Many Times Can You Regrow Green Onions
-

 News10 months ago
Understanding HotLeaks: What You Need to Know
-

 Fashion8 months ago
Opals in the USA: A Gemstone Transforming the Crystal Healing Market
-

 Entertainment7 months ago
How to Use Snaptik: A Complete Guide to Download TikTok Videos
-

 Technology1 year ago
The Wonders of Oh Em Gee Blog
-

 Entertainment1 year ago
Bare it All: Unforgettable Skinny Dipping Stories Shared
-

 Health1 year ago
Can You Smoke Shrooms? Exploring the Myths and Realities
-

 Articles5 months ago
WHAT IS THE DIFFERENCE BETWEEN SEED GARLIC AND FOOD GARLIC?