
Articles
“How Much Garlic Should I Buy?”

Because we have access to fresh garlic and its superior flavor, we have increased our garlic use exponentially in recent years! We think this happens with our customers as well.
The real garlic flavor of fresh, home-grown garlic is so much better than what comes from store-bought powdered garlic or the old garlic purchased in stores’ produce sections and from bottles…fresh garlic flavor and aroma are addicting as well as healthy! We use garlic (roasted, minced fresh, minced frozen, minced dried, powdered from last year’s crop, etc.) almost every day. It goes in homemade bread, casseroles, dips, in almost all main dishes, and more.
A sound suggestion would be “don’t short yourself.”
- For example, if you used 2 cloves per day on average, that would mean you need to raise over 700 cloves per year, or around 70-90 garlic bulbs. Depending upon the variety and the size, you should order 5 to 11 pounds of garlic to plant.
- If you sell at Farmer’s Markets, be prepared. These large, fresh, flavorful bulbs from your garlic patch will sell better than hotcakes!
And don’t forget to grow a little extra to share with family and friends… 🙂
For Larger Planting Areas
Under construction 9/2/2010
(Length of Rows) x (2 to 4 seeds per foot) x (Number of Rows) / (# of Seeds Per Pound) = Pounds Needed
Note that the # of Seeds Per Pound will always be an estimate due to variances in bulb sizes, bulbs per pound, and seeds per bulb…and therefore, seeds per pound.
BREAKING DOWN THE NUMBERS
1. Number of Seeds per Row: Multiply the length of your row by 2, as you will probably plant one seed every 5 to 6 inches. However, some sources suggest 3 to 5 inches for spacing, so adjust this number as per your preferred spacing. If you space your garlic every 3 inches, you should use the number “4” in the equation, for example.
2. Number of Rows: Some people plant a single row, with a 2 or 3 foot gap between each row (to allow for mulch or tilling for weed control). Others plant two rows a few inches apart, and then a 2 or 3 foot gap. Still others will plant in more of a “bed” type situation, with 6 or 8 rows close together, and then a 2 or 3 foot gap between. Decide what will work best for your situation, and determine the number of rows you will have.
3. Total Number of Seeds Needed: Determine how many seeds you will need for the length or your rows, and multiply by the number of rows you will fit into your area. For example, a 100′ row would have 200 or more seeds if they were spaced 5 to 6″ apart. If you have 100′-long rows, and have 10 rows, then you would need 100 x 2 x 10 = 2000 seeds (length of row times seeds per foot times number of rows).
4. Calculate the Number of Pounds Needed: After calculating your seed needs in terms of numbers comes the tricky part, because the differing varieties have different numbers of cloves in each pound of seed. For example, some garlics have 4 seeds per bulb, while others have 20 or more seeds per bulb. Also, one variety might average 8 bulbs in a pound of large-sized garlic, while another might average 6 bulbs per pound, and another might require 12 bulbs to make a pound. Medium-sized garlic might have around 18 bulbs per pound. Once you decide on a variety, you can calculate seeds based upon those varieties’ average clove numbers per bulb and average bulbs per pound.
EXAMPLES
Using Music and Lorz as examples, and assuming a 6″ spacing:
Estimating Music:
- Approximately 5 cloves per bulb, ~8 bulbs per pound equals 40 cloves per pound (cloves x bulbs per pound).
- (your total number of cloves needed) divided by 40 equals how many pounds of Music you would need.
- A 100′ row would require approximately 5 pounds of Music if planted 6″ apart.
- Math: 100 x 2 seeds per foot = 200 seeds needed. 200 % 40 seeds per pound = 5 pounds of seed.
Estimating Lorz Italian:
- ~10 to 18 cloves per bulb, but using 10 to estimate (planting the larger cloves helps result in a larger-bulbed harvest), ~8 bulbs per pound equals 80 cloves per pound.
- (your total number of cloves needed) divided by 80 equals how many pounds of Lorz Italian you would need.
- A 100′ row would require approximately 2.5 pounds of Lorz if planted 6″ apart.
- Math: 100 feet x 2 seeds per foot = 200 seeds needed. 200 % 80 seeds per pound = 2.5 pounds.
Planting a 4″ spacing (3 seeds per foot) within the row would result in different seed needs:
Estimating Music:
- Approximately 5 cloves per bulb, ~8 bulbs per pound equals 40 cloves per pound (cloves x bulbs per pound).
- (your total number of cloves needed) divided by 40 equals how many pounds of Music you would need.
- A 100′ row would require approximately 7.5 pounds of Music if planted 4″ apart.
- Math: 100 x 3 seeds per foot = 300 seeds needed. 300 % 40 seeds per pound = 7.5 pounds of seed.
Estimating Lorz Italian:
- ~10 to 18 cloves per bulb, but using 10 to estimate (planting the larger cloves helps result in a larger-bulbed harvest), ~8 bulbs per pound equals 80 cloves per pound.
- (your total number of cloves needed) divided by 80 equals how many pounds of Lorz Italian you would need.
- A 100′ row would require approximately 4 pounds of Lorz if planted 4″ apart.
- Math: 100 feet x 3 seeds per foot = 300 seeds needed. 300 % 80 seeds per pound = 4 pounds.
Estimate of Seeds/Pound
All garlic seed for sale is supplied by our small micro farm in Elgin Oregon – Greifs Gourmet Garlic!
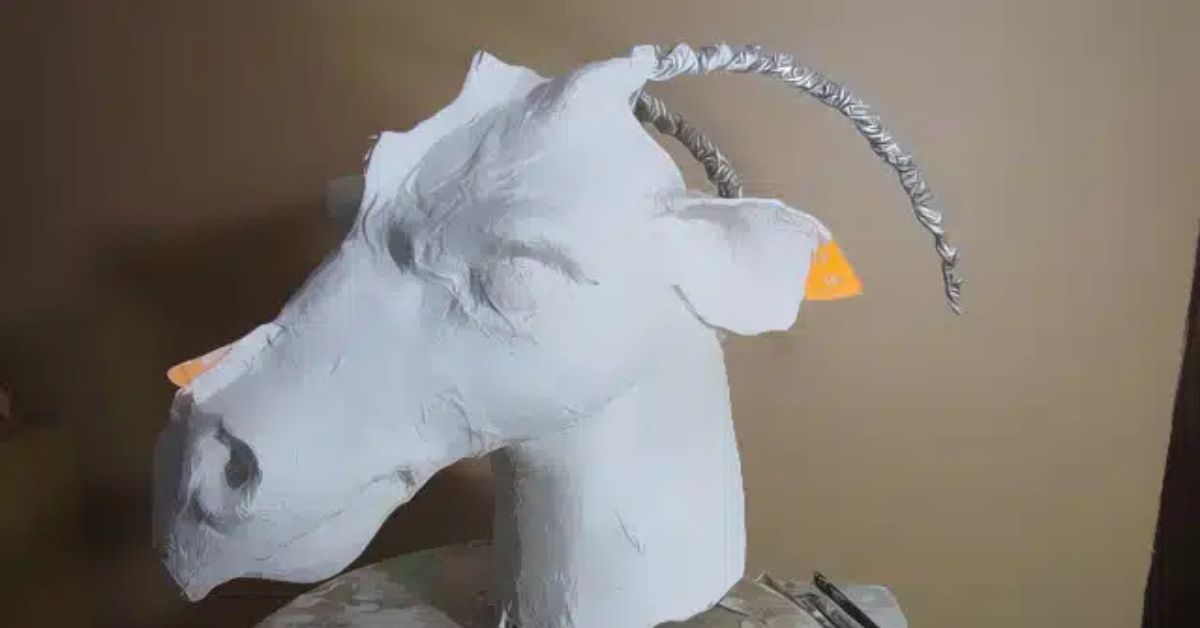
In the world of art, design, and craftsmanship, progress is everything. Whether you’re a sculptor, animator, or hobbyist, documenting your journey through armature progress pictures can be a game-changer. Not only do these images serve as a visual diary of your growth, but they also provide invaluable insights into your creative process.
This guide dives deep into the importance of armature progress pictures, offering actionable tips, tools, and strategies to help you track, analyze, and showcase your artistic evolution. Let’s get started!
Why Armature Progress Pictures Matter
Armature progress pictures are more than just snapshots of your work-in-progress. They are a powerful tool for:
- Tracking Growth: Visual documentation helps you see how far you’ve come, boosting motivation and confidence.
- Identifying Patterns: Spot recurring mistakes or breakthroughs in your creative process.
- Sharing Your Journey: Build an audience by showcasing your progress on social media or portfolios.
- Improving Skills: Analyze your techniques and refine them over time.
How to Capture Effective Armature Progress Pictures
1. Use Consistent Lighting and Angles
Consistency is key when documenting your progress. Use the same lighting setup and camera angle for each picture to ensure accurate comparisons. Natural light or a softbox setup works best for highlighting details.
2. Focus on Key Stages
Capture images at critical milestones, such as:
- Initial sketches or wireframes.
- Midway through the detailing process.
- Final touches and completed work.
3. Leverage High-Quality Tools
Invest in a good camera or smartphone with a high-resolution lens. Use a tripod to avoid blurry shots and ensure stability.
4. Add Context with Timestamps and Notes
Include timestamps, descriptions, or annotations to provide context. This helps you remember specific techniques or challenges faced during each stage.
Tools and Apps for Organizing Armature Progress Pictures
1. Google Photos or iCloud
Store and organize your images in the cloud for easy access and backup.
2. Procreate or Adobe Lightroom
Edit and enhance your pictures to highlight details and improve clarity.
3. Notion or Evernote
Create a digital journal to pair your images with notes, sketches, and reflections.
4. Time-Lapse Apps
Use apps like Lapse It or Hyperlapse to create time-lapse videos of your creative process.
Showcasing Your Armature Progress Pictures
1. Build a Portfolio
Create a dedicated section in your portfolio to showcase your progress. This demonstrates your commitment to growth and improvement.
2. Share on Social Media
Platforms like Instagram, TikTok, and Pinterest are perfect for sharing armature progress pictures. Use hashtags like #ArtProgress, #CreativeJourney, and #ArmatureProgress to reach a wider audience.
3. Create Before-and-After Collages
Highlight your growth by creating side-by-side comparisons of your initial and final stages.
4. Write Blog Posts or Tutorials
Share your insights and techniques by writing about your creative process. Include your progress pictures to make your content more engaging.
Case Study: How Armature Progress Pictures Transformed One Artist’s Career
Meet Sarah, a self-taught sculptor who struggled with self-doubt. By documenting her armature progress pictures, she was able to:
- Track her improvement over time.
- Identify areas for refinement.
- Build a loyal following on Instagram.
Within a year, Sarah’s progress pictures caught the attention of a gallery owner, leading to her first solo exhibition.
Comparison Chart: Traditional vs. Digital Documentation
| Feature | Traditional (Sketchbooks) | Digital (Apps & Cloud) |
|---|---|---|
| Accessibility | Limited to physical space | Accessible anywhere |
| Editing Options | None | Extensive |
| Storage Capacity | Limited | Unlimited |
| Sharing Ease | Difficult | Easy |
| Cost | Low | Moderate to High |
Tips for Maximizing the Impact of Your Armature Progress Pictures
- Be Consistent: Document your progress regularly to build a comprehensive visual timeline.
- Engage Your Audience: Ask for feedback or share behind-the-scenes stories to connect with your followers.
- Experiment with Formats: Try time-lapse videos, GIFs, or interactive galleries to make your progress pictures more dynamic.
- Celebrate Milestones: Share your achievements and reflect on your journey to stay motivated.
Conclusion: Start Documenting Your Creative Journey Today
Armature progress pictures are more than just a record of your work—they’re a testament to your dedication, creativity, and growth. By following the tips and strategies outlined in this guide, you can transform your creative process and inspire others along the way.

Are you feeling a shiver down your spine at the mere mention of a “Should I Kill a Black Widow Spider”? You’re not alone. These notorious arachnids have earned quite the reputation for their venomous bite and striking appearance. But before you reach for that shoe to squash one on sight, let’s delve into the myths and facts surrounding these eight-legged creatures. Join us as we uncover whether you should really kill a Black Widow spider or if there might be a better way to handle them.
Identifying a Black Widow Spider
Black Widow spiders are easily recognizable by their shiny black bodies and distinctive red hourglass marking on the underside of their abdomen. Females are larger than males, with bodies measuring about half an inch in length. Their webs are irregular and messy, often found in dark, secluded areas like garages, sheds, or woodpiles. When identifying a Black Widow spider, remember that they prefer to hide rather than confront humans.
Keep an eye out for these telltale signs to spot a Black Widow spider lurking nearby. Familiarizing yourself with their appearance can help you take appropriate precautions if you come across one in your home or yard.
Black Widow Spider Bites
Black Widow Spider Bites can be a cause for concern due to the venom they inject when biting humans. These bites are often sharp and painful, with symptoms ranging from redness and swelling to muscle cramps and nausea. While most healthy adults may not experience severe reactions, children, the elderly, or individuals with compromised immune systems are at higher risk of complications. It’s essential to seek medical attention if bitten by a Black Widow Spider to receive proper treatment and prevent any potential complications that may arise from the venom.
Where Are Black Widows Commonly Found?
Black widow spiders are often found in dark, secluded areas such as sheds, garages, and basements. They prefer hiding spots close to the ground where they can easily build their webs and catch prey. Outdoor spaces like woodpiles, rock piles, and dense vegetation also provide ideal habitats for black widows to thrive.
In warmer climates, black widows can be commonly found in undisturbed outdoor structures or debris piles. It’s essential to remain cautious when working around these areas to avoid accidental encounters with these venomous arachnids.
How to Get Rid of Black Widow Spiders (Safely)
If you’re dealing with black widow spiders in your home, it’s essential to address the issue promptly and safely. To get rid of these potentially dangerous pests, start by decluttering and organizing your space. Seal up cracks and crevices where they may enter, and use a vacuum to remove webs and egg sacs. Be cautious when handling items in dark or secluded areas as that’s where they like to hide.
Consider using natural remedies like diatomaceous earth or essential oils known for repelling spiders. If the infestation persists, contact a professional pest control service for effective removal without putting yourself at risk.
Black Widow Prevention
Preventing black widow spiders from entering your home starts with keeping a tidy environment. Regularly clean and declutter to eliminate hiding spots. Seal cracks and crevices around doors, windows, and utility entry points to block their access. Outdoor lighting can attract insects that black widows feed on, so consider using yellow bulbs instead of white ones. Keep vegetation trimmed away from the house to reduce potential nesting sites.
Being proactive in maintaining a clean and well-sealed home can significantly reduce the chances of encountering black widow spiders indoors. Simple steps like these can create an inhospitable environment for these venomous arachnids, helping to keep you and your family safe from potential bites.
Professional Black Widow Control
When facing a black widow infestation, seeking professional help is often the best course of action. Pest control experts have the knowledge and tools to safely remove these dangerous spiders from your home. They can identify entry points, locate nests, and implement effective eradication methods tailored to your specific situation.
Professional black widow control services not only eliminate current infestations but also provide long-term prevention strategies to keep these venomous spiders at bay. By enlisting the expertise of professionals, you can ensure a thorough and safe removal process for your peace of mind.
Busting Black Widow Spider Myths
There are plenty of myths surrounding black widow spiders that can make them seem scarier than they actually are. One common myth is that their bites are deadly, but the truth is that fatalities from black widow bites are extremely rare. Another misconception is that these spiders are aggressive and will attack humans without provocation, which is not true.
Additionally, many believe that a black widow bite will result in excruciating pain, but most people only experience mild symptoms. It’s important to separate fact from fiction when it comes to these arachnids to avoid unnecessary fear or harm.
Myth: Black Widow Bites Are Deadly
Black Widow spiders have a fearsome reputation, with one common myth being that their bites are deadly. While it’s true that Black Widow venom is potent, fatal outcomes from their bites are extremely rare. Most healthy adults will experience painful symptoms but recover without serious complications.
In reality, only a small percentage of Black Widow bite cases result in severe reactions, and fatalities are even rarer. It’s crucial to seek medical attention if bitten to manage symptoms effectively and prevent any potential complications.
Myth: Black Widow Spiders Are Aggressive
One common myth about black widow spiders is that they are aggressive creatures ready to attack at any moment. However, the truth is quite different. Black widows are actually shy and reclusive by nature, preferring to stay hidden rather than confront humans.
These spiders only bite when they feel threatened or cornered, such as when someone accidentally disturbs their web or habitat. In most cases, they will retreat and try to avoid human contact altogether. So next time you spot a black widow in your home, remember that they are more likely to flee than come after you aggressively!
Myth: Bites From Black Widow Spiders Are Excruciating
One common myth about black widow spiders is that their bites are excruciatingly painful. While it’s true that the venom of a black widow can cause discomfort, not all bites result in intense pain. In fact, many people may not even realize they have been bitten until symptoms appear.
The severity of a black widow bite can vary depending on factors like the individual’s health and where the bite occurred. It’s important to seek medical attention if you suspect you’ve been bitten by a black widow spider to receive proper care and treatment.
What’s The Truth?
The truth about “Should I Kill a Black Widow Spider” is that while their bites can be harmful, they are rarely life-threatening. These spiders are shy and prefer to flee rather than attack, making them less aggressive than popularly believed.
Contrary to common misconceptions, not all Black Widow bites result in excruciating pain. In fact, many victims may only experience mild symptoms similar to a bee sting. Understanding the facts behind these creatures can help dispel unnecessary fear and encourage more humane approaches to managing their presence.
How Dangerous Are Black Widow Spiders?
Black widow spiders are known for their venomous bite, containing a neurotoxin that can be harmful to humans. While fatalities from black widow bites are rare, the symptoms can be severe and may require medical attention. It’s essential to recognize the signs of a black widow bite, such as muscle cramps, abdominal pain, and sweating.
Although most healthy adults will recover from a black widow bite with proper treatment, children and individuals with compromised immune systems may experience more severe reactions. It’s crucial to exercise caution around these spiders and seek medical help if bitten.
5 Ways You’re Inviting Black Widow Spiders Into Your Home
Black widow spiders might be lurking closer to home than you think. Cluttered spaces offer cozy hiding spots for these arachnids, so tidy up those messy corners and storage areas. Outdoor lighting can attract insects, which in turn draw black widows – consider using yellow bug lights instead.
Overgrown vegetation around your home creates a spider paradise; keep shrubs trimmed and remove debris to deter them from setting up camp. Firewood stacked against the house provides easy access for black widows – store it away from the structure to limit their entry points.
Conclusion
Should I Kill a Black Widow Spider, can be concerning due to their venomous bite, it is important to remember that they are not as dangerous as commonly believed. By understanding more about these spiders, their behavior, and how to prevent them from entering your home, you can coexist with them safely. If you encounter a black widow spider, consider the facts rather than myths before deciding whether or not to eliminate it. With proper knowledge and precautions in place, you can effectively manage any potential risks associated with black widow spiders without resorting to unnecessary harm. Remember: education and prevention are key when it comes to dealing with these misunderstood arachnids.

The Antigua and Barbuda flag is more than just a national emblem—it’s a vibrant tapestry of history, culture, and pride. Whether you’re a history enthusiast, a traveler planning your next Caribbean adventure, or simply curious about world flags, this article will take you on a journey through the fascinating story behind this iconic symbol.
The Antigua and Barbuda Flag: A Visual Masterpiece
The flag of Antigua and Barbuda is instantly recognizable with its bold colors and striking design. It features a unique combination of red, blue, white, black, and yellow, arranged in a sunburst pattern. But what do these elements represent? Let’s break it down:
- Red: Symbolizes the energy and dynamism of the people.
- Blue: Represents hope and the Caribbean Sea that surrounds the islands.
- White: Stands for purity and the sandy beaches of Antigua and Barbuda.
- Black: Reflects the African heritage of the nation’s people.
- Yellow: Depicts the sun, a nod to the islands’ warm climate and bright future.
The rising sun at the center of the flag is a powerful symbol of a new era of independence and optimism.
A Brief History of the Antigua and Barbuda Flag
The flag was designed by Sir Reginald Samuel, a renowned Antiguan artist and teacher, in 1967. It was officially adopted on February 27, 1967, when Antigua and Barbuda became an associated state of the United Kingdom. The flag’s design was chosen through a national competition, reflecting the collective pride and creativity of the nation.
When Antigua and Barbuda gained full independence on November 1, 1981, the flag remained unchanged, solidifying its status as a timeless symbol of national identity.
The Cultural Significance of the Flag
The Antigua and Barbuda flag is deeply intertwined with the nation’s cultural identity. It is prominently displayed during national holidays, sporting events, and official ceremonies, serving as a unifying symbol for the people.
For travelers, the flag is a welcoming sight, often seen fluttering in the breeze at airports, hotels, and historic sites. It’s a reminder of the islands’ rich heritage and warm hospitality.
Fun Facts About the Antigua and Barbuda Flag
- The flag’s sunburst design is one of the most unique among world flags.
- It is one of the few flags to feature a combination of five colors.
- The flag’s proportions are 2:3, making it slightly longer than it is tall.
How to Respect and Display the Flag
If you’re visiting Antigua and Barbuda or simply want to show your appreciation for the flag, here are some tips for respectful display:
- Fly it high: Always ensure the flag is hoisted above other flags when displayed together.
- Keep it clean: Avoid displaying a torn or dirty flag.
- Follow local customs: Be mindful of local traditions and regulations regarding flag usage.
The Antigua and Barbuda Flag in Popular Culture
The flag has made appearances in various forms of media, from travel documentaries to international sporting events. It’s a symbol that resonates not only with Antiguans and Barbudans but also with people around the world who admire its beauty and meaning.
Comparing the Antigua and Barbuda Flag to Other Caribbean Flags
To better understand the uniqueness of the Antigua and Barbudaflag, let’s compare it to other flags in the Caribbean region:
| Country | Flag Colors | Symbolism |
|---|---|---|
| Antigua and Barbuda | Red, blue, white, black, yellow | Sun, sea, heritage, hope, energy |
| Jamaica | Green, gold, black | Sunshine, natural wealth, strength |
| Barbados | Blue, gold, black | Sea, sand, independence |
| Trinidad and Tobago | Red, white, black | Fire, water, earth, unity |
This comparison highlights the distinctiveness of the Antigua and Barbudaflag, which stands out for its vibrant colors and intricate symbolism.
Why the Antigua and Barbuda Flag Matters
The flag is more than just a piece of fabric—it’s a symbol of unity, resilience, and hope. It represents the struggles and triumphs of a nation that has overcome colonialism and embraced independence. For visitors, it’s a gateway to understanding the heart and soul of Antigua and Barbuda.
How to Incorporate the Flag into Your Travel Experience
If you’re planning a trip to Antigua and Barbuda, here are some ways to connect with the flag and its meaning:
- Visit historic sites: Explore landmarks like Nelson’s Dockyard and Betty’s Hope, where the flag’s history comes alive.
- Attend cultural events: Experience local festivals and celebrations where the flag takes center stage.
- Shop for souvenirs: Bring home a piece of Antigua and Barbuda with flag-themed memorabilia.
Conclusion: A Flag That Tells a Story
The Antigua and Barbuda flag is a masterpiece of design and symbolism, reflecting the nation’s past, present, and future. Its vibrant colors and unique patterns tell a story of resilience, hope, and cultural pride.
Whether you’re a history buff, a traveler, or simply curious about world flags, the Antigua and Barbudaflag is a symbol worth exploring. So, the next time you see it waving in the breeze, take a moment to appreciate the rich heritage and vibrant spirit it represents.
-

 Articles12 months ago
How Many Times Can You Regrow Green Onions
-

 News7 months ago
Understanding HotLeaks: What You Need to Know
-

 Technology10 months ago
The Wonders of Oh Em Gee Blog
-

 Entertainment10 months ago
Bare it All: Unforgettable Skinny Dipping Stories Shared
-

 Fashion4 months ago
Opals in the USA: A Gemstone Transforming the Crystal Healing Market
-

 Health10 months ago
Can You Smoke Shrooms? Exploring the Myths and Realities
-

 Articles2 months ago
WHAT IS THE DIFFERENCE BETWEEN SEED GARLIC AND FOOD GARLIC?
-

 Fashion11 months ago
Make a Statement with Stunning Black Homecoming Dresses