
Food And Drinks
Tenkasu: The Crispy, Golden Secret to Umami-Rich Flavor
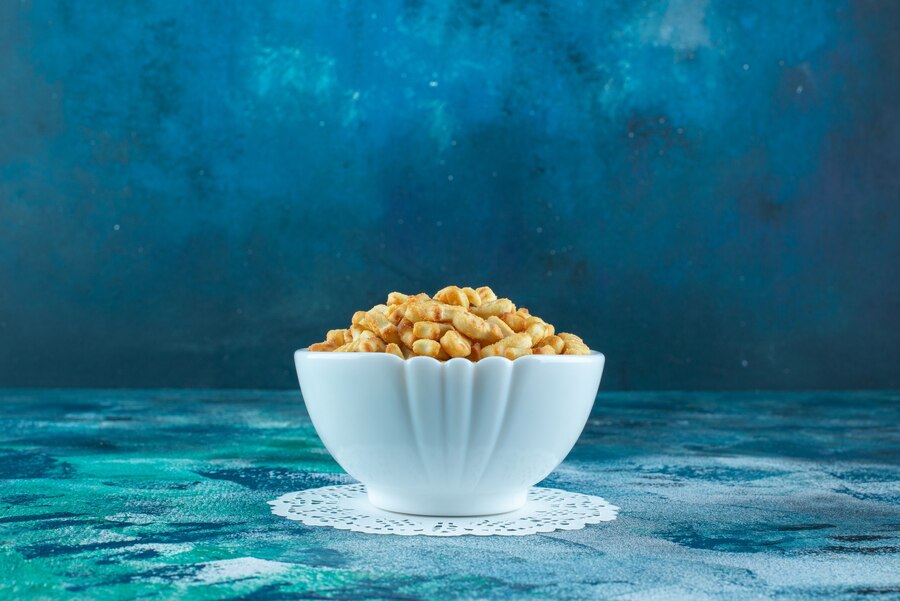
Tenkasu, those little golden flakes you find sprinkled on your ramen or okonomiyaki, are much more than just a crunchy topping. They’re a key ingredient in Japanese cuisine, adding a depth of flavor and texture that elevates dishes to the next level.
A Journey Through the History of Tenkasu
The origins of tenkasu can be traced back to the Edo period (1603-1868) when tempura became a popular street food in Japan. As tempura chefs perfected their craft, they sought ways to utilize every part of the ingredients. Leftover tempura batter, instead of being discarded, was ingeniously transformed into tenkasu, a testament to the resourcefulness of Japanese cuisine.
The Art of Crafting Tenkasu
While seemingly simple, the creation of tenkasu requires a delicate balance of ingredients and technique. The tempura batter, a blend of wheat flour, water, soy sauce, and dashi, forms the foundation of tenkasu’s flavor. The batter is spread thinly and cut into small pieces, ensuring a light and crispy texture. These pieces are then carefully deep-fried in hot oil, transforming them into golden-hued treasures.
Unveiling the Magic of Tenkasu
Tenkasu’s culinary magic lies in its unique combination of flavor, texture, and versatility.
- Flavor Boost: The savory, umami-rich flavor of tenkasu comes from the combination of wheat flour, soy sauce, and dashi used in the tempura batter. This intense flavor adds a distinct depth to dishes, enhancing the overall taste experience.
- Textural Delight: The crispy texture of tenkasu provides a delightful contrast to the soft noodles or creamy sauces in many Japanese dishes. This textural interplay adds a satisfying element to each bite.
- Visual Appeal: The bright golden color of tenkasu adds a pop of vibrancy to any dish, making it visually appealing and inviting.
- Versatility: Tenkasu’s adaptability extends beyond ramen and okonomiyaki. They can be used to enhance stir-fries, add a crunch to salads, or even sprinkled on rice bowls for an extra flavor kick.
Tenkasu vs. Panko: A Tale of Two Textures
While both tenkasu and panko are used as toppings in Japanese cuisine, they offer distinct characteristics:
| Feature | Tenkasu | Panko |
|---|---|---|
| Texture | Crispy, light, and airy | Crunchy, flaky, and coarse |
| Flavor | Savory, umami-rich | Neutral |
| Color | Golden brown | White |
| Ingredients | Tempura batter (wheat flour, soy sauce, dashi) | Breadcrumbs |
Tenkasu’s light and airy texture contrasts beautifully with the denser, flakier texture of panko. Their distinct flavors also play different roles in dishes. Tenkasu’s umami richness complements savory dishes, while panko’s neutral flavor provides a blank canvas for other ingredients to shine.
Crafting Tenkasu at Home: A Culinary Adventure
Making tenkasu at home is surprisingly easy. With a few simple ingredients and a bit of patience, you can create your own batch of these golden treasures.
Ingredients:
- 1 cup all-purpose flour
- 1/2 teaspoon salt
- 1/4 cup soy sauce
- 1/4 cup dashi (or water)
- Vegetable oil for frying
Instructions:
- Mix the batter: Combine the flour, salt, soy sauce, and dashi in a bowl until smooth. The batter should be thin enough to spread easily.
- Spread the batter: Pour a thin layer of batter onto a baking sheet lined with parchment paper.
- Cut and fry: Cut the batter into small pieces and deep-fry in hot oil (350°F) until golden brown and crispy.
- Drain and cool: Remove the tenkasu from the oil and let them cool completely on a paper towel-lined plate.
Tenkasu: A Culinary Journey Through Japanese Cuisine:
Tenkasu’s versatility shines through in its diverse applications across Japanese cuisine.
- Ramen: Tenkasu adds a crunchy texture and umami flavor to the rich broth and noodles, creating a symphony of taste and texture.
- Okonomiyaki: The crispy ten-kasu complements the savory pancake and the sweet and tangy okonomiyaki sauce, adding a delightful textural contrast.
- Udon: Ten-kasu adds a textural contrast to the chewy udon noodles and the flavorful broth, creating a satisfying and flavorful experience.
- Yakimeshi: The golden flakes elevate the simple fried rice with a savory boost,
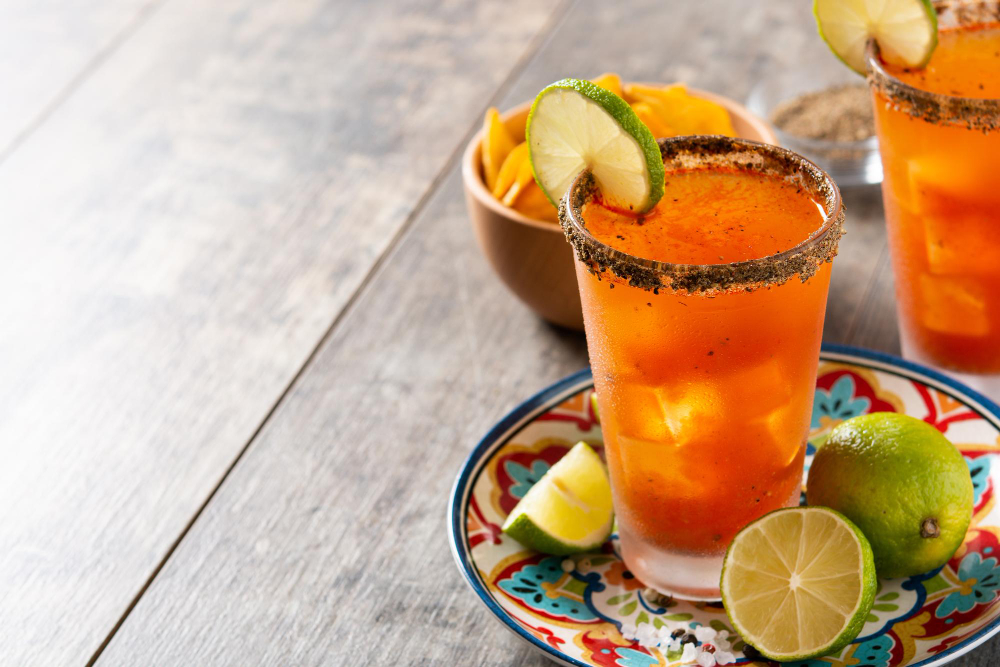
Ever wondered why margaritas dominate Cinco de Mayo celebrations? While this iconic drink is a staple, there’s a whole world of vibrant, flavorful beverages that can elevate your fiesta. Whether you’re hosting a party or simply want to enjoy a festive drink, we’ve got you covered with expert-backed recipes, modern twists, and must-try classics.
Let’s dive into the best Cinco de Mayo drinks—beyond the basic margarita—that will impress your guests and keep the celebration lively!
1. The Classic Margarita (With a Twist)
No Cinco de Mayo is complete without a margarita, but why stick to the ordinary?
Why It Works:
-
Balanced flavors – The perfect mix of sweet, sour, and salty.
-
Customizable – Swap tequila for mezcal for a smoky twist.
Recipe:
-
2 oz reposado tequila
-
1 oz fresh lime juice
-
½ oz triple sec
-
½ oz agave syrup
-
Salt rim (optional)
Pro Tip: Use chili salt for an extra kick!
2. Paloma: Mexico’s Most Popular Cocktail
Move over, margarita—the Paloma is Mexico’s true favorite.
Why It Works:
-
Refreshing & light – Grapefruit soda (like Jarritos or Squirt) keeps it bubbly.
-
Easy to batch – Perfect for parties.
Recipe:
-
2 oz blanco tequila
-
½ oz lime juice
-
Grapefruit soda (to top)
-
Salt rim (optional)
Upgrade It: Use fresh grapefruit juice + club soda for a less sweet version.
3. Michelada: The Ultimate Beer Cocktail
If you love spicy, savory drinks, the Michelada is a must-try.
Why It Works:
-
Umami-rich – Combines beer with lime, hot sauce, and spices.
-
Hangover helper – The electrolytes from the spices help recovery.
Recipe:
-
1 bottle Mexican lager (e.g., Modelo or Victoria)
-
1 oz lime juice
-
2 dashes hot sauce (Valentina or Cholula)
-
½ tsp Worcestershire sauce
-
Tajín rim
Spicy Version: Add a splash of Clamato for a Chelada.
4. Horchata RumChata Cocktail
For a sweet, creamy alternative, try this spiked horchata.
Why It Works:
-
Dessert-like – Cinnamon and vanilla flavors pair perfectly with rum.
-
Non-tequila option – Great for those who prefer something different.
Recipe:
-
1.5 oz RumChata
-
1 oz vanilla vodka
-
1 oz horchata (store-bought or homemade)
-
Cinnamon sprinkle
Frozen Version: Blend with ice for a milkshake-style treat!
5. Mezcal Mule (A Smoky Alternative)
If you love Moscow Mules, this Mexican-inspired version will blow you away.
Why It Works:
-
Mezcal’s smokiness adds depth to the classic ginger-lime combo.
-
Copper mug optional – Serve over ice for simplicity.
Recipe:
-
2 oz mezcal
-
½ oz lime juice
-
4 oz ginger beer
-
Candied ginger garnish
Extra Kick: Add a dash of chili powder to the rim.
Bonus: Non-Alcoholic Agua Fresca
Not drinking alcohol? No problem! Agua fresca is a refreshing, fruity alternative.
Why It Works:
-
Naturally sweet – Made with fresh fruit and water.
-
Kid-friendly – Perfect for all ages.
Recipe:
-
2 cups chopped watermelon (or pineapple, mango)
-
1 cup water
-
1 tbsp lime juice
-
1 tsp honey (optional)
Blend, strain, and serve over ice!
Final Thoughts: Which Drink Will You Try?
Cinco de Mayo Drinks are all about bold flavors and festive vibes. Whether you’re sipping a spicy Michelada, shaking up a mezcal mule, or keeping it classic with a margarita, these drinks will make your celebration unforgettable.
Pro Hosting Tip: Set up a DIY drink station with different rims (salt, Tajín, chili powder) and let guests customize their cocktails!
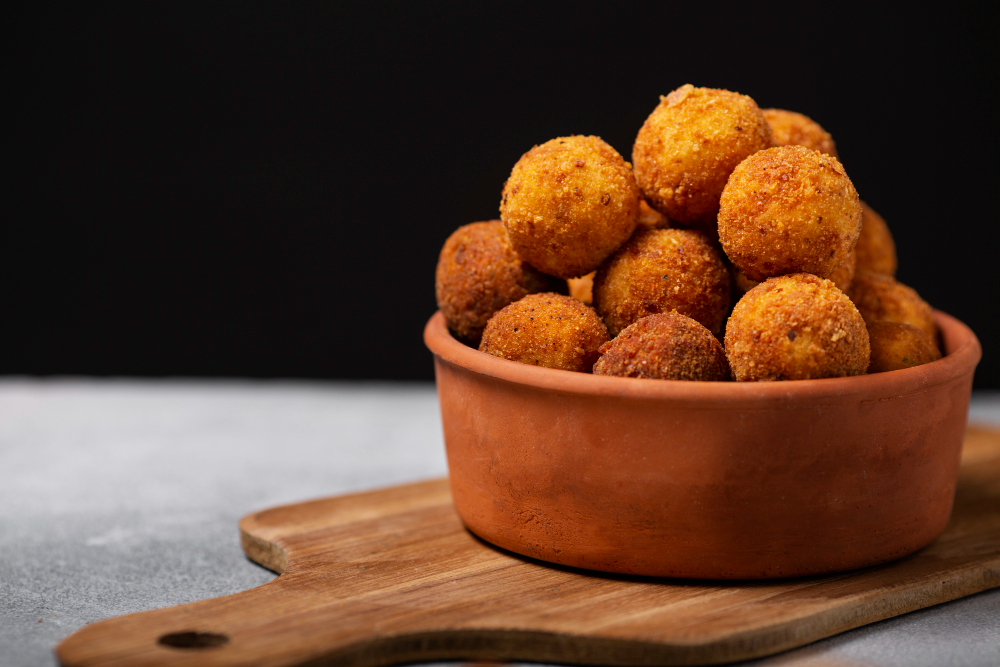
Ever crave a crispy, golden snack that’s creamy on the inside and perfectly crunchy on the outside? Potato balls are the answer! Whether you know them as croquettes, aloo balls, or papas rellenas, these bite-sized delights are a universal favorite.
In this guide, you’ll learn how to make restaurant-quality potato balls at home—crispy on the outside, fluffy inside, and packed with flavor. We’ll cover expert tips, variations, and even how to store them for later. Let’s get cooking!
Why You’ll Love This Potato Balls Recipe
✔ Easy to make – Uses simple, pantry-friendly ingredients.
✔ Versatile – Customize fillings (cheese, meat, herbs, or spices).
✔ Crowd-pleaser – Perfect for parties, snacks, or meal prep.
✔ Kid-friendly – A fun way to sneak in veggies or protein.
Ingredients You’ll Need
For the Potato Mixture:
-
4 large potatoes (Russet or Yukon Gold)
-
2 tbsp butter (or olive oil for dairy-free)
-
¼ cup milk (or plant-based milk)
-
½ tsp salt (adjust to taste)
-
¼ tsp black pepper
-
¼ tsp garlic powder (optional)
For the Filling (Optional but Delicious!):
-
½ cup shredded cheese (cheddar, mozzarella, or pepper jack)
-
¼ cup cooked bacon, ham, or ground beef
-
2 tbsp finely chopped herbs (parsley, chives, or cilantro)
For Breading & Frying:
-
1 cup breadcrumbs (panko for extra crunch)
-
½ cup all-purpose flour
-
2 eggs (beaten)
-
Oil for frying (vegetable, canola, or air-fryer option)
Step-by-Step Instructions
1. Prep the Potatoes
-
Peel, chop, and boil potatoes until fork-tender (~15 mins).
-
Drain well, then mash with butter, milk, salt, and spices until smooth. Let cool.
Pro Tip: Overcooked potatoes can get gluey—stop when just tender!
2. Shape the Potato Balls
-
Scoop ~2 tbsp of mashed potatoes, flatten slightly, and add filling (cheese, meat, etc.).
-
Roll into smooth balls (about 1.5-inch diameter).
Pro Tip: Wet hands slightly to prevent sticking.
3. Bread for Crispiness
-
Roll each ball in flour → dip in beaten egg → coat with breadcrumbs.
-
Chill for 15 mins (helps them hold shape while frying).
4. Fry to Golden Perfection
-
Heat oil to 350°F (175°C).
-
Fry in batches for 2-3 mins until deep golden brown.
-
Drain on a paper towel.
Alternative Cooking Methods:
-
Air Fryer: Spray with oil, cook at 375°F for 10-12 mins, flipping halfway.
-
Baked: Brush with oil, bake at 400°F for 20-25 mins.
5 Expert Tips for the Best Potato Balls
-
Use Starchy Potatoes – Russets or Yukon Golds hold shape better than waxy varieties.
-
Keep the Mixture Dry – Excess moisture = soggy balls. Drain potatoes well!
-
Double-Breading Trick – For extra crunch, dip in egg and breadcrumbs twice.
-
Freeze for Later – Freeze before frying, then cook straight from frozen (add 1-2 mins frying time).
-
Serve with Dipping Sauces – Try garlic aioli, spicy ketchup, or sour cream.
Creative Variations to Try
-
Loaded Potato Balls – Add bacon bits, cheddar, and green onions.
-
Spicy Version – Mix in jalapeños or chili flakes.
-
Veggie-Packed – Fold in finely chopped spinach or corn.
-
Sweet Twist – Swap salt for cinnamon, stuff with Nutella or jam.
Final Thoughts: Crispy Potato Balls Recipe
Crispy Potato Balls Recipe, creamy, and endlessly customizable—making them a foolproof snack for any occasion. Whether you fry, bake, or air-fry them, they’re guaranteed to disappear fast!
Now it’s your turn: Which filling will you try first? Cheese? Spicy beef? Or maybe a sweet surprise? Drop your favorite combo in the comments!
FAQs About Crispy Potato Balls Recipe
Can I make these ahead?
Yes! Prep and refrigerate for up to 24 hours or freeze for 3 months.
Why do my potato balls fall apart?
Potatoes may be too wet, or breading wasn’t packed tightly. Chill before frying.
Can I use sweet potatoes?
Absolutely! Adjust spices (try paprika or cumin for a savory twist).
Ever crave a restaurant-quality meal but dread the long prep time? Imagine a dish that’s creamy, garlicky, packed with protein, and ready in 20 minutes. That’s the magic of a Creamy Tuscan White Bean Skillet—a one-pan wonder that’s hearty, healthy, and bursting with Italian-inspired flavors.
Whether you’re a busy parent, a meal-prep enthusiast, or just someone who loves rich, comforting food, this dish delivers. Let’s break down why it’s a must-try, how to make it perfectly, and expert-backed tips to elevate it.
Why This Dish Works (Nutrition & Flavor Science)
Before diving into the recipe, let’s explore why this skillet meal is a nutritional and culinary powerhouse:
✅ Plant-Based Protein Punch – White beans (like cannellini) offer 15g protein per cup, plus fiber for lasting energy.
✅ Healthy Fats – Olive oil and a touch of cream (or dairy-free alternatives) provide satiating fats without heaviness.
✅ Umami & Depth – Sun-dried tomatoes, garlic, and Parmesan (or nutritional yeast) create a savory, complex flavor profile.
✅ Quick & Adaptable – Works as a main dish, side, or meal-prep staple—gluten-free, vegetarian, and easily veganized.
“Beans are one of the most underrated superfoods—they’re affordable, shelf-stable, and incredibly versatile.” — Dr. Mark Hyman, Functional Medicine Expert
The Ultimate Creamy Tuscan White Bean Skillet Recipe
Ingredients (Serves 4)
-
2 tbsp olive oil
-
4 garlic cloves, minced
-
1 shallot (or small onion), diced
-
1 tsp Italian seasoning
-
½ tsp red pepper flakes (optional)
-
2 cups cooked white beans (or 1 can, drained)
-
½ cup sun-dried tomatoes, chopped
-
1 cup baby spinach (or kale)
-
½ cup vegetable broth
-
¼ cup heavy cream (or coconut milk for vegan)
-
¼ cup grated Parmesan (or nutritional yeast)
-
Salt & pepper to taste
-
Fresh basil or parsley for garnish
Step-by-Step Instructions
1️⃣ Sauté Aromatics – Heat olive oil in a skillet. Add garlic, shallot, Italian seasoning, and red pepper flakes. Cook until fragrant (1-2 min).
2️⃣ Add Beans & Sun-Dried Tomatoes – Stir in white beans and sun-dried tomatoes. Let them soak up the flavors (2-3 min).
3️⃣ Deglaze & Simmer – Pour in broth, scraping up any browned bits. Add spinach and cook until wilted.
4️⃣ Creamy Finish – Reduce heat, stir in cream and Parmesan. Simmer until slightly thickened (3-4 min).
5️⃣ Garnish & Serve – Top with fresh herbs and a drizzle of olive oil. Pair with crusty bread or over pasta.
Pro Tips for the Best Results
1. Bean Choice Matters
-
Cannellini beans are classic, but Great Northern beans or even chickpeas work.
-
For creamier texture, mash a few beans before adding liquid.
2. Flavor Boosters
-
Lemon zest brightens the dish.
-
Miso paste (½ tsp) adds umami depth.
-
Crispy pancetta (or mushrooms) for a meaty twist.
3. Meal-Prep Friendly
-
Stores well for 3-4 days in the fridge.
-
Freezes beautifully—just omit dairy and add it fresh when reheating.
Why This Skillet Beats Takeout
-
Cost-Effective – A fraction of the price of restaurant meals.
-
Customizable – Swap in seasonal veggies (asparagus, zucchini).
-
Fast Cleanup – One pan = less mess.
“The combination of fiber, protein, and healthy fats in this dish helps stabilize blood sugar, making it a great balanced meal.” — Nutritionist Kelly LeVeque
Final Thoughts: A Dish You’ll Make Weekly
The Creamy Tuscan White Bean Skillet is proof that simple ingredients can create extraordinary meals. Whether you need a quick weeknight dinner or an impressive dish for guests, this recipe delivers.
Try it tonight and taste the magic of Tuscan comfort—without the fuss.
-

 Articles3 months ago
How Many Times Can You Regrow Green Onions
-

 News11 months ago
Understanding HotLeaks: What You Need to Know
-

 Fashion8 months ago
Opals in the USA: A Gemstone Transforming the Crystal Healing Market
-

 Entertainment8 months ago
How to Use Snaptik: A Complete Guide to Download TikTok Videos
-

 Technology1 year ago
The Wonders of Oh Em Gee Blog
-

 Entertainment1 year ago
Bare it All: Unforgettable Skinny Dipping Stories Shared
-
 Health1 year ago
Can You Smoke Shrooms? Exploring the Myths and Realities
-
 Articles5 months ago
WHAT IS THE DIFFERENCE BETWEEN SEED GARLIC AND FOOD GARLIC?