Connect with us

Technology

Elevator Buttons: The Unsung Heroes of Vertical Transportation

Published

on

Elevator Buttons

Introduction

Elevator buttons, though often overlooked, play a crucial role in the functioning of elevators, enabling passengers to navigate between floors with ease and efficiency. From simple push buttons to sophisticated touch panels, elevator controls have evolved over the years to meet the demands of modern buildings and transportation systems. In this article, we explore the fascinating world of residential elevators and elevator buttons, shedding light on their history, design, and significance in vertical transportation.

A Brief History of Elevator Buttons

The concept of elevator controls dates back to the early days of elevator technology, with primitive systems relying on manual levers or pulleys to operate elevators. The introduction of push buttons revolutionized elevator design, providing passengers with a convenient means of selecting their desired floor without the need for manual intervention. Over time, advancements in electronics and automation have led to the development of more sophisticated button systems, including touch-sensitive panels and destination dispatch systems, enhancing the efficiency and usability of elevators in modern buildings.

Design and Functionality
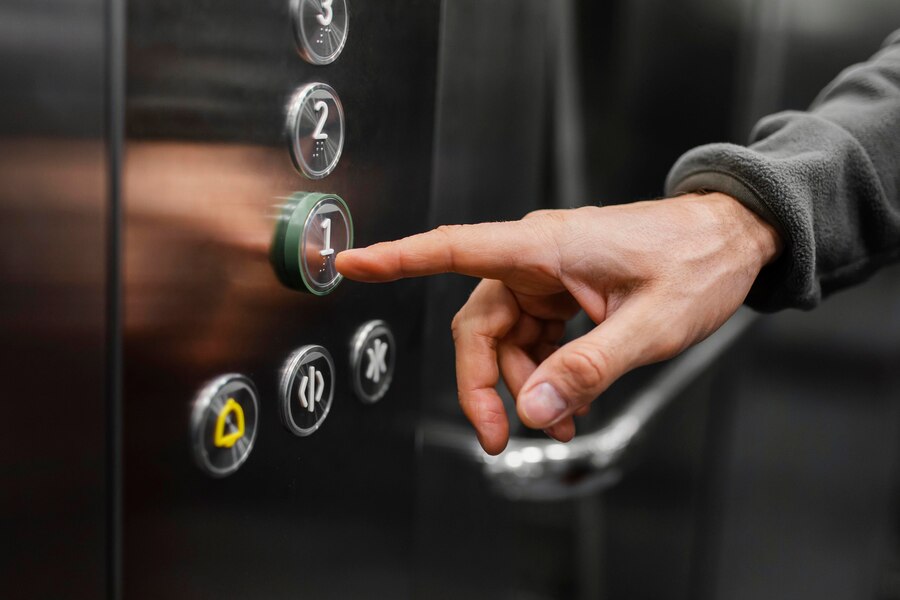
Push Buttons:

  • Mechanical Design: Traditional push buttons feature a mechanical design, typically consisting of a button cap, switch mechanism, and indicator light. When pressed, the button actuates a switch, signaling the elevator control system to respond accordingly.
  • Visual Feedback: Many push buttons are equipped with indicator lights or illuminated numerals to provide visual feedback, indicating the selected floor and confirming user input.

Touch Panels:

  • Sleek and Modern: Touch panels represent the latest advancement in elevator button technology, featuring sleek, intuitive interfaces that allow passengers to select their desired floor with a simple touch or swipe gesture.
  • Customizable Interfaces: Touch panels often offer customizable interfaces, allowing building owners and designers to tailor the user experience to specific preferences and requirements.

Destination Dispatch Systems:

  • Efficient Traffic Management: Destination dispatch systems optimize elevator efficiency by grouping passengers traveling to similar floors and assigning elevators accordingly, reducing wait times and congestion in busy buildings.
  • User-Friendly Interfaces: These systems typically feature user-friendly interfaces, such as touchscreen displays or mobile apps, that allow passengers to input their destination and receive instructions on which elevator to take.

Significance in Vertical Transportation

Elevator buttons are more than just functional controls; they are integral components of vertical transportation systems that contribute to the safety, efficiency, and user experience of elevators in buildings of all sizes. By providing passengers with intuitive controls and feedback mechanisms, elevator buttons help facilitate smooth and seamless journeys between floors, whether in office buildings, residential complexes, or transportation hubs.

Future Trends and Innovations

As technology continues to evolve, so too will elevator button design and functionality. Future trends may include the integration of biometric authentication systems, voice recognition technology, and predictive algorithms that anticipate passenger needs and optimize elevator performance. Additionally, advancements in materials and manufacturing techniques may lead to the development of more durable, environmentally friendly button components that enhance the longevity and sustainability of elevator systems.

Conclusion

Elevator buttons are essential elements of vertical transportation systems that have undergone significant evolution since their inception. From simple push buttons to sophisticated touch panels and destination dispatch systems, these controls play a vital role in enabling smooth and efficient passenger journeys between floors. As technology advances and buildings become increasingly complex, elevator button will continue to adapt and innovate, ensuring that vertical transportation remains safe, convenient, and accessible for all.

FAQs

  1. How do elevator buttons communicate with the elevator control system?
    1. Elevator buttons typically communicate with the elevator control system through electrical signals. When a passenger presses a button to select a floor, it sends a signal to the control system, which then directs the elevator car to the designated floor.
  2. Are there any accessibility features available for elevator buttons?
    1. Yes, many elevator buttons are equipped with accessibility features to accommodate individuals with disabilities. These features may include braille labels, audible feedback, and tactile indicators to assist visually impaired passengers in navigating the control panel.
  3. What role do elevator buttons play in building sustainability and energy efficiency?
    1. Elevator buttons contribute to building sustainability and energy efficiency by optimizing elevator traffic flow and reducing unnecessary energy consumption. Destination dispatch systems, for example, group passengers traveling to similar floors, minimizing elevator stops and reducing energy usage. Additionally, energy-efficient lighting and control systems help conserve energy while providing passengers with intuitive and responsive button interfaces.
Continue Reading
Click to comment

Leave a Reply

Your email address will not be published. Required fields are marked *

Technology

ecvh0 dforce master how to: Unlock Its Benefits

Published

on

ecvh0 dforce master how to

Introduction

Struggling with ecvh0 dforce master setup? You’re not alone. Many users find its configuration tricky, but mastering it unlocks powerful automation and efficiency. This guide breaks down the process into simple steps, helping you harness its full potential quickly.

Why It Matters

Properly setting up ecvh0 dforce master ensures smoother workflows, reduces errors, and maximizes productivity. Whether for personal projects or enterprise use, mastering this tool can save hours of manual work.

Step-by-Step Guide

1. Install & Configure

  • Download the latest ecvh0 dforce master package from the official site.
  • Follow the installation wizard, ensuring all dependencies are met.

2. Set Up Permissions

  • Assign appropriate user roles (admin, editor, viewer).
  • Configure access controls to prevent unauthorized changes.

3. Integrate with Your System

  • Connect ecvh0 dforcemaster to your existing tools via API.
  • Test the connection to ensure seamless data flow.

4. Automate Key Tasks

  • Use built-in templates or create custom automation rules.
  • Schedule recurring tasks to minimize manual input.

5. Monitor & Optimize

  • Track performance metrics in the dashboard.
  • Adjust settings for better speed and efficiency.

Pro Tip

Use keyboard shortcuts to navigate ecvh0 dforcemaster faster. Press Ctrl + K (Windows) or Cmd + K (Mac) to open the command palette for quick actions.

Conclusion

Mastering ecvh0 dforce master simplifies complex tasks and boosts efficiency. By following these steps, you’ll optimize your workflow and get the most out of this powerful tool.

FAQ

Is ecvh0 dforcemaster free?

It offers a free tier with limited features; advanced options require a subscription.

Can I use it offline?

Some features work offline, but full functionality requires an internet connection.

How secure is ecvh0 dforcemaster?

It uses encryption and role-based access for security. For best practices, check our security guide.

Continue Reading

Technology

How to Disassemble a Sony KV-27S42 CRT TV: Complete Guide

Published

on

How to Disassemble a Sony KV-27S42 CRT TV

Introduction

The Sony KV-27S42 is a classic CRT television, and while it’s no longer in production, many enthusiasts still repair, modify, or salvage these sets. However, disassembling a CRT TV requires caution—high-voltage components and delicate electronics mean one wrong move could be dangerous.

This guide will walk you through the full disassembly process of the KV-27S42, covering:
✔ Safety precautions (CRT discharge, avoiding shocks)
✔ Tool requirements (what you’ll need)
✔ Step-by-step teardown (removing the case, tube, and boards)
✔ Salvaging useful parts (what to keep or discard)
✔ Reassembly tips (if needed)

Whether you’re repairing, modding, or recycling, this guide ensures you do it safely and efficiently.

Why Disassemble a KV-27S42?

Before diving in, it’s worth understanding why you might need to take apart this TV:

🔹 Repairs – Fixing power supply issues, bad capacitors, or video problems.
🔹 Modifications – RGB or component video mods for retro gaming.
🔹 Salvage – Reusing the CRT, speakers, or other parts for projects.
🔹 Safe Disposal – CRTs contain hazardous materials (lead, phosphors) and must be recycled properly.

Warning:
⚠ CRTs hold high voltage even when unplugged – improper handling can result in severe electric shock.
⚠ The tube is heavy and fragile – dropping it can cause implosion or injury.

Tools & Safety Gear You’ll Need

Before starting, gather these essentials:

Essential Tools

✔ Screwdrivers (Phillips & flathead)
✔ CRT discharge tool (or insulated screwdriver + wire)
✔ Needle-nose pliers (for small connectors)
✔ Anti-static wrist strap (optional but recommended)

Safety Precautions

✔ Work in a dry, well-lit area
✔ Discharge the CRT before touching anything
✔ Wear gloves & safety glasses (glass shards are sharp)
✔ Keep pets/kids away (CRTs are dangerous when mishandled)

Step-by-Step Disassembly Guide

Step 1: Unplug & Discharge the CRT

  1. Unplug the TV and wait at least 30 minutes for capacitors to discharge.
  2. Locate the anode cap (the large rubber suction cup on the CRT).
  3. Discharge the CRT:
    • Use a CRT discharge tool (best option).
    • Alternative: Clip one end of a wire to the TV’s metal frame and carefully slide a flathead screwdriver under the anode cap until you hear/see a small spark.

Step 2: Remove the Rear Cover

  1. Flip the TV face-down on a soft surface (blanket/towel).
  2. Remove all rear screws (some may be hidden under stickers).
  3. Gently pry the back cover off—plastic tabs may hold it in place.

Step 3: Disconnect Internal Cables

  1. Take photos of all connections before unplugging anything.
  2. Unplug:
    • Deflection yoke (two large plugs near the tube neck)
    • Anode cap (already discharged, but still be careful)
    • Speaker wires & control board connectors

Step 4: Remove the CRT Tube

  1. Unscrew the 4 CRT mounting brackets (they hold the tube to the frame).
  2. Carefully lift the tube out – it’s extremely heavy (get help if needed).
  3. Set it face-down on a soft surface to avoid scratches.

Step 5: Extract Circuit Boards & Other Components

  1. Mainboard – Remove screws and gently lift it out.
  2. Power supply – Disconnect all wires before removing.
  3. Speakers & tuner – Useful for retro projects if salvaging.

Pro Tips for Safe Disassembly

🔧 Label every wire and screw (masking tape + marker) to avoid confusion later.
🔧 Use a magnetic tray to keep screws organized.
🔧 If keeping the CRT, store it upright to avoid stress on the glass.

What Can You Salvage?

If you’re parting out the TV, these components are useful:
✅ CRT tube – Great for arcade builds or replacements.
✅ Speakers – Decent quality for DIY audio projects.
✅ Power supply & mainboard – Useful for electronics tinkering.
✅ Control knobs & buttons – Handy for retro mods.

How to Dispose of a CRT Safely

CRTs contain leaded glass and toxic phosphors, so never throw them in the trash. Instead:
♻ Check local e-waste recycling centers (many accept CRTs for free).
♻ Contact electronics repair shops – Some may take old TVs.
♻ Look for CRT buyback programs (some collectors pay for working tubes).

Conclusion: How to Disassemble a Sony KV-27S42 CRT TV

How to Disassemble a Sony KV-27S42 CRT TV,  requires patience and safety awareness, but it’s a rewarding project for retro tech enthusiasts. Whether you’re fixing, modding, or salvaging, following this guide ensures a smooth process.

FAQ About How to Disassemble a Sony KV-27S42 CRT TV

1. Can I get shocked if the TV has been unplugged for days?

Yes! CRTs can hold charge for weeks. Always discharge before working.

2. How heavy is the KV-27S42 CRT?

Around 50-60 lbs (23-27 kg)—lift carefully or get help.

3. Can I reuse the CRT in another TV?

Possibly, but tube swaps require matching specs (size, impedance, etc.).

4. What if I break the CRT?

The glass is under vacuum—if it cracks, it can implode. Wear safety gear!

5. Is it worth repairing a KV-27S42?

If you love CRTs, yes! These Sonys have great picture quality for retro gaming.


Continue Reading

Technology

How Much Does Window Tinting Cost? Save Money, Boost Comfort

Published

on

How Much Does Window Tinting Cost?

Introduction

Window tinting costs can vary widely, leaving many car owners unsure about fair pricing. Whether you want UV protection, privacy, or heat reduction, understanding the factors that influence cost helps you budget wisely. This guide breaks down pricing, so you get the best value without surprises.

Why It Matters

Window tinting isn’t just about style—it blocks harmful UV rays, reduces glare, and keeps your car cooler. But overpaying or choosing cheap options can lead to poor quality. Knowing the average costs ensures you invest in a tint that lasts and performs well.

Step-by-Step Guide to Window Tinting Costs

1. Understand the Pricing Factors

  • Film Quality: Basic dyed film starts at 50–150, while premium ceramic tints run 200–800.
  • Vehicle Size: Smaller cars cost less (100–300) vs. SUVs (200–600).
  • Number of Windows: Full-car tinting costs more than just side windows.

2. Compare Film Types

  • Dyed Film (50–150): Affordable but fades faster.
  • Carbon Film (150–350): Better heat rejection, matte finish.
  • Ceramic Film (200–800): Top-tier heat/UV protection, no signal interference.

3. Factor in Labor Costs

Professional installation adds 50–200, depending on complexity. DIY kits (20–100) are cheaper but risk bubbles/peeling.

4. Check Local Market Prices

Urban areas often charge more. Get 3+ quotes to avoid overpaying.

5. Consider Legal Limits

Some states restrict tint darkness (e.g., California bans <70% VLT on front windows). Non-compliant tints may require costly removal.

Pro Tip

“Ask for a warranty! Reputable shops offer 5–10-year guarantees against peeling or fading—saving you long-term costs.”

Conclusion: How Much Does Window Tinting Cost

Window tinting cost 50–800+, depending on film type, vehicle size, and labor. Investing in ceramic film or a trusted installer ensures durability and performance. Always check local laws and compare quotes to make a smart choice.

FAQ: How Much Does Window Tinting Cost

1. Is tinting worth the cost?
Yes—it reduces skin-damaging UV rays by 99% and lowers AC use, saving fuel.

2. How long does tint last?
High-quality tints last 10+ years; cheap ones fade in 2–3 years.

3. Can I tint my windshield?
Most states only allow a clear or light tint strip. Check your local laws.

4. Does tint affect visibility?
Not if you choose the right VLT (%)—go for 35% or higher for safety.

Continue Reading

Trending