Connect with us

Articles

WHAT IS THE DIFFERENCE BETWEEN SEED GARLIC AND FOOD GARLIC?

Published

on

SEED GARLIC AND FOOD GARLIC

Food garlic is generally the comprised of the prettier, smaller bulbs of the season. Seed garlic is typically the largest of the harvest’s bulbs.

Garlic meant for seed is often left to grow for a couple more weeks than garlic that will be sold as food. The purpose of this extra time is to allow for as much growth of the cloves as possible, as larger seeds (cloves) can produce larger bulbs in the next harvest.

While the variety remains unchanged by this extra maturation time in terms of flavor or genetics, the resulting bulbs are often larger and may have a “less pretty” appearance. The two most common effects in addition to clove size are discoloration of the wrapper around the bulb, and the loss of some of the wrapper layers. Also, larger bulbs often don’t last as long in the cupboard and smaller bulbs do.

NOTE: Some years, the wrappers are not affected or are minimally affected.

But in some years, the wrappers may have a less-bright-white color, and some cloves may burst through the wrappers. In particular, artichoke softnecks are more susceptible. Some hardnecks may lose wrappers and become less white as well.

This later harvest is not detrimental to the garlic as seed, and in fact, the larger seed is desirable for planting!

Some growers may choose to bleach or use other detergents to wash their wrappers so the bulb wrappers appear brighter white. We do not attempt to alter color with chemicals.

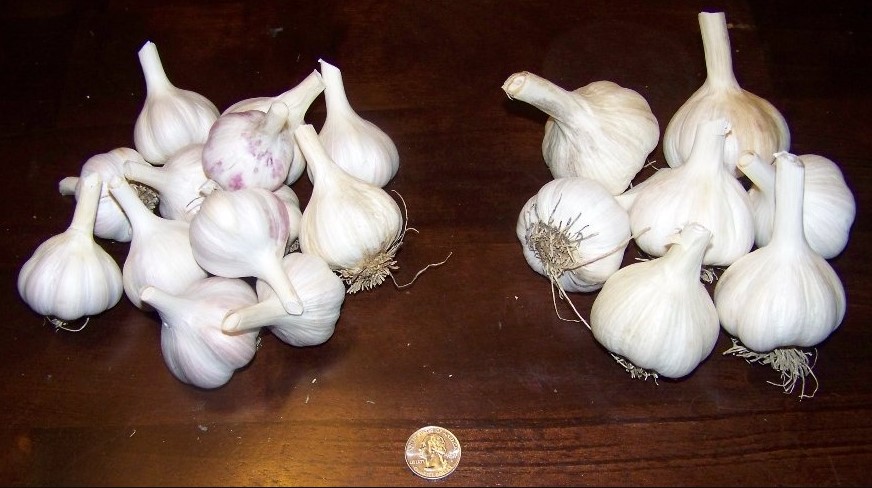
A comparison of bulb wrapper colors, using German Red as an example.
On the left is one pound of German Red, smaller-sized food-quality bulbs with white wrappers.
On the right is one pound of German Red, showing a less white wrapper color and larger size.

Examples of softnecks in a cold and wet year, which have stained wrappers and blown wrappers.
Not all years’ weather/growing conditions result in this much change, but these pictures from an extremely-wet year show it clearly.
This is not a problem for seed garlic, but definitely is an example of how seed garlic “can” be less pretty than the food bulbs.

Can Seed Garlic Be Eaten?

Yes. We obviously eat the garlic we raise. The garlic’s flavor characteristics are not changed by a longer growth period before harvest. Generally, the only difference between seed garlic and food garlic is, at times, a change in wrapper color and the loss of some wrapping. However, bulbs without wrappers probably won’t store as long in the cabinet. Therefore, the advantage of harvesting late is seed and bulb growth, but not storage length.

Continue Reading
Click to comment

Leave a Reply

Your email address will not be published. Required fields are marked *

Articles

How Long Does It Take to Get a CDL? Timeline Breakdown

Published

on

How Long Does It Take to Get a CDL?

Earning your Commercial Driver’s License (CDL) is one of the fastest ways to launch a lucrative career in trucking. But if you’re wondering, “How long does it take to get a CDL?”—the answer isn’t one-size-fits-all. Depending on your training path, state requirements, and personal schedule, it can take anywhere from 3 weeks to 3 months.

This guide breaks down each step of the process, factors that speed up (or slow down) your timeline, and expert tips to get you on the road faster.

Why CDL Training Time Matters

Unlike a regular driver’s license, a CDL requires specialized training and testing. The faster you complete the process, the sooner you can:
✔ Start earning 45,000–80,000/year (or more with experience)
✔ Qualify for company-sponsored training programs (free CDL school!)
✔ Avoid delays from DMV backlogs or retesting

Let’s dive into the exact steps—and how long each one takes.

Step-by-Step CDL Timeline (From Zero to Licensed)

1. Meet Basic Eligibility Requirements (1–7 Days)

Before you can train, you must:
✅ Be the right age

  • 18+ for intrastate (in-state) driving
  • 21+ for interstate (crossing state lines) or hauling hazardous materials
    ✅ Hold a valid driver’s license (no suspensions)
    ✅ Pass a DOT physical exam (~$100, takes 1–2 hours)
    ✅ Get a Commercial Learner’s Permit (CLP)
  • Study your state’s CDL manual (free online)
  • Pass written knowledge tests (General Knowledge + endorsements)
  • Timeframe: If you study hard, you can get your CLP in 1–3 days

🚛 Pro Tip: Some states let you take CLP tests online—saving a DMV trip!

2. Choose Your Training Path (Biggest Time Factor)

This is where timelines vary most. Here are your options:

A. Company-Sponsored CDL Training (3–4 Weeks)

Best for: Fast, free training with a guaranteed job

  • Companies like Swift, Schneider, and CR England train you in exchange for a work contract (usually 1 year)
  • Programs run full-time (M-F, 8–10 hrs/day)
  • Includes behind-the-wheel practice + testing
  • Timeframe3–4 weeks from start to CDL

B. Private CDL School (4–8 Weeks)

Best for: More flexibility, no work contract

  • Costs 3,000–7,000 (financial aid may apply)
  • Full-time programs take 4–5 weeks
  • Part-time (nights/weekends) takes 6–8 weeks
  • Bonus: Some schools help with job placement

C. Self-Paid Training + DMV Testing (Varies Widely)

Best for: Experienced drivers or those on a tight budget

  • Practice with a mentor (must have a CDL-holder supervise)
  • Schedule skills tests at the DMV (wait times vary)
  • Timeframe4–12 weeks (depends on DMV delays)

3. Master the Skills Tests (1–2 Weeks)

After training, you’ll take 3 key exams:

  1. Pre-Trip Inspection (Memorize 100+ checkpoints)
  2. Basic Vehicle Control (Backing, docking, etc.)
  3. Road Test (Driving in traffic, shifting, safety checks)

🚛 Pro Tip: Many states allow third-party testers, which can mean faster scheduling than the DMV.

4. Get Your CDL (Same Day–1 Week)

Once you pass:

  • Some states print your CDL on the spot
  • Others mail it within 3–7 business days
  • You can start working immediately (with restrictions if under 21)

How to Get Your CDL Faster

Want to speed up the process? Try these hacks:
✔ Study the manual early (before enrolling) to pass CLP tests faster
✔ Choose an accelerated program (3-week courses exist!)
✔ Practice pre-trip inspections daily (most fail this test the first time)
✔ Test at a third-party site (avoid DMV wait times)


Realistic CDL Timelines (Examples)

Training Path Total Time Cost Best For
Company-Sponsored 3–4 weeks $0 (with contract) Fastest + free
Private School (Full-Time) 4–5 weeks 3K–7K More flexibility
Self-Taught + DMV 6–12 weeks 500–2K Budget option

Final Thoughts

Most people earn their CDL in 4–8 weeks, but with the right plan, you could be driving in just 3. The key? Pick the right training path, study hard, and practice daily.

FAQ

1. Can I get a CDL in 2 weeks?

Rarely. Some military or experienced drivers test quickly, but most beginners need at least 3 weeks for proper training.

2. What’s the hardest part of the CDL test?

Most failures happen on:

  • Pre-trip inspection (forgetting items)
  • Backing maneuvers (offsets, alley docks)

3. Do I need to go to school, or can I self-study?

Some states allow self-study, but employers prefer certified training. Plus, schools help with job placement.

4. How much do CDL drivers make?

Starting pay: 45K–60K
Experienced: 70K–100K+ (with endorsements like HazMat)

5. What’s the fastest way to get a CDL?

Company-sponsored training (like Knight or Prime Inc.) gets you licensed in 3–4 weeks with no upfront cost.

Continue Reading

Articles

How Long Does It Take to Change a Tire: Quick & Easy Guide

Published

on

How Long Does It Take to Change a Tire

A flat tire can turn a good day into a stressful one—especially if you’re unprepared. One of the first questions that comes to mind is: “How long does it take to change a tire?”

The short answer: 15–30 minutes for most drivers. But several factors affect this, including your experience, tools, and the situation.

In this guide, we’ll break down:
✔ Exactly how long each step takes
✔ Pro tips to speed up the process
✔ What slows you down (and how to avoid it)
✔ When to call for help instead

Let’s get you back on the road safely and efficiently.

Why Knowing How to Change a Tire Fast Matters

Flat tires don’t happen at convenient times. Whether you’re late for work, on a road trip, or in bad weather, a quick, confident tire change can:
✅ Save you from costly tow trucks
✅ Keep you safe (no waiting in risky areas)
✅ Prevent further wheel damage

Even if you rely on roadside assistance, knowing how to DIY ensures you’re never stuck waiting for hours.

How Long Does Each Step Take? (Detailed Breakdown)

Here’s a realistic timeline for changing a tire, step by step:

1. Pull Over Safely (1–3 minutes)

  • Find a flat, stable spot (avoid hills or soft ground).
  • Turn on hazards and set the parking brake.
  • Place wheel wedges (or heavy objects) against the opposite tires.

🚗 Pro Tip: If you’re on a busy highway, try to exit first—safety over speed!

2. Gather Tools (1–2 minutes)

You’ll need:

  • Spare tire (don’t assume it’s inflated—check monthly!)
  • Jack (scissor or hydraulic)
  • Lug wrench (some cars have a locking key—don’t lose it!)
  • Gloves & flashlight (optional but helpful)

🔧 Problem Spot: Can’t find your tools? They’re often under the trunk mat or with the spare.

3. Loosen Lug Nuts (2–5 minutes)

  • Break the resistance while the car is still on the ground.
  • Turn counterclockwise (lefty loosey!).
  • If they’re stuck, use your body weight or a breaker bar.

💡 Pro Hack: Spray WD-40 if rusted, or carefully use a pipe for extra leverage.

4. Jack Up the Car (3–5 minutes)

  • Place the jack on the manufacturer’s lift point (check your manual).
  • Lift until the tire is 2–3 inches off the ground.
  • Never put any body part under the car!

⚠️ Big Mistake: Jacking on uneven ground can make the car slip—always park on a firm surface.

5. Remove Flat & Mount Spare (5–8 minutes)

  • Take off the flat tire.
  • Line up the spare and push it on.
  • Hand-tighten lug nuts in a star pattern (keeps it even).

🔄 Critical Step: Lower the car slightly before fully tightening to prevent wobbling.

6. Lower & Tighten Lug Nuts (2–4 minutes)

  • Fully lower the car.
  • Use the wrench to tighten in a star pattern (don’t skip this!).
  • Double-check tightness after driving a few miles.

🔩 Torque Tip: If you have a torque wrench, use your car’s recommended setting (usually 80–100 ft-lbs).

Total Time: ~15–30 minutes

(Faster if you’ve done it before, slower if it’s your first time.)

What Slows You Down? (And How to Avoid It)

Issue Time Wasted Quick Fix
Missing tools +10 min Keep a tire kit in your trunk
Rusted lug nuts +5–15 min Use anti-seize lubricant
Bad spare tire +∞ (useless!) Check pressure monthly
Dark/rainy conditions +10 min Keep a headlamp in your car

When Should You NOT Change a Tire Yourself?

Call for help if:
❌ You’re on a steep hill or busy highway
❌ The spare is flat/damaged
❌ Lug nuts won’t budge (stripped or over-torqued)
❌ You feel unsafe (bad weather, no proper tools)

(Roadside assistance or a tow truck is cheaper than an accident!)

FAQ: Quick Answers to Common Questions

1. Can I drive on a donut spare long-term?

No! Most “space-saver” spares are rated for 50–70 miles max at under 50 mph. Get a full-size replacement ASAP.

2. What if I don’t have a jack?

Some cars use run-flat tires (check your manual). Otherwise, call for help—improvised jacks are dangerous.

3. Do I need to retighten lug nuts later?

Yes! After driving ~50 miles, check them again—they can loosen slightly.

4. Can I use fix-a-flat instead?

Only for small punctures—it’s a temporary fix and can damage TPMS sensors.

5. How often should I check my spare?

Every oil change (or at least every 3 months). A flat spare is worse than no spare!

Continue Reading

Articles

How Long Does a Smog Check Take? Guide to Emissions Testing

Published

on

How Long Does a Smog Check Take

If you’ve ever asked, “How long does a smog check take?”, you’ll be relieved to know that most emissions tests are completed in just 15 to 30 minutes. This quick and essential inspection ensures your vehicle meets environmental standards, helps you avoid legal penalties, and contributes to cleaner air.

Why Smog Checks Are Important

Smog checks are mandatory in many states (like California, New York, and Texas) to reduce harmful vehicle emissions. Failing to get one can result in:

  • Registration suspension – You won’t be able to legally drive your car.
  • Fines & penalties – Late smog checks may lead to costly fees.
  • Failed vehicle sales – Buyers often require a recent smog certificate.

Beyond compliance, a smog check can also improve your car’s performance—if your vehicle fails, it may indicate engine or exhaust issues that need fixing.

What Affects Smog Check Duration?

While most tests take under 30 minutes, several factors can influence the time:

1. Type of Vehicle

  • Older cars (1995 and earlier) – May require a tailpipe test, adding 5-10 minutes.
  • Newer cars (OBD-II systems) – Faster since they plug into the car’s computer.
  • Diesel & hybrid vehicles – Some need specialized testing, extending wait times.

2. Testing Method

  • Basic smog check – 15-20 minutes (checks emissions and engine codes).
  • Enhanced smog test – 20-30 minutes (required in high-pollution areas, includes a dyno test).

3. Shop Workload

  • Busy hours (lunchtime, weekends) – Longer wait times.
  • Early morning or weekdays – Quicker turnaround.

4. Vehicle Condition

  • Check engine light on? – Immediate failure; you’ll need repairs first.
  • Recent battery reset? – Some shops require a few days of driving before testing.

Step-by-Step Smog Check Process

Step 1: Find a Licensed Smog Station

  • Only state-certified smog centers can perform valid tests.
  • Check your DMV’s website for approved locations.

Step 2: Prepare Your Car

✅ Warm up the engine – A cold engine can skew results.
✅ Check for warning lights – A lit “Check Engine” light means automatic failure.
✅ Ensure proper tire pressure – Some tests require a dynamometer (dyno) test.

Step 3: The Actual Smog Test

  1. Visual Inspection – The technician checks for tampered emissions parts.
  2. OBD-II Scan (1996+ vehicles) – The computer checks for error codes.
  3. Tailpipe Test (if required) – Measures exhaust emissions directly.

Step 4: Get Your Results

  • Pass? You’ll receive a certificate (digital or printed) for DMV registration.
  • Fail? You’ll get a report listing needed repairs before retesting.

Pro Tip: How to Pass a Smog Check the First Time

Drive your car for at least 20 minutes before the test—this ensures accurate readings. Also, consider using a fuel system cleaner a week before to reduce emissions.

What If My Car Fails? Next Steps

If your vehicle doesn’t pass:

  1. Get a detailed report – The shop will explain why it failed.
  2. Make necessary repairs – Common fixes include:
    • Replacing the oxygen sensor
    • Fixing exhaust leaks
    • Addressing a faulty catalytic converter
  3. Retest (often at a discount) – Many shops offer free or low-cost retests.

FAQ: Quick Smog Check Answers

How much does a smog check cost?
Typically 30–60, but prices vary by location and vehicle type.

How often do I need a smog check?
It depends on your state—some require yearly tests, others every 2 years.

Can I get a smog check without an appointment?
Yes, most shops accept walk-ins, but appointments save time.

Do electric cars need smog checks?
No—EVs produce zero emissions, so they’re exempt.

Final Thoughts

A smog check is a fast, affordable, and necessary part of vehicle ownership. Since it usually takes less than 30 minutes, there’s no reason to delay—schedule yours today and keep your car legal, efficient, and eco-friendly!

Continue Reading

Trending