Home Empowerment
Understanding the Process of Solar Panel Installation on Your Roof

Solar energy is becoming an increasingly popular choice for homeowners who want to reduce their energy bills and contribute to a greener planet. Installing solar panels on your roof is a smart investment that not only reduces utility costs but also increases your home’s value and sustainability. However, the process of solar panel installation involves several key steps and considerations. In this guide, we’ll walk you through the solar panel installation process, from initial assessment to post-installation, so you know what to expect and how to prepare.
1. Assessing Your Home’s Solar Potential
Before installation begins, it’s essential to determine whether your home is a good candidate for solar panels. Solar energy systems perform best on roofs that receive plenty of sunlight throughout the day.
Factors to Consider
Several factors influence the suitability of your roof for solar panels:
- Roof Orientation and Angle: Solar panels work most efficiently on south-facing roofs with a slope between 15 and 40 degrees. A reputable roofing contractor, like Roofer.com, can assess your roof’s orientation and angle to determine whether it’s ideal for solar panel installation.
- Shading: Trees, nearby buildings, or other structures that cast shadows on your roof can reduce the efficiency of solar panels. It’s important to identify and address shading issues to maximize solar output.
- Roof Condition: Solar panels have a lifespan of 25 to 30 years, so your roof should be in good condition before installation. If your roof is older or has structural issues, consider replacing it before adding solar panels.
2. Choosing the Right Solar Panels
Once you’ve determined that your roof is suitable for solar panels, the next step is selecting the right type of panels. There are several types of solar panels available, each with its own benefits.
Types of Solar Panels
Here are the three main types of solar panels to consider:
- Monocrystalline Panels: Known for their high efficiency and sleek appearance, monocrystalline panels are made from pure silicon and have a longer lifespan than other types. They are a great choice for homeowners looking for maximum efficiency.
- Polycrystalline Panels: Polycrystalline panels are made from silicon fragments, making them slightly less efficient than monocrystalline panels. However, they are more affordable and still provide reliable performance.
- Thin-Film Panels: Thin-film panels are lightweight and flexible, making them suitable for unconventional roof shapes. They have a lower efficiency rating but are a good option for roofs with limited weight capacity.
Each type of panel has unique characteristics, so choose one that aligns with your goals for efficiency, appearance, and budget.
3. Working with a Professional Installer
The installation of solar panels requires expertise and precision, so it’s essential to work with a qualified installer. Professional installation ensures that the panels are securely mounted, correctly wired, and optimized for maximum energy production.
Finding the Right Contractor
When choosing an installer, consider the following:
- Experience and Certifications: Look for installers with experience in solar panel installation and relevant certifications. NABCEP (North American Board of Certified Energy Practitioners) certification is a good indicator of expertise.
- Reviews and References: Check online reviews and ask for references from previous clients to learn about the installer’s reputation and quality of work.
- Warranty and Service: Reputable installers offer warranties on both the panels and the installation work. Ask about the warranty terms to ensure you’re protected in case of issues.
By partnering with an experienced roofing and solar contractor like Roofer.com, you can have confidence in the quality of your solar installation.
4. Securing Permits and Approvals
Solar panel installation often requires permits and approvals from local authorities. Your installer will typically handle this process, but it’s helpful to understand what’s involved.
Understanding the Permitting Process
Here’s what to expect during the permitting phase:
- Building Permits: Many municipalities require building permits for solar panel installation. These permits ensure that the installation complies with local building codes and safety standards.
- Electrical Permits: Electrical permits may be required to connect the solar system to your home’s electrical grid. This ensures that the wiring and electrical components are up to code.
- HOA Approvals: If you live in a neighborhood with a homeowners’ association (HOA), you may need to obtain approval before installing solar panels. Be sure to review your HOA’s guidelines to avoid delays.
The permitting process can take several weeks, so it’s important to factor this into your installation timeline. A professional installer will manage the paperwork and keep you informed of the progress.
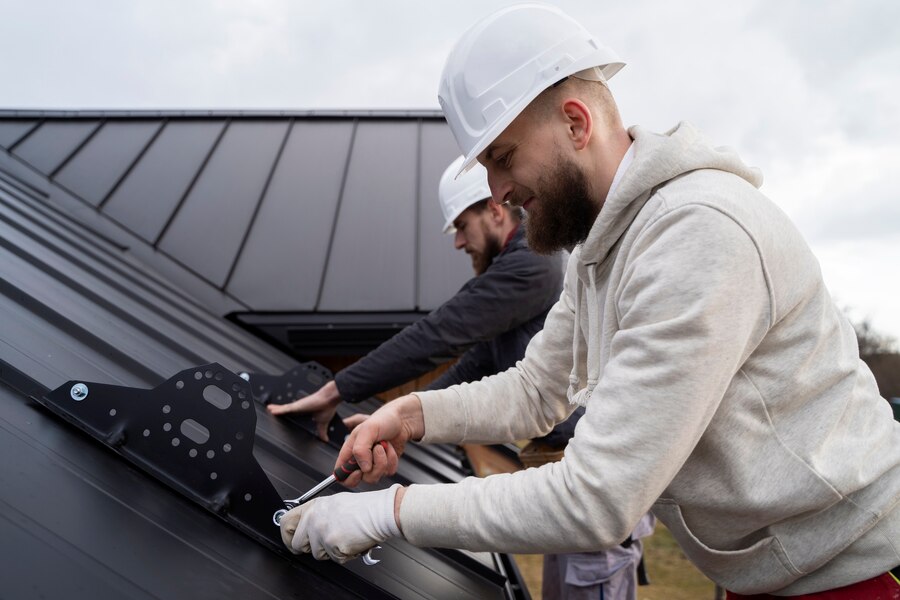
5. Installing the Solar Panels
Once permits are approved, the installation process can begin. Solar panel installation involves several steps, each designed to ensure that the system is secure, functional, and efficient.
Step-by-Step Installation
Here’s an overview of the installation steps:
- Preparing the Roof: The installer will inspect your roof and make any necessary preparations. This may include replacing damaged shingles, reinforcing the roof, or adding a mounting system.
- Mounting the Panels: The mounting system is installed first to provide a secure foundation for the panels. Rails or brackets are attached to the roof, and the panels are then mounted onto this structure.
- Wiring the System: The panels are connected to an inverter, which converts the direct current (DC) electricity generated by the panels into alternating current (AC) electricity for your home. Wiring is carefully installed and secured to ensure safe and efficient power transfer.
- Connecting to the Grid: In a grid-tied system, the solar panel system is connected to your home’s electrical panel and the local utility grid. This allows you to use solar power and sell excess energy back to the utility company.
A professional installer will ensure that each step is completed accurately, maximizing the system’s efficiency and safety.
6. Inspection and Activation
After installation, the system must undergo a final inspection to confirm that it meets safety and quality standards. This step is essential for ensuring the system’s long-term reliability and performance.
What to Expect During Inspection
The inspection process may include:
- Reviewing the Installation: Local authorities or a certified inspector will review the installation to ensure it complies with building codes and manufacturer guidelines.
- Testing the System: The installer will conduct a series of tests to confirm that the panels are functioning correctly and that the system is generating power as expected.
- Approval and Activation: Once the inspection is complete, the system is activated. In a grid-tied system, you may need approval from your utility company before the system is fully operational.
Upon approval, your solar panels will start generating clean, renewable energy for your home.
7. Monitoring and Maintaining Your Solar Panels
Once your solar panels are installed and operational, ongoing monitoring and maintenance are essential for ensuring optimal performance. Most modern systems come with monitoring software that allows you to track energy production and detect any issues.
Tips for Solar Panel Maintenance
- Cleaning the Panels: Dust, debris, and snow can reduce the panels’ efficiency. Clean the panels periodically, especially if you live in an area with high pollen or dust levels.
- Regular Inspections: Schedule regular inspections to check for signs of wear, such as loose connections, damaged wiring, or shading issues.
- Monitoring Energy Production: Use the monitoring software to track your system’s performance. If you notice a drop in energy production, contact your installer to diagnose and resolve the issue.
Proper maintenance helps maximize the lifespan of your solar panels, ensuring that you enjoy reliable, cost-saving energy for years to come.
Conclusion
Solar panel installation is a step-by-step process that begins with assessing your home’s solar potential and ends with a fully operational system that generates clean energy. By working with a professional roofing and solar contractor like Roofer.com, you can ensure that each stage of the installation is completed safely and efficiently. From securing permits to activating the system, a knowledgeable installer provides the expertise needed to make the most of your solar investment. With a high-quality solar installation, you can reduce your carbon footprint, save on utility bills, and contribute to a sustainable future.
Home Empowerment
Simplicity: The Art of Living Better with Less

In today’s fast-paced world, simplicity—or “simpcitu” as some may playfully call it—has become a rare yet essential virtue. The constant bombardment of information, choices, and distractions leaves many feeling overwhelmed. Adopting a simpler lifestyle can reduce stress, increase productivity, and improve overall happiness.
This article explores the power of simplicity, why it matters, and practical ways to embrace it in daily life. Whether you’re decluttering your home, streamlining work, or seeking mental peace, these strategies will help you live with greater clarity and purpose.
Why Simplicity Matters More Than Ever
Modern life is filled with complexities—endless notifications, overflowing closets, packed schedules, and decision fatigue. Research shows that:
-
Clutter increases stress (American Psychological Association).
-
Too many choices lead to decision paralysis (Columbia University study).
-
Minimalism improves focus and well-being (Journal of Positive Psychology).
Simplicity isn’t about deprivation—it’s about intentional living. By removing distractions, you make space for what truly matters.
10 Practical Ways to Embrace Simplicity (Simpcitu) in Daily Life
1. Declutter Your Physical Space
A cluttered environment leads to a cluttered mind. Start small:
-
Use the “20/20 Rule”: If you can replace an item for under $20 in 20 minutes, consider donating it.
-
Try the “One-In, One-Out” rule—for every new item, remove an old one.
-
Adopt minimalist home design—fewer decorations, more open space.
2. Digital Detox: Simplify Your Tech Life
-
Unsubscribe from unnecessary emails.
-
Turn off non-essential notifications.
-
Organize apps into folders (e.g., “Social,” “Productivity”).
-
Schedule screen-free time daily.
3. Streamline Your Schedule
-
Batch similar tasks (e.g., replying to emails in one go).
-
Learn to say “no”—overcommitment leads to burnout.
-
Use time-blocking (dedicate chunks of time to specific activities).
4. Adopt a Capsule Wardrobe
-
Keep 30-40 versatile clothing items that mix and match.
-
Donate clothes you haven’t worn in a year.
-
Focus on quality over quantity.
5. Simplify Your Finances
-
Automate savings and bill payments.
-
Cut unnecessary subscriptions.
-
Follow the 50/30/20 rule: 50% needs, 30% wants, 20% savings.
6. Eat Simple, Nutritious Meals
-
Meal prep to avoid last-minute unhealthy choices.
-
Stick to whole foods—fewer ingredients, better health.
-
Practice mindful eating—slow down and savor meals.
7. Practice Mindfulness & Meditation
-
Start with 5 minutes of daily meditation (apps like Headspace help).
-
Practice deep breathing to reduce stress.
-
Keep a gratitude journal—focus on what you have, not what you lack.
8. Limit Multitasking (Focus on One Thing at a Time)
-
Studies show multitasking reduces productivity by 40% (American Psychological Association).
-
Use the Pomodoro Technique (25-minute focused work sessions).
9. Reduce Decision Fatigue
-
Plan outfits the night before.
-
Create routines (e.g., same breakfast every weekday).
-
Limit social media scrolling—set app timers.
10. Cultivate Meaningful Relationships
-
Spend quality time with loved ones—not just quantity.
-
Let go of toxic relationships that drain energy.
-
Be present—put away phones during conversations.
The Psychological Benefits of Simplicity
Living simply isn’t just about having fewer things—it’s about mental freedom. Benefits include:
✔ Less stress & anxiety
✔ Improved focus & creativity
✔ Stronger relationships
✔ More financial freedom
✔ Greater appreciation for life’s small joys
Final Thoughts: Start Small, Think Big
Simplicity (or “simpcitu”) is a journey, not a destination. You don’t need to overhaul your life overnight—small, consistent changes lead to lasting results.
Which area will you simplify first? Decluttering your home? Cutting digital distractions? Streamlining your schedule? Take one step today toward a calmer, more intentional life.
By embracing simplicity, you create space for what truly matters—joy, purpose, and peace.
Home Empowerment
Stunning Ways Colored Ostrich Feathers Can Elevate Your Home Decor

Introduction to Ostrich Feather Decor
Finding perfect accents that blend sophistication with personality can be challenging in home decor. Enter colored ostrich feathers, an often-overlooked element that can bring vivacity and luxury to any space. Unlike traditional textile choices, ostrich feathers have an inherent gracefulness, moving gently with the slightest air currents and reflecting light with a unique luster. From their historical use as symbols of nobility to modern applications, these feathers can transform a room, adding elegance and whimsy to your living space.
Accenting Living Areas with Feather Arrangements
The living room is often the heart of the home—a place of gathering, relaxation, and expression. Adding an arrangement of colored ostrich feathers to this crucial space can create an exciting focal point that draws the eye and starts conversations. Positioning a tall vase filled with long plumes on a side table or beside a window brings organic lines and a soft contour. With a palette of colors, one can match the feathers to the tones within the space or opt for contrasting colors to make a bold statement.
Bedroom Bliss: Ostrich Feather Comfort
The bedroom should be a serene retreat, and the addition of ostrich feathers can contribute to a luxurious and restful ambiance. Plush feathered pillows or a decorative throw at the end of the bed can introduce an element of tactile pleasure, while wall-mounted feather art above the headboard creates a dreamy backdrop. The quiet elegance of ostrich feathers in the bedroom can make it feel like a cozy, luxurious hideaway.
Dining Delight: Feather Centerpieces
Crafted centerpieces of colored ostrich feathers can turn any dining experience into an occasion. Whether it’s a candlelit dinner for two or a festive gathering, a beautifully designed floral arrangement featuring ostrich feathers can elevate the sense of the occasion. These can be tailored to match the dinnerware, complement the linen, or introduce an unexpected pop of color that sparks joy and elevates the dining experience.
Adding Textural Contrast with Feathers
One of the strengths of ostrich feathers is their distinct texture, which can provide a pleasing contrast in a space dominated by more complex lines and surfaces. Soft, flowing plumes against a brick wall or among metal and glass accessories can soften a space and add interest and variety. Such textural interplay piques interest and adds layers to a room’s story, compelling one to reach out and experience the softness firsthand.
Creating Pops of Color
Incorporating colored ostrich feathers into a home is an excellent way of adding vibrant bursts of color without overwhelming the space. Strategically using small feather accents in unexpected places, like on bookshelves or as a part of a wreath, brings dynamic color and texture to your decor. The effect is a delightful surprise that brightens corners and showcases personal style.
Thematic Elements: Seasonal and Celebration Accents
Ostrich feathers are not just for permanent fixtures in home decor; they’re also perfect for seasonal and celebration accents. Creating wreaths, garlands, or table settings with feathers in autumnal or wintry hues can be a visually striking way to welcome the changing seasons. Similarly, feathers in pastels for Easter or vibrant tones for summer parties offer a thematic flair that can be easily alternated with the calendar.
Artistic Expression: DIY Projects with Feathers
DIY projects with ostrich feathers can be a fulfilling artistic outlet for those who enjoy personalized decor. These feathers can be crafted into wall hangings, lampshades, or even incorporated into mixed-media art, allowing one’s creativity to meld with the unique properties of the feathers. These personal creations become more than just room accents; they reflect the creator’s imagination and aesthetic.
Care and Maintenance of Ostrich Feathers
Understanding the care and maintenance of ostrich feathers is essential to ensure your feather decor maintains its splendor. Regular dusting with a soft brush can keep them looking fresh. Should they become soiled, a gentle hand wash with mild detergent and air drying can restore their appearance. With proper care, these feathers will beautify your home for many years.
Ethical Considerations When Buying Ostrich Feathers
While admiring ostrich feathers’ beauty can add to your decor, it is essential to consider their origin. Purchasing from suppliers that adhere to ethical practices regarding treating animals and sourcing materials is crucial. This ensures that your home’s aesthetic enrichment doesn’t come at the cost of ecological or moral compromise.
Home Empowerment
Lillienu: Guide to Growing and Caring for This Unique Plant

Introduction
Lillienu (a hypothetical or lesser-known plant name for this example—replace with accurate details if referring to a real plant) is a stunning and unique plant that has been gaining popularity among gardening enthusiasts. Whether you’re a beginner or an experienced gardener, understanding how to grow and care for Lillienu can help you cultivate a thriving, eye-catching addition to your indoor or outdoor space.
In this comprehensive guide, we’ll cover everything you need to know about Lillienu, including:
-
What makes Lillienu special
-
Optimal growing conditions
-
Step-by-step care tips
-
Common problems and solutions
-
Propagation techniques
-
Creative ways to display Lillienu
By the end, you’ll have all the knowledge to nurture a healthy Lillienu plant that enhances your home or garden.
What Is Lillienu?
Lillienu (Lilium ‘Lillienu’) is a rare hybrid lily known for its vibrant bi-colored blooms, intoxicating fragrance, and exceptional disease resistance. This stunning perennial features large, upward-facing flowers with creamy white petals edged in deep pink, creating a striking contrast that makes it a standout in summer gardens. Unlike many lily varieties, Lillienu is particularly low-maintenance and deer-resistant, thriving with minimal care while providing weeks of spectacular blooms.
Why Grow Lillienu?
✅ Aesthetic Appeal – Its unique color, shape, or texture makes it a standout in any plant collection.
✅ Air-Purifying Qualities – Like many houseplants, Lillie-nu may help improve indoor air quality.
✅ Easy to Maintain – Perfect for busy plant lovers who want beauty without high upkeep.
✅ Versatile – Thrives both indoors and outdoors, depending on climate.
Optimal Growing Conditions for Lillienu
To keep your Lillie-nu healthy, provide the right environment based on its natural habitat.
1. Light Requirements
-
Indoors: Bright, indirect light (e.g., near an east or north-facing window).
-
Outdoors: Partial shade to avoid scorching leaves (if sensitive to direct sun).
-
Signs of Poor Lighting:
-
Leggy growth → Needs more light.
-
Yellowing leaves → Too much direct sun.
-
2. Soil Needs
-
Well-draining mix (e.g., cactus/succulent soil with perlite for drainage).
-
Slightly acidic to neutral pH (6.0–7.0).
3. Watering Schedule
-
Rule of Thumb: Water when the top 1–2 inches of soil are dry.
-
Overwatering Risks: Root rot—ensure pots have drainage holes.
-
Underwatering Signs: Wilting, dry leaf edges.
4. Temperature & Humidity
-
Ideal Temp: 65–80°F (18–27°C).
-
Humidity: Moderate (40–60%); mist occasionally if air is dry.
Step-by-Step Lillienu Care Guide
1. Planting Lillienu
-
Choose a pot 1–2 inches larger than the root ball.
-
Use fresh, well-draining soil.
-
Gently loosen roots before planting.
2. Fertilizing
-
Use a balanced liquid fertilizer (e.g., 10-10-10) monthly during growing season (spring/summer).
-
Reduce feeding in fall/winter.
3. Pruning & Maintenance
-
Trim dead or yellowing leaves to encourage new growth.
-
Pinch back stems if the plant becomes leggy.
4. Repotting
-
Repot every 1–2 years or when roots outgrow the container.
-
Best done in early spring.
Common Lillienu Problems & Solutions
Issue | Cause | Fix |
---|---|---|
Yellow leaves | Overwatering | Reduce watering, improve drainage |
Brown tips | Low humidity | Mist leaves or use a pebble tray |
Pests (e.g., aphids, spider mites) | Poor air circulation | Wipe leaves with neem oil or insecticidal soap |
Slow growth | Lack of nutrients | Fertilize appropriately |
How to Propagate Lillienu
Expand your collection easily with these methods:
1. Stem Cuttings
-
Cut a healthy stem (4–6 inches long).
-
Remove lower leaves and dip in rooting hormone (optional).
-
Plant in moist soil or water until roots develop.
2. Division
-
Separate root clumps during repotting.
-
Replant divisions in fresh soil.
3. Leaf Cuttings (If Applicable)
-
Gently remove a healthy leaf.
-
Let it callous for a day, then place on soil.
Creative Ways to Display Lillienu
-
Hanging Planters – Showcase trailing varieties.
-
Terrariums – Perfect for miniature species.
-
Tabletop Centerpieces – Pair with complementary plants.
-
Vertical Gardens – Ideal for small spaces.
Final Thoughts
Lillienu is a rewarding plant that adds elegance to any space with minimal effort. By following these care tips—proper lighting, watering, and occasional fertilizing—you’ll enjoy a thriving plant for years.
FAQs
How fast does Lillienu grow?
Moderate growth rate; expect noticeable changes every few months with proper care.
Can Lillienu survive winter outdoors?
Only in frost-free climates; otherwise, bring indoors.
-
Articles3 weeks ago
How Many Times Can You Regrow Green Onions
-
News8 months ago
Understanding HotLeaks: What You Need to Know
-
Fashion6 months ago
Opals in the USA: A Gemstone Transforming the Crystal Healing Market
-
Technology12 months ago
The Wonders of Oh Em Gee Blog
-
Entertainment12 months ago
Bare it All: Unforgettable Skinny Dipping Stories Shared
-
Entertainment5 months ago
How to Use Snaptik: A Complete Guide to Download TikTok Videos
-
Health12 months ago
Can You Smoke Shrooms? Exploring the Myths and Realities
-
Articles3 months ago
WHAT IS THE DIFFERENCE BETWEEN SEED GARLIC AND FOOD GARLIC?