Connect with us

How to

The Rise of Remote Work: How It Transforms Our Homes and Workspaces

Published

on

Remote Work

Remote Work: A New Norm

Remote work has swiftly transitioned from a trend to an essential aspect of modern work culture, necessitated partly by global events and technological advancements. Companies worldwide have adopted this model, resulting in a substantial rise in remote working trends. Recent studies indicate that remote work has grown by 159% since 2005, highlighting a significant shift in how we perceive job environments and professional obligations. This transition is reshaping our professional lives and our living spaces as homes become multi-functional environments.

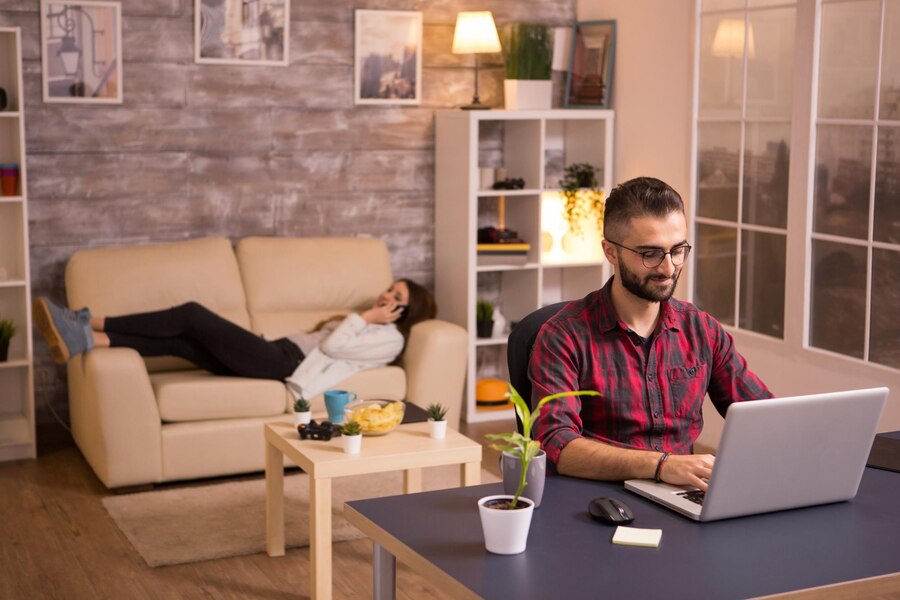
As more people embrace remote work, the importance of a suitable home office has become evident. Finding or designing a home that meets the specific needs of remote workers requires expertise.

Designing Your Home for Remote Work

Creating an effective home office involves more than just placing a desk in a corner; it requires thoughtful design considerations to foster productivity and comfort. That’s where a skilled real estate advisor, such as Bend OR real estate advisor Christy Evans, can provide invaluable insights into creating or selecting homes that facilitate effective remote work setups. Essential factors to consider include:

  • Designated Workspace: Setting aside a dedicated work area helps separate professional duties from personal living spaces, which is crucial for both productivity and mental health. This separation helps create a physical and psychological boundary, providing a structured work environment within the home.
  • Lighting: Proper lighting is vital for maintaining energy levels and reducing eye strain. Natural light fosters a positive working environment, invigorating the space. Placing your desk near windows can enhance your mood and productivity. Additionally, incorporating artificial lighting can mitigate the impacts of inadequate natural light.
  • Noise Levels: Controlling ambient noise is essential for maintaining focus. Soundproofing solutions or noise-canceling headphones can significantly reduce distractions, especially in bustling household environments. Creating a quieter, controlled workspace enhances concentration and work efficiency.
  • Ergonomics: Investing in ergonomic furniture is crucial. Ergonomics focuses on designing workspaces that support the user’s physical health, preventing strain and potential long-term injuries. Ergonomic chairs, adjustable desks, and proper monitor placement can significantly enhance comfort and productivity.

Case Study: Implementing Successful Home Office Designs

According to a case study by the Harvard Business Review, thoughtfully designed home offices can increase productivity by up to 20%. For example, integrating office plants and adjustable lighting significantly improves worker well-being and efficiency. Consider using partitions or room dividers to demarcate work zones, especially in open-plan homes or smaller spaces. Tailoring your office design to suit personal and professional needs can significantly affect day-to-day work life.

Technology and Tools for Home Offices

Equipping your home office with the right technology is critical for a seamless remote work experience. This includes:

  • High-Speed Internet: A reliable internet connection is the foundation of any remote work setup. It’s essential for virtual meetings, accessing cloud-based services, and maintaining productivity. Ensuring high-speed internet can help avoid interruptions and inefficiencies.
  • Computers and Peripherals: Modern computers, laptops, and peripherals such as printers and dual monitors are vital for various professional tasks. Investing in quality technology ensures smoother workflows and better performance, enhancing overall productivity.
  • Productivity Tools: Utilizing collaboration tools and software designed for remote work can significantly enhance efficiency. Platforms like Slack, Trello, and Zoom facilitate communication and project management, making remote collaboration more accessible and practical.

Check out this list of essential remote work tools for more information on the tools needed to optimize your remote work environment.

Balancing Comfort and Productivity

Your home office should have a balanced blend of comfort and productivity-friendly features. Ergonomic furniture, such as adjustable chairs, sit-stand desks, and supportive seating options, plays a critical role in preventing physical discomfort during long working hours. These features not only enhance physical health but also improve work output.

Incorporating elements like natural light and indoor plants has significantly boosted mood and productivity. Studies reveal that exposure to natural light during the day can enhance sleep quality, energy levels, and overall well-being. Similarly, indoor plants improve air quality and add a refreshing touch to the workspace. Personalized decor elements, such as inspirational artwork or personal items, can make the environment more inviting and conducive to productivity.

Work-Life Balance in a Remote Setup

Maintaining a healthy work-life balance is crucial in a remote work setup, where personal and professional life boundaries can easily blur. Strategies to achieve this balance include:

  • Clear Boundaries: Establishing and adhering to specific working hours helps create a clear division between work and personal time. This practice prevents work from encroaching on individual life, ensuring a balanced lifestyle.
  • Regular Breaks: Regular breaks during work hours are essential for maintaining mental well-being and preventing burnout. These breaks provide a chance to refresh and re-energize, enhancing overall productivity.
  • Workspace Separation: Keeping your workspace separate from your living areas helps maintain a professional mindset during work hours. This physical separation creates a distinct boundary, making switching between work and relaxation modes easier.

For further insights, check out this comprehensive guide to achieving work-life balance.

Remote Work and Real Estate Trends

The surge in remote work is significantly influencing real estate trends. There is an increased demand for homes designed to accommodate remote work lifestyles. Prospective buyers are prioritizing properties with features that facilitate effective work-from-home setups, such as dedicated office spaces, ample natural light, and quiet surroundings. This shift reflects a growing preference for adaptable living environments that can seamlessly transition between personal and professional use.

Market experts predict that the preference for homes with versatile spaces will continue to rise. Properties that offer flexible rooms that serve multiple functions, such as home offices that can double as guest rooms, are particularly sought after. This trend highlights the evolving needs of homebuyers in response to the changing work landscape.

DIY Office Setup on a Budget

Creating a functional home office doesn’t necessarily require a significant financial investment. There are numerous budget-friendly ways to set up an efficient workspace:

  • Repurpose Furniture: Utilize existing furniture items in new, creative ways. For example, a sturdy table can serve as a practical desk, and a bookshelf can function as storage for office supplies. Repurposing furniture minimizes costs while providing practical solutions.
  • DIY Projects: Simple do-it-yourself projects can enhance your workspace. Installing wall shelves for organizations or creating custom desk accessories can improve functionality without a substantial financial investment. These projects allow you to personalize your workspace while keeping expenses low.
  • Budget-Friendly Options: Look for deals on office furniture and consider purchasing second-hand items. Many affordable options can meet your needs as effectively as more costly alternatives. You can assemble a comfortable and efficient home office on a budget with some creativity.

Future of Remote Work and Home Office Design

The future of remote work points towards even greater prevalence and sophistication in home office designs. Predictions suggest that innovative features will gain traction, catering to the evolving needs of remote workers. Key trends include modular furniture, soundproofing solutions, and smart home integrations that enhance functionality and convenience.

Adaptability in home design will be increasingly crucial. Homes will need to accommodate various functions seamlessly, reflecting our multifaceted lifestyles. Spaces that can transform to serve multiple purposes—from work to relaxation to fitness—will become highly desirable. As remote work continues to evolve, so will the demand for homes that can adapt to these changing dynamics, ensuring comfortable and efficient work environments for the future.

Continue Reading
Click to comment

Leave a Reply

Your email address will not be published. Required fields are marked *

How to

How To Check Engine Cold Weather

Published

on

Check Engine Cold Weather

Introduction

Winter can be a magical season with its snow-covered landscapes and festive holidays, but it can also be a challenging time for your vehicle. One of the most frustrating issues you might face is the check engine light turning on, seemingly out of nowhere. Understanding why this happens and how to address it can save you a lot of stress and potential repair costs. Let’s dive into why your check engine light might come on during cold weather and what you can do about it.

Why the Check Engine Light Comes On

The check engine light is your car’s way of telling you that something isn’t quite right under the hood. This warning light can be triggered by a variety of issues, ranging from minor problems like a loose gas cap to more serious issues like engine misfires. Cold weather, in particular, can exacerbate certain problems due to its impact on various car components.

Common Cold Weather Issues

Cold weather affects your car in several ways. It can make your battery less efficient, cause your oil to thicken, and even lead to fuel system complications. Let’s explore some of these common cold weather issues in more detail.

Battery Problems in Cold Weather

Cold temperatures can significantly reduce your battery’s capacity. A battery that functions perfectly in warm weather might struggle to start your car when it’s cold outside. Signs of a failing battery include dim headlights, slow engine cranking, and the check engine light turning on. To maintain your battery’s health, ensure that it’s fully charged, clean the terminals regularly, and consider using a battery heater in extremely cold conditions.

Oil Viscosity and Cold Weather

Oil viscosity, or thickness, plays a crucial role in how well your engine runs, especially in cold weather. When temperatures drop, oil can become thicker and less capable of lubricating the engine efficiently. This can cause increased friction and wear, potentially triggering the check engine light. To avoid this, use oil with a lower viscosity rating during winter months, as recommended by your vehicle’s manufacturer.

Fuel System Complications

Cold weather can also affect your car’s fuel system. Fuel lines can freeze, fuel pumps can struggle, and condensation can form in the tank, leading to various issues. Symptoms of fuel system problems include difficulty starting the car, sputtering, and poor acceleration. To prevent these issues, keep your gas tank at least half full to avoid condensation and use a fuel stabilizer if your car sits idle for long periods.

Exhaust System Concerns

Your car’s exhaust system is another area that can be affected by cold weather. Moisture can accumulate in the exhaust system, leading to rust and corrosion over time. Additionally, cold weather can cause the catalytic converter to work less efficiently, triggering the check engine light. Regularly inspect your exhaust system for signs of damage and consider using an exhaust system cleaner to keep it in good condition.

How to Address the Check Engine Light

When your check engine light comes on, it’s essential to address it promptly. Here are some steps you can take:

  1. Immediate Steps to Take:
    • Check if the gas cap is loose or damaged.
    • Look for any obvious signs of trouble under the hood.
  2. Diagnosing the Problem:
    • Use an OBD-II scanner to read the trouble codes.
    • Research the codes or consult your vehicle’s manual for guidance.
  3. When to Seek Professional Help:
    • If the problem seems serious or you’re unsure about the cause, take your car to a mechanic for a thorough inspection.

Preventative Maintenance Tips

Preventative maintenance is key to avoiding check engine light issues, especially in cold weather. Here are some tips:

  • Regular Check-Ups: Schedule regular maintenance checks to catch potential problems early.
  • Winterizing Your Vehicle: Prepare your car for winter by checking antifreeze levels, switching to winter tires, and inspecting the battery.
  • Using Quality Fuel and Oils: Always use high-quality fuel and the right type of oil for the season.

Driving Habits in Cold Weather

Adopting good driving habits can also help keep your check engine light off:

  • Warm-Up Practices: Allow your engine to warm up for a few minutes before driving, especially on very cold days.
  • Gentle Driving Techniques: Drive gently until the engine reaches its optimal temperature.
  • Avoiding Short Trips: Short trips can prevent the engine from warming up fully, leading to increased wear and tear.

Common Myths About Cold Weather and Cars

There are several myths about cold weather and cars that can lead to confusion. Let’s debunk a few:

  • Myth: It’s necessary to idle your car for long periods in the cold.
    • Reality: Idling for a few minutes is enough; prolonged idling wastes fuel and can harm the engine.
  • Myth: You should rev the engine to warm it up faster.
    • Reality: Revving a cold engine can cause damage; gentle driving is better.
  • Myth: Premium fuel is always better in cold weather.
    • Reality: Use the fuel grade recommended by your manufacturer; premium fuel isn’t necessary unless specified.

Personal Stories

Real-life experiences can provide valuable insights. Here are a couple of stories:

  • Sarah’s Winter Woes: Sarah’s check engine light came on every winter due to a failing battery. After replacing the battery and using a battery warmer, she no longer had issues.
  • Mike’s Fuel System Freeze: Mike faced fuel system issues every cold season until he started adding a fuel stabilizer and keeping his tank at least half full. Now, his car runs smoothly all winter long.

Expert Insights

Hearing from experts can offer valuable advice:

  • Mechanic’s Advice: “Regular maintenance and using the right oil for the season can prevent many cold weather issues. Don’t ignore the check engine light; it’s there for a reason.” – John, Auto Mechanic
  • Automotive Expert Opinion: “Cold weather challenges your car’s systems. Be proactive with maintenance and mindful of driving habits to keep your vehicle in top shape.” – Emily, Automotive Journalist

Conclusion

Winter brings unique challenges for your vehicle, but understanding why the check engine light comes on and how to address it can keep you on the road with confidence. By taking preventative measures, adopting good driving habits, and staying informed, you can minimize the impact of cold weather on your car. Remember, a proactive approach is always better than reacting to problems as they arise.

FAQs

1. Why does my check engine light come on only in cold weather? Cold weather can affect various car components, such as the battery and fuel system, causing the check engine light to turn on.

2. Can cold weather cause permanent damage to my engine? Yes, if issues like thickened oil or fuel system problems are ignored, they can cause long-term damage to the engine.

3. How often should I check my oil in winter? Check your oil at least once a month during winter to ensure it’s at the proper level and viscosity.

4. What should I do if my car won’t start in the cold? Check the battery, fuel level, and oil. If these are all fine, you may need professional assistance to diagnose the issue.

5. Is it safe to drive with the check engine light on in cold weather? It’s best to address the check engine light promptly. While some issues may be minor, others can lead to significant engine damage if ignored.

Continue Reading

How to

How To Fix a Iron Burn On Carpet: Comprehensive Guide

Published

on

Iron Burn On Carpet

Introduction to the problem of iron burns on carpet

Accidents happen, and sometimes they leave a mark—literally. If you’ve ever accidentally left your iron resting on the carpet for too long, you know how frustrating it can be to discover an unsightly burn. Those scorch marks not only ruin the aesthetics of your space but also serve as a constant reminder of that one careless moment. But don’t worry! There’s hope for your beloved carpet yet. With some patience and the right approach, you can mend those ugly burns and restore your carpet to its former glory. Let’s dive into what causes these pesky burns and how you can fix them with ease!

What causes iron burns on carpet?

Iron burns on carpet typically occur when a hot iron touches the fabric for too long. It can happen during ironing clothes when the iron accidentally slips or is left unattended.

Another common scenario is when someone sets down a hot iron without realizing it’s in contact with the carpet fibers. This moment of carelessness can lead to unsightly scorch marks.

Certain carpets are more susceptible than others, particularly those made from synthetic materials like polyester and nylon. These fabrics tend to melt rather than simply burn, creating an even more noticeable damage.

Additionally, using an inappropriate heat setting on your iron may contribute to this problem. Always ensure that the temperature aligns with the type of fabric being worked on nearby.

Steps to fix an iron burn on carpet

Fixing an iron burn on carpet can be straightforward with the right approach. Start by preparing your materials. You’ll need scissors, a patch of matching carpet, adhesive, and perhaps some tweezers.

Next, carefully remove the burnt fibers using scissors. Be gentle to avoid damaging surrounding areas. Aim for a clean cut that will make it easier to patch later.

Once you’ve cleared away the damaged section, it’s time to apply your patch. Cut a piece of matching carpet slightly larger than the area you’re repairing. Use adhesive on the back before placing it in position.

Blending is essential for a seamless look. Trim any excess from your patch as needed and use tweezers to adjust any stray fibers so they align with your existing carpet pattern perfectly. This attention to detail makes all the difference!

A. Preparing the necessary materials

Before tackling the iron burn on your carpet, gather all necessary materials. This will streamline the process and ensure you have everything at hand.

First, you’ll need scissors to trim away any burnt fibers. A sharp blade allows for a clean cut, which is essential for effective patching.

Next, grab a pair of tweezers. These will help in carefully removing any remaining damaged strands without disturbing the surrounding carpet.

You’ll also want to have some adhesive on standby—carpet glue or fabric adhesive works best. This will secure your patch in place once it’s applied.

Don’t forget about spare carpet pieces! If you don’t have leftover scraps from installation, check with friends or local stores for remnants that match your flooring.

With these materials ready, you’re set to begin repairing that unsightly mark left by an iron accident.

B. Removing burnt fibers

Start by carefully inspecting the burnt area. Use your fingers or a small comb to gently separate the damaged fibers. This helps you assess how deep the burn has penetrated.

Next, grab sharp scissors. Trim away any visibly charred fibers, cutting just above the carpet’s base. Be cautious not to snip healthy strands; precision is key here.

If there are remaining singed edges that won’t come loose easily, consider using tweezers for better control. Gently pull out these stubborn bits without disturbing nearby fibers.

Once you’ve cleared away all burnt material, check for an even surface before proceeding to patch up the space. An organized approach will make blending in new materials much simpler later on.

C. Patching the affected area

To patch the affected area, start by carefully cutting a piece of carpet that closely matches your existing flooring. This could be an extra remnant you have saved or a section from a less visible part of the room.

Next, apply carpet adhesive to both the back of the cut piece and the surrounding area. Position it over the burn spot with precision. Press down firmly but gently to ensure it adheres well.

Once in place, use a heavy object to weigh it down for about 24 hours. This helps create a secure bond between your patch and original carpet fibers.

Afterward, trim any excess material around the edges for a seamless look. You want it to blend in perfectly with its surroundings without drawing attention to itself.

D. Blending in the patch with the rest of the carpet

Once the patch is securely in place, it’s time to make it look like part of the original carpet. Start by gently brushing the newly patched area with a soft-bristle brush. This helps lift the fibers and blend them seamlessly.

Choose a carpet dye that matches your existing colors closely. Apply this sparingly using a cotton swab or small brush, focusing on areas where the new fibers stand out.

Next, consider steam cleaning just around the patched section. The heat can help set everything nicely while giving that uniform appearance you’re aiming for.

If possible, vacuum gently over both old and new sections together after some time has passed. This will encourage further blending as loose fibers intermix naturally underfoot without drawing attention to any repairs made.

Tips for preventing iron burns on carpet

To avoid iron burns on your carpet, always stay vigilant while ironing. Designate a stable, non-fabric surface for your ironing needs. This will minimize the chances of an accidental slip.

Using a protective mat can also be beneficial. These mats are heat-resistant and provide an extra layer between the hot iron and your carpet.

If you need to adjust settings on your iron, do it away from fabric surfaces. Keeping the iron’s soleplate clean helps too; residue can lead to unexpected issues.

Consider using a steam generator or vertical steamer for delicate fabrics when possible. They reduce direct contact with heated surfaces.

Make sure children and pets are kept at a safe distance during ironing sessions to prevent any accidents that could lead to burns on carpets or other flooring materials.

Alternative solutions for severe burns

For severe iron burns, sometimes DIY methods just won’t cut it. If the damage is extensive, consider enlisting professional help. Carpet repair specialists have the tools and expertise to restore your carpet effectively.

Another option is to replace the burned section entirely. This involves cutting out the damaged area and replacing it with a patch from an inconspicuous spot in your home or using leftover carpet.

If matching colors seems daunting, look for a close match at local stores or online retailers that specialize in flooring materials. You might even find remnants on sale.

In cases where restoration isn’t practical, think about strategically placing furniture or rugs over the burned areas. It’s not ideal but can be an immediate fix while you figure out long-term solutions.

Conclusion: Iron Burn On Carpet

Iron burns on carpet can be frustrating, but they’re not the end of the world. With a little patience and the right approach, you can restore your carpet to its former glory.

Taking proactive steps is key to preventing future mishaps. Always use an ironing board and keep an eye on your iron’s temperature settings.

If a burn does occur, remember that various solutions exist depending on severity. From minor touch-ups to more extensive repairs, there’s usually a way forward.

Don’t hesitate to seek professional help if needed. Sometimes, expert intervention can save both time and effort.

Your carpets deserve care and attention. Embrace these tips for maintenance as part of your routine home care practices. Your living space will thank you with comfort and style for years to come!

FAQs

  1. What exactly causes iron burns on carpet?
  2. Iron burns occur when a hot iron accidentally touches the carpet. The extreme heat damages the carpet fibers, resulting in unsightly scorch marks that can be hard to ignore.
  3. Can I fix an iron burn myself?
  4. Yes, many minor burns can be fixed at home using simple tools and materials. Just follow the steps outlined above for effective results.
  5. How do I know if my carpet is too damaged to repair?
  6. If you have extensive burning or melting of fibers, it may not be possible to fully restore the area. Consulting with a professional might be necessary for severe damage.
  7. Will any type of patch work for my carpet?
  8. Ideally, use a piece of leftover carpet from your home or purchase matching material. Make sure it’s similar in color and texture for seamless blending.
  9. Is there anything else I should avoid while repairing my carpet?
  10. Be careful not to use excessive force when pulling out burnt fibers or applying adhesive. Gentle handling will prevent further damage and ensure better results.
  11. Can professional help guarantee a perfect fix?
  12. While professionals have more experience, results can vary based on the extent of damage and your specific type of carpeting. It’s always good to discuss expectations beforehand.

With these tips and tricks in hand, you’re well-equipped to tackle those pesky iron burns on your beloved carpets!

Continue Reading

How to

Budget-Friendly Buds for Sale: How to Find Quality Cannabis at Affordable Prices

Published

on

Buds for Sale

Finding high-quality cannabis without breaking the bank doesn’t have to be a challenge. Whether you’re new to cannabis or a seasoned user, everyone loves a good deal.

This blog post will guide you through essential tips on spotting the best buds for sale at affordable prices. We’ll help you make smart choices so you can enjoy top-grade marijuana without overspending. Read on to discover how to get the most bang for your buck!

Compare Prices and Strains

Always compare prices across different dispensaries. Check both online and local stores for deals and discounts. This helps ensure you get high-quality cannabis buds at the best price.

Pay attention to the different strains available. Some strains may cost more due to their potency or popularity. Knowing the strains helps you choose the best option for your budget and experience. Also, take advantage of online tools and resources that allow you to compare prices and read online reviews from other customers.

Buy in Bulk

Buying cannabis in larger quantities can lead to significant savings. Many dispensaries offer discounts when you purchase in bulk. This is a great option if you use cannabis regularly.

When buying in bulk, make sure to store your products properly. Good storage keeps your cannabis fresh and potent. Use airtight containers and keep them in a cool, dark place.

Look for Daily Deals and Promotions

Dispensaries often run daily deals and promotions, which can offer substantial discounts on various products. Check their websites or visit the stores to stay informed about these offers. Signing up for newsletters or loyalty programs can also help you get alerts about special deals.

These promotions might include discounts on specific strains, buy-one-get-one-free deals, or holiday sales. Staying updated with these promotions can save you a lot of money. Always compare these deals to ensure you are getting the best price for quality cannabis.

Join the Rewards Program

Loyalty programs are a fantastic way to save money on cannabis. Many dispensaries offer a great rewards program where you can earn points with each purchase. These points can then be redeemed for discounts or free products, helping you save even more.

Joining a rewards program is usually free and easy. Simply sign up at your favorite dispensary and start earning points right away. Plus, many programs also include special perks, like birthday discounts or exclusive sales events.

Consider Alternative Products

Exploring alternative cannabis products can also lead to cost savings. For example, concentrates, and edibles often provide a more potent experience, meaning you need less product to achieve the desired effect. This can help stretch your budget while still enjoying high-quality cannabis.

Additionally, options like oils, capsules, and tinctures offer versatility and longer shelf life. These products may sometimes be more affordable than traditional buds. By experimenting with different forms of cannabis, you can find a cost-effective solution that works for you.

Final Tips for Finding the Best Buds for Sale

In conclusion, finding the best buds for sale doesn’t have to be expensive if you follow these tips. By comparing prices, buying in bulk, and keeping an eye on daily deals, you can save money while still enjoying top-quality cannabis.

Join rewards programs and consider alternative products to stretch your budget even further. Happy shopping and may you always find the best buds for sale at the best prices!

For more helpful blog posts and advice on a range of topics, head to the blog now.

Continue Reading

Trending