Connect with us

Technology

M10 Wolverine Tank Destroyer: A Versatile Weapon in World War II

Published

on

M10 Wolverine Tank Destroyer

Introduction

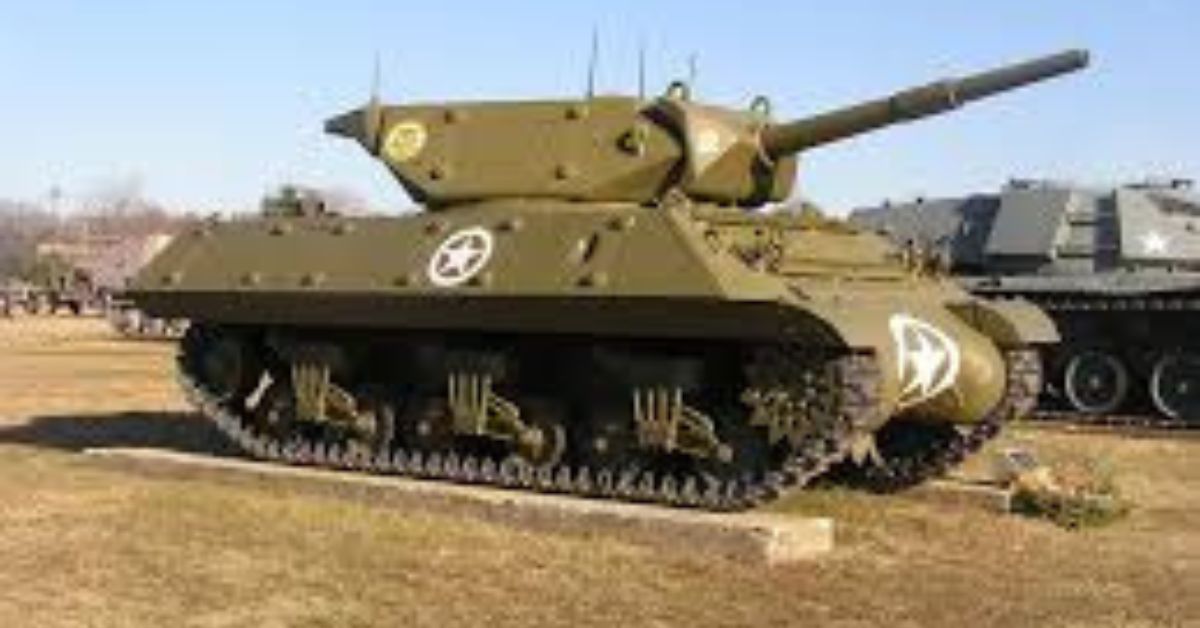
The M10 Wolverine was a tank destroyer used by the United States during World War II. It was based on the chassis of the M4 Sherman medium tank, but featured a larger, open-topped turret mounting a 3-inch (76 mm) M7 gun capable of defeating the armor of most German tanks of the time.

Design and Development

The M10 was designed to be a fast, lightly armored vehicle that could hunt down enemy tanks. Its open-topped turret allowed for a larger gun than could be mounted in the turret of the M4 Sherman, but also left the crew more vulnerable to enemy fire. The M10’s thin armor was compensated for by its speed and the power of its main gun.

Production and Variants

Over 6,000 M10s were produced between 1942 and 1943. They saw action in North Africa, Italy, France, and Germany. The British used the M10 under the name “Wolverine”. They were used in the Italian Campaign and in Northwest Europe. The British M10s were equipped with a 17-pounder anti-tank gun in place of the standard 3-inch gun.

Battle of Normandy

The M10 played a key role in the Battle of Normandy, where its 76mm gun was crucial in defeating German Panther and Tiger tanks. The M10’s mobility allowed it to maneuver on the battlefield and engage enemy tanks from advantageous positions.

Successor and Legacy

The M10 was succeeded by the M36 Jackson tank destroyer, which mounted a 90mm gun. However, the M10 remained in service until the end of the war. Its combination of mobility, firepower, and relatively low cost made it an important part of the American tank destroyer force.

Crew and Armament

The M10 had a crew of five: a commander, gunner, loader, driver, and assistant driver. The main armament was the 3-inch (76 mm) M7 gun, which was capable of penetrating the armor of most German tanks at normal combat ranges. The secondary armament consisted of a .50 caliber (12.7 mm) M2 Browning machine gun mounted coaxially with the main gun.

Armor and Mobility

The M10’s armor ranged from 0.5 to 1 inch (12.7 to 25.4 mm) thick, which was relatively thin compared to contemporary tanks. However, its speed and mobility compensated for this. The M10 was powered by a Continental R-975 C1 9-cylinder radial engine, which provided 400 horsepower. This allowed the M10 to reach a top speed of 35 mph (56 km/h).

Deployment and Combat Record

The M10 saw action in several major campaigns and battles of World War II, including the North African Campaign, the Italian Campaign, the Battle of Normandy, and the Battle of the Bulge. It played a crucial role in defeating German tanks and supporting infantry operations.

Variants and Upgrades

Several variants of the M10 were produced, including the M10A1, which had a different engine and transmission, and the M10A1C, which was equipped with a 76mm M1A1 gun. The M10 was also upgraded with additional armor protection for the crew compartment and the engine deck.

Conclusion

The M10 Wolverine was a significant tank destroyer used by the United States and its allies in World War II. Its combination of firepower, mobility, and relatively low cost made it an important part of the American tank destroyer force. The M10 played a key role in several major campaigns and battles of the war, and its legacy continues to be felt today.

FAQs

  1. What was the main difference between the M10 and the M4 Sherman?
  1. The main difference was the M10’s larger, open-topped turret that mounted a 76mm gun, compared to the M4 Sherman’s 75mm gun.
  1. How effective was the M10’s 76mm gun against German tanks?
  1. The 76mm gun was capable of penetrating the armor of most German tanks at normal combat ranges, making it an effective weapon against enemy armor.
  1. What was the M10’s top speed?
  1. The M10 could reach a top speed of 35 mph (56 km/h).
  1. How many M10s were produced during World War II?
  1. Over 6,000 M10s were produced between 1942 and 1943.
  1. What was the M10’s successor?
  1. The M10 was succeeded by the M36 Jackson tank destroyer, which mounted a 90mm gun.
Continue Reading
Click to comment

Leave a Reply

Your email address will not be published. Required fields are marked *

Technology

ecvh0 dforce master how to: Unlock Its Benefits

Published

on

ecvh0 dforce master how to

Introduction

Struggling with ecvh0 dforce master setup? You’re not alone. Many users find its configuration tricky, but mastering it unlocks powerful automation and efficiency. This guide breaks down the process into simple steps, helping you harness its full potential quickly.

Why It Matters

Properly setting up ecvh0 dforce master ensures smoother workflows, reduces errors, and maximizes productivity. Whether for personal projects or enterprise use, mastering this tool can save hours of manual work.

Step-by-Step Guide

1. Install & Configure

  • Download the latest ecvh0 dforce master package from the official site.
  • Follow the installation wizard, ensuring all dependencies are met.

2. Set Up Permissions

  • Assign appropriate user roles (admin, editor, viewer).
  • Configure access controls to prevent unauthorized changes.

3. Integrate with Your System

  • Connect ecvh0 dforcemaster to your existing tools via API.
  • Test the connection to ensure seamless data flow.

4. Automate Key Tasks

  • Use built-in templates or create custom automation rules.
  • Schedule recurring tasks to minimize manual input.

5. Monitor & Optimize

  • Track performance metrics in the dashboard.
  • Adjust settings for better speed and efficiency.

Pro Tip

Use keyboard shortcuts to navigate ecvh0 dforcemaster faster. Press Ctrl + K (Windows) or Cmd + K (Mac) to open the command palette for quick actions.

Conclusion

Mastering ecvh0 dforce master simplifies complex tasks and boosts efficiency. By following these steps, you’ll optimize your workflow and get the most out of this powerful tool.

FAQ

Is ecvh0 dforcemaster free?

It offers a free tier with limited features; advanced options require a subscription.

Can I use it offline?

Some features work offline, but full functionality requires an internet connection.

How secure is ecvh0 dforcemaster?

It uses encryption and role-based access for security. For best practices, check our security guide.

Continue Reading

Technology

How to Disassemble a Sony KV-27S42 CRT TV: Complete Guide

Published

on

How to Disassemble a Sony KV-27S42 CRT TV

Introduction

The Sony KV-27S42 is a classic CRT television, and while it’s no longer in production, many enthusiasts still repair, modify, or salvage these sets. However, disassembling a CRT TV requires caution—high-voltage components and delicate electronics mean one wrong move could be dangerous.

This guide will walk you through the full disassembly process of the KV-27S42, covering:
✔ Safety precautions (CRT discharge, avoiding shocks)
✔ Tool requirements (what you’ll need)
✔ Step-by-step teardown (removing the case, tube, and boards)
✔ Salvaging useful parts (what to keep or discard)
✔ Reassembly tips (if needed)

Whether you’re repairing, modding, or recycling, this guide ensures you do it safely and efficiently.

Why Disassemble a KV-27S42?

Before diving in, it’s worth understanding why you might need to take apart this TV:

🔹 Repairs – Fixing power supply issues, bad capacitors, or video problems.
🔹 Modifications – RGB or component video mods for retro gaming.
🔹 Salvage – Reusing the CRT, speakers, or other parts for projects.
🔹 Safe Disposal – CRTs contain hazardous materials (lead, phosphors) and must be recycled properly.

Warning:
⚠ CRTs hold high voltage even when unplugged – improper handling can result in severe electric shock.
⚠ The tube is heavy and fragile – dropping it can cause implosion or injury.

Tools & Safety Gear You’ll Need

Before starting, gather these essentials:

Essential Tools

✔ Screwdrivers (Phillips & flathead)
✔ CRT discharge tool (or insulated screwdriver + wire)
✔ Needle-nose pliers (for small connectors)
✔ Anti-static wrist strap (optional but recommended)

Safety Precautions

✔ Work in a dry, well-lit area
✔ Discharge the CRT before touching anything
✔ Wear gloves & safety glasses (glass shards are sharp)
✔ Keep pets/kids away (CRTs are dangerous when mishandled)

Step-by-Step Disassembly Guide

Step 1: Unplug & Discharge the CRT

  1. Unplug the TV and wait at least 30 minutes for capacitors to discharge.
  2. Locate the anode cap (the large rubber suction cup on the CRT).
  3. Discharge the CRT:
    • Use a CRT discharge tool (best option).
    • Alternative: Clip one end of a wire to the TV’s metal frame and carefully slide a flathead screwdriver under the anode cap until you hear/see a small spark.

Step 2: Remove the Rear Cover

  1. Flip the TV face-down on a soft surface (blanket/towel).
  2. Remove all rear screws (some may be hidden under stickers).
  3. Gently pry the back cover off—plastic tabs may hold it in place.

Step 3: Disconnect Internal Cables

  1. Take photos of all connections before unplugging anything.
  2. Unplug:
    • Deflection yoke (two large plugs near the tube neck)
    • Anode cap (already discharged, but still be careful)
    • Speaker wires & control board connectors

Step 4: Remove the CRT Tube

  1. Unscrew the 4 CRT mounting brackets (they hold the tube to the frame).
  2. Carefully lift the tube out – it’s extremely heavy (get help if needed).
  3. Set it face-down on a soft surface to avoid scratches.

Step 5: Extract Circuit Boards & Other Components

  1. Mainboard – Remove screws and gently lift it out.
  2. Power supply – Disconnect all wires before removing.
  3. Speakers & tuner – Useful for retro projects if salvaging.

Pro Tips for Safe Disassembly

🔧 Label every wire and screw (masking tape + marker) to avoid confusion later.
🔧 Use a magnetic tray to keep screws organized.
🔧 If keeping the CRT, store it upright to avoid stress on the glass.

What Can You Salvage?

If you’re parting out the TV, these components are useful:
✅ CRT tube – Great for arcade builds or replacements.
✅ Speakers – Decent quality for DIY audio projects.
✅ Power supply & mainboard – Useful for electronics tinkering.
✅ Control knobs & buttons – Handy for retro mods.

How to Dispose of a CRT Safely

CRTs contain leaded glass and toxic phosphors, so never throw them in the trash. Instead:
♻ Check local e-waste recycling centers (many accept CRTs for free).
♻ Contact electronics repair shops – Some may take old TVs.
♻ Look for CRT buyback programs (some collectors pay for working tubes).

Conclusion: How to Disassemble a Sony KV-27S42 CRT TV

How to Disassemble a Sony KV-27S42 CRT TV,  requires patience and safety awareness, but it’s a rewarding project for retro tech enthusiasts. Whether you’re fixing, modding, or salvaging, following this guide ensures a smooth process.

FAQ About How to Disassemble a Sony KV-27S42 CRT TV

1. Can I get shocked if the TV has been unplugged for days?

Yes! CRTs can hold charge for weeks. Always discharge before working.

2. How heavy is the KV-27S42 CRT?

Around 50-60 lbs (23-27 kg)—lift carefully or get help.

3. Can I reuse the CRT in another TV?

Possibly, but tube swaps require matching specs (size, impedance, etc.).

4. What if I break the CRT?

The glass is under vacuum—if it cracks, it can implode. Wear safety gear!

5. Is it worth repairing a KV-27S42?

If you love CRTs, yes! These Sonys have great picture quality for retro gaming.


Continue Reading

Technology

How Much Does Window Tinting Cost? Save Money, Boost Comfort

Published

on

How Much Does Window Tinting Cost?

Introduction

Window tinting costs can vary widely, leaving many car owners unsure about fair pricing. Whether you want UV protection, privacy, or heat reduction, understanding the factors that influence cost helps you budget wisely. This guide breaks down pricing, so you get the best value without surprises.

Why It Matters

Window tinting isn’t just about style—it blocks harmful UV rays, reduces glare, and keeps your car cooler. But overpaying or choosing cheap options can lead to poor quality. Knowing the average costs ensures you invest in a tint that lasts and performs well.

Step-by-Step Guide to Window Tinting Costs

1. Understand the Pricing Factors

  • Film Quality: Basic dyed film starts at 50–150, while premium ceramic tints run 200–800.
  • Vehicle Size: Smaller cars cost less (100–300) vs. SUVs (200–600).
  • Number of Windows: Full-car tinting costs more than just side windows.

2. Compare Film Types

  • Dyed Film (50–150): Affordable but fades faster.
  • Carbon Film (150–350): Better heat rejection, matte finish.
  • Ceramic Film (200–800): Top-tier heat/UV protection, no signal interference.

3. Factor in Labor Costs

Professional installation adds 50–200, depending on complexity. DIY kits (20–100) are cheaper but risk bubbles/peeling.

4. Check Local Market Prices

Urban areas often charge more. Get 3+ quotes to avoid overpaying.

5. Consider Legal Limits

Some states restrict tint darkness (e.g., California bans <70% VLT on front windows). Non-compliant tints may require costly removal.

Pro Tip

“Ask for a warranty! Reputable shops offer 5–10-year guarantees against peeling or fading—saving you long-term costs.”

Conclusion: How Much Does Window Tinting Cost

Window tinting cost 50–800+, depending on film type, vehicle size, and labor. Investing in ceramic film or a trusted installer ensures durability and performance. Always check local laws and compare quotes to make a smart choice.

FAQ: How Much Does Window Tinting Cost

1. Is tinting worth the cost?
Yes—it reduces skin-damaging UV rays by 99% and lowers AC use, saving fuel.

2. How long does tint last?
High-quality tints last 10+ years; cheap ones fade in 2–3 years.

3. Can I tint my windshield?
Most states only allow a clear or light tint strip. Check your local laws.

4. Does tint affect visibility?
Not if you choose the right VLT (%)—go for 35% or higher for safety.

Continue Reading

Trending