Connect with us

Home Empowerment

How to Build a Sustainable Garden Using Recycled Materials

Published

on

How to Build a Sustainable Garden Using Recycled Materials

Building a sustainable garden is a rewarding and environmentally friendly way to cultivate plants, beautify your outdoor space, and contribute to a greener planet. One of the most effective ways to create a sustainable garden is by using recycled materials. Not only does this approach minimize waste, but it also saves money and reduces the environmental footprint of traditional gardening methods. In this comprehensive guide, we will walk you through the key steps and strategies on how to build a sustainable garden using recycled materials, offering practical advice and up-to-date tips to make your garden a haven for both nature and sustainability.

Why Build a Sustainable Garden?

Before diving into the specifics of how to build a sustainable garden using recycled materials, let’s first explore why sustainable gardening is so important.

  1. Environmental Impact: Sustainable gardening practices help reduce pollution, conserve water, and protect biodiversity. By using recycled materials, you reduce the need for new resources, cutting down on production energy and waste.
  2. Cost-Efficiency: Recycled materials, such as old wood, bricks, and containers, are often free or significantly cheaper than buying new garden supplies. This makes it an excellent choice for gardeners on a budget.
  3. Waste Reduction: By repurposing items you already have at home, you can keep items out of landfills, contributing to a circular economy and reducing environmental waste.
  4. Biodiversity Support: Sustainable gardens encourage local wildlife, such as birds, insects, and beneficial pollinators, to thrive. This biodiversity helps maintain a balanced ecosystem and supports long-term plant health.

Step-by-Step Guide: How to Build a Sustainable Garden Using Recycled Materials

1. Planning Your Garden Layout

The first step in building any garden is planning. Think about the size and shape of your garden space, the types of plants you want to grow, and how you can incorporate recycled materials into your design.

  • Design a Functional Layout: Whether you’re creating raised beds, a herb garden, or a flower bed, make sure your design maximizes sunlight exposure, minimizes water wastage, and uses recycled materials effectively.
  • Consider Soil Health: Healthy soil is the foundation of any thriving garden. You can improve soil quality by incorporating compost (which you can make from food scraps) or using old cardboard as mulch to prevent weeds and conserve moisture.

2. Gathering Recycled Materials

Once you’ve planned your garden layout, it’s time to gather your materials. Here are some common recycled materials you can use in your sustainable garden:

  • Old Wood: Old pallets, fencing, or wooden furniture can be repurposed into garden structures, such as raised beds, garden boxes, or trellises for climbing plants. Make sure the wood is untreated or use non-toxic paint to ensure safety.
  • Plastic Containers: Reuse plastic bottles, containers, and tubs as planters. Cut them to size, create drainage holes, and fill them with soil for an eco-friendly gardening solution.
  • Glass Jars and Bottles: Glass jars and bottles can be used to create unique garden lighting or small greenhouses for seedlings.
  • Bricks and Stones: If you have old bricks or stones lying around, these can be used to create pathways, build garden borders, or even create a fire pit.
  • Old Tires: Tires can be turned into raised beds or garden planters. Paint them in vibrant colors for a fun touch, or stack them for added height in your garden.
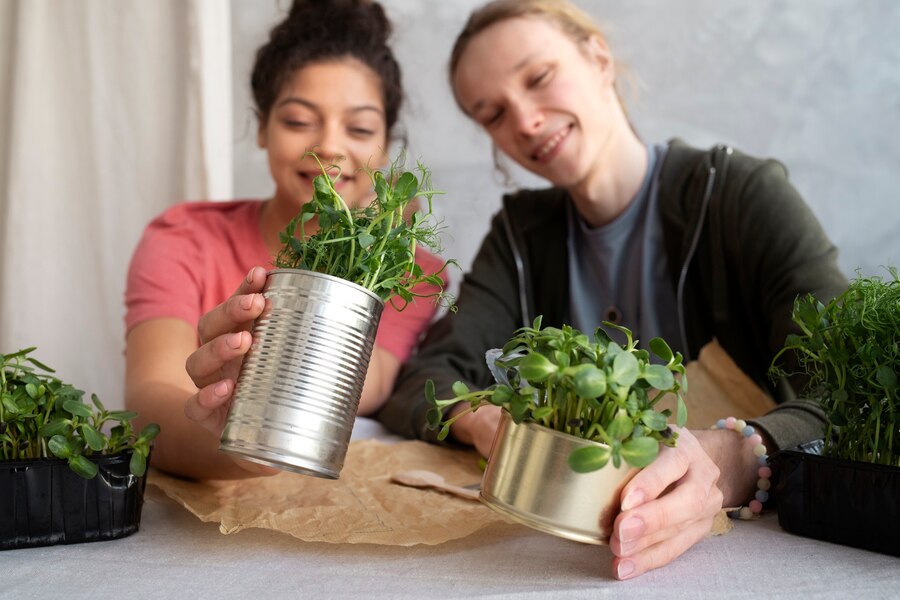
  • Cans and Tin Containers: Empty tin cans can be used as planters, wind chimes, or garden markers. These can be creatively decorated for added charm.

3. Building Raised Beds with Recycled Materials

One of the most popular ways to use recycled materials in gardening is to build raised beds. Raised beds provide better drainage, help to prevent soil compaction, and can be made from materials like old wood, bricks, and even corrugated metal.

  • Materials Needed: Old wooden pallets, scrap wood, bricks, cinder blocks, or even large plastic containers.
  • Steps:
    1. Choose a location with plenty of sunlight.
    2. Lay down a weed barrier, such as cardboard, to prevent weeds from growing through the bottom of the bed.
    3. Assemble the materials to form a border. If you’re using bricks or cinder blocks, stack them in a rectangular shape. If you’re using wood, nail or screw the planks together to form the edges.
    4. Fill the raised bed with nutrient-rich soil or compost.
    5. Plant your desired crops and enjoy your eco-friendly garden!

4. Creating Vertical Gardens Using Recycled Materials

If space is limited, vertical gardens can be a great way to maximize your growing area. You can create vertical gardens using recycled materials such as old pallets, wine crates, and plastic bottles.

  • Materials Needed: Wooden pallets, wine crates, plastic bottles, gutters, or old ladders.
  • Steps:
    1. Find a vertical surface or wall to mount your garden.
    2. For pallets, simply hang the pallet upright and fill each slat with soil for planting.
    3. For wine crates, secure them on a wall or fence and fill them with soil for planting.
    4. Plastic bottles can be cut into sections and hung vertically, each holding a small plant.

Vertical gardens not only make use of recycled materials, but they also help conserve space and water, making them a sustainable option for small gardens or urban environments.

5. Water Conservation Strategies

Water is one of the most valuable resources in any garden, so it’s important to conserve it as much as possible. By using recycled materials, you can create efficient irrigation systems and water-saving techniques.

  • Rain Barrels: Install a rain barrel to collect runoff water from your roof. This water can then be used to irrigate your garden.
  • Greywater Systems: If you’re comfortable with a DIY project, consider setting up a greywater recycling system to reuse water from your sink, shower, or washing machine for irrigation.
  • Drip Irrigation: Use recycled hoses or plastic bottles with small holes poked in them to create an inexpensive drip irrigation system.

6. Composting and Waste Reduction

Composting is a fundamental part of sustainable gardening. It allows you to recycle organic waste into valuable, nutrient-rich soil that can be used in your garden.

  • Compost Bin: You can build a compost bin using wooden pallets or old chicken wire. Make sure to include a mix of green and brown materials, such as kitchen scraps, leaves, and garden trimmings.
  • Vermiculture: For an eco-friendly option, consider vermiculture (worm composting) using old containers or crates.

By composting at home, you’ll reduce waste and enhance your garden soil with natural nutrients.

7. Recycling and Repurposing Garden Tools

If you have old, rusty garden tools or unused items lying around, consider repurposing them into something useful for your sustainable garden. Old shovels can be turned into garden hooks, and broken terracotta pots can be used as drainage pots or garden decorations.

Recycled Materials vs. New Materials in Gardening

Material Type Recycled Material New Material Benefits of Recycled Materials
Garden Beds Old wood, pallets, bricks, tires New wood, plastic, concrete blocks Eco-friendly, cost-effective, reduces waste
Planters Plastic bottles, cans, wine crates, old tires Ceramic, terracotta, plastic planters Low-cost, creative, reuses existing items
Watering Systems Rain barrels, recycled hoses Commercial irrigation systems Water conservation, reuses household waste
Compost Kitchen scraps, yard trimmings Commercial compost Reduces landfill waste, enriches soil

Tips for Maintaining a Sustainable Garden

  • Use Organic Fertilizers: Instead of synthetic fertilizers, opt for organic compost, manure, or plant-based fertilizers to nourish your garden sustainably.
  • Mulch Your Garden: Use organic mulches, such as leaves, grass clippings, or newspaper (a recycled material), to reduce water evaporation, suppress weeds, and improve soil health.
  • Harvest Rainwater: Install a rainwater collection system using barrels or recycled containers to capture and store rainwater for later use in your garden.

Conclusion

Building a sustainable garden using recycled materials is an excellent way to contribute to environmental conservation while enjoying the beauty of your garden. By repurposing items like old wood, plastic bottles, and tires, you can create a functional, eco-friendly outdoor space that thrives with minimal impact on the environment. Whether you’re creating raised beds, vertical gardens, or efficient watering systems, the possibilities are endless when you incorporate recycled materials into your gardening plans.

Continue Reading
Click to comment

Leave a Reply

Your email address will not be published. Required fields are marked *

Home Empowerment

How to Get Pee Smell Out of Couch: Solutions for a Fresh Home

Published

on

How to Get Pee Smell Out of Couch

Few household smells are as stubborn—or as embarrassing—as urine odor embedded in a couch. Whether it’s from a potty-training toddler, an elderly pet, or an unexpected accident, that lingering ammonia scent can make your living space feel unclean. The good news? With the right techniques, you can completely eliminate urine smells and restore freshness to your upholstery.

This comprehensive guide covers everything from immediate emergency response to deep-cleaning solutions for set-in odors. We’ll explore both DIY remedies and professional-grade solutions, ensuring you have options for every level of mess.

Why Proper Urine Odor Removal Matters

Ignoring urine smells doesn’t just create an unpleasant environment—it can lead to bigger problems:

  • Bacterial growth: Urine breeds bacteria, which can cause health issues.
  • Repeat accidents: Pets often remark the same spot if the scent remains.
  • Long-term damage: Urine can degrade fabric and cushioning over time.

By acting quickly and using the right cleaning methods, you’ll protect your furniture and maintain a fresh, hygienic home.

Step-by-Step Guide to Remove Pee Smell from Couch

1. Act Fast: Blot Up Excess Liquid

Why it works: The sooner you remove urine, the less it soaks into fibers.

  • Materials needed: Absorbent towels, paper towels, or a dry microfiber cloth.
  • Technique:
    • Press (don’t rub) firmly to soak up liquid.
    • Replace towels as they become saturated.
    • If the urine is already dry, skip to step 2.

2. Neutralize Odors with Vinegar Solution

Why it works: Vinegar’s acidity breaks down uric acid crystals, the main cause of lingering smells.

  • Mix: 1 part white vinegar + 1 part cold water in a spray bottle.
  • Application:
    • Lightly mist the affected area (test on a hidden spot first).
    • Let sit for 10-15 minutes.
    • Blot dry with a clean cloth.
  • Bonus: Add a few drops of essential oil (e.g., lavender) for a fresh scent.

3. Deep Clean with Baking Soda

Why it works: Baking soda absorbs odors and lifts remaining stains.

  • Method:
    • Sprinkle a generous layer over the damp area.
    • For tough smells, mix baking soda with hydrogen peroxide (3%) to form a paste.
    • Let sit for 6+ hours (overnight is best).
    • Vacuum thoroughly.

4. Use an Enzyme Cleaner for Stubborn Stains

Why it works: Enzymes break down urine’s organic compounds, eliminating odors at the source.

  • Top picks: Nature’s Miracle, Rocco & Roxie, or Simple Solution.
  • How to apply:
    • Follow product instructions (usually involves soaking the area).
    • Allow to air-dry completely—don’t rinse!

5. Machine Wash Removable Covers (If Applicable)

  • Best detergent: Use an enzyme-based or oxygen bleach formula.
  • Drying: Air-dry in sunlight (UV rays help kill bacteria).

Pro Tips for Maximum Effectiveness

✅ Avoid Heat: Never use steam or hot water—it sets urine stains and odors.
✅ Blacklight Trick: Use a UV flashlight to find old, hidden urine spots.
✅ Prevent Residue: Rinse with cold water after vinegar treatment to avoid stickiness.
✅ For Leather Couches: Use a leather-safe enzymatic cleaner to avoid damage.

When to Call a Professional

If the smell persists after multiple treatments, consider:

  • Professional upholstery cleaning (hot water extraction method).
  • Ozone treatment (for severe, deep-set odors).

Final Thoughts

How to Get Pee Smell Out of Couch requires quick action, the right cleaners, and patience. By following these steps—especially using enzyme treatments for stubborn odors—you can restore your couch to a fresh, odor-free state.

FAQ: Your Top Questions Answered

Does vinegar discolor couch fabric?

It shouldn’t, but always test on a hidden area first.

Can I use bleach on my couch?

No! Bleach can damage fabric and react with urine, making smells worse.

How do I stop my pet from peeing on the couch again?

  • Use a pet deterrent spray.
  • Place a washable waterproof cover.
  • Retrain with positive reinforcement.

Why does the smell come back after cleaning?

If urine reached the cushion foam, you may need a deep soak with enzyme cleaner or professional help.


Continue Reading

Home Empowerment

How to Get Rid of German Roaches: The Ultimate Guide

Published

on

How to Get Rid of German Roaches

German roaches (Blattella germanica) are among the most stubborn household pests. Unlike other roach species, they reproduce rapidly, hide in tight spaces, and quickly develop resistance to pesticides. If you’re dealing with an infestation, this guide will walk you through how to get rid of German roaches using proven, science-backed methods.

Why German Roaches Are So Hard to Eliminate

Before diving into solutions, it’s crucial to understand why these pests are so resilient:

✅ Rapid Reproduction – A single female can produce up to 400 offspring in her lifetime.
✅ Pesticide Resistance – They adapt quickly to chemical treatments.
✅ Nocturnal & Secretive – They hide in cracks, appliances, and electrical outlets.

Now, let’s tackle the problem systematically.

Step 1: Identify the Infestation

German roaches are small (½ inch), light brown, with two dark stripes behind their heads. Signs of infestation include:

🔍 Droppings (tiny black specks)
🔍 Egg cases (oothecae) – Small, brown, capsule-like
🔍 Musty odor – A sign of large infestations

Step 2: Sanitation – Cut Off Their Food Supply

Roaches thrive in dirty environments. To discourage them:

✔ Store food in airtight containers
✔ Clean spills immediately
✔ Take out trash daily
✔ Fix leaky pipes (roaches need water)

Step 3: Use German Roach-Specific Baits

Why baits work best:
German roaches eat dead roaches and feces, making baits highly effective. The poison spreads through the colony.

Top Bait Choices:

Product Active Ingredient Effectiveness
Advion Gel Bait Indoxacarb ★★★★★
Combat Max Roach Killing Gel Hydramethylnon ★★★★☆
Invict Gold Cockroach Gel Abamectin ★★★★★

How to Apply:

  1. Place pea-sized drops near hiding spots (under sinks, behind fridges).
  2. Avoid spraying insecticides—they’ll scatter roaches, worsening the problem.

Step 4: Apply Insect Growth Regulators (IGRs)

IGRs disrupt roach reproduction by preventing nymphs from maturing. Recommended brands:

✅ Gentrol Point Source (Hydroprene)
✅ NyGuard IGR Concentrate

Step 5: Seal Entry Points

Prevent re-infestation by:

🔧 Caulking cracks in walls
🔧 Installing door sweeps
🔧 Covering vents with fine mesh

Step 6: Monitor with Sticky Traps

Place sticky traps in hotspots to track remaining roaches. Brands like Harris Roach Traps work well.

Step 7: When to Call a Professional

If DIY methods fail after 4-6 weeks, consider hiring an exterminator. They use stronger treatments like:

💉 Fumigation
💉 Residual insecticide sprays

Prevention: Keep Roaches from Coming Back

🚫 Avoid cardboard storage (roaches love it)
🚫 Inspect groceries before storing
🚫 Regularly deep-clean kitchens & bathrooms

German Roach vs. Other Roaches (Comparison Chart)

Feature German Roach American Roach Oriental Roach
Size ½ inch 1.5–2 inches 1 inch
Color Light brown Reddish-brown Dark brown/black
Preferred Habitat Kitchens, bathrooms Sewers, basements Damp areas
Reproduction Speed Very fast Moderate Slow

Final Verdict: How to Get Rid of German Roaches for Good

  1. Use gel baits (Advion, Invict Gold).
  2. Apply IGRs to stop reproduction.
  3. Maintain strict sanitation.
  4. Seal entry points.
  5. Monitor with traps.
Continue Reading

Home Empowerment

Heliconia Color: Transform Your Garden with Tropical Beauty

Published

on

Heliconia Color

Heliconias, often called “lobster claws” or “parrot flowers,” are the crown jewels of tropical gardens. Their bold, vibrant colors and unique shapes make them a favorite among gardeners and landscapers. But what makes heliconia color so captivating? And how can you harness their beauty to transform your outdoor space?

In this comprehensive guide, we’ll dive deep into the world of heliconias. From their origins and varieties to practical growing tips and design ideas, you’ll walk away with everything you need to know to make these tropical wonders the star of your garden.

Why Heliconia Color is a Game-Changer for Your Garden

Heliconias are more than just pretty flowers—they’re a statement. Their fiery reds, sunny yellows, and deep oranges can instantly elevate any garden or landscape. Here’s why heliconia color is so special:

  • Unmatched Vibrancy: Heliconias boast some of the most intense hues in the plant kingdom.
  • Tropical Appeal: They bring an exotic, vacation-like vibe to your space.
  • Versatility: Whether in pots, borders, or as focal points, heliconias adapt to various garden styles.

The Science Behind Heliconia Color

Heliconias owe their stunning colors to a combination of pigments and environmental factors. The primary pigments responsible for their hues are:

  1. Anthocyanins: These produce red, purple, and blue shades.
  2. Carotenoids: Responsible for yellows and oranges.
  3. Chlorophyll: Adds a touch of green to the bracts and leaves.

Interestingly, heliconia color can vary depending on factors like soil pH, sunlight, and temperature. For instance, heliconias grown in slightly acidic soil often exhibit deeper reds, while those in alkaline soil may lean toward yellows.

Top Heliconia Varieties for Jaw-Dropping Color

With over 200 species, heliconias offer a rainbow of options. Here are some of the most popular varieties to consider:

Variety Color Height Best For
Heliconia Rostrata Red and Yellow 6-15 ft Backdrop or Focal Point
Heliconia Psittacorum Orange and Green 3-6 ft Borders and Containers
Heliconia Caribaea Deep Red and Gold 10-20 ft Tropical Landscapes
Heliconia Wagneriana Multicolored (Red, Yellow, Green) 4-8 ft Accent Planting

How to Grow and Care for Heliconias: A Step-by-Step Guide

1. Choosing the Right Location

Heliconias thrive in warm, humid climates (USDA zones 10-12). They need:

  • Full to Partial Sunlight: At least 6 hours of sunlight daily.
  • Well-Draining Soil: Rich in organic matter.
  • Space to Grow: Some varieties can reach up to 20 feet tall!

2. Planting Tips

  • Dig a hole twice the size of the root ball.
  • Mix compost or aged manure into the soil for added nutrients.
  • Water thoroughly after planting.

3. Watering and Feeding

  • Water: Keep the soil consistently moist but not waterlogged.
  • Fertilizer: Use a balanced, slow-release fertilizer every 6-8 weeks during the growing season.

4. Pruning and Maintenance

  • Remove dead or damaged leaves to encourage new growth.
  • Divide overcrowded clumps every 2-3 years to maintain vigor.

Designing with Heliconia Color: Tips and Ideas

Heliconias are incredibly versatile in garden design. Here are some creative ways to use them:

  • Tropical Oasis: Pair heliconias with palms, ferns, and orchids for a lush, jungle-like feel.
  • Color Blocking: Use contrasting heliconia colors to create bold, eye-catching displays.
  • Container Gardening: Grow smaller varieties like Heliconia Psittacorum in pots for patios or balconies.
  • Cut Flowers: Heliconias make stunning floral arrangements that last up to two weeks.

Common Challenges and How to Overcome Them

While heliconias are relatively low-maintenance, they can face a few challenges:

  • Pests: Watch out for aphids and spider mites. Use neem oil or insecticidal soap as a natural remedy.
  • Fungal Diseases: Ensure proper air circulation and avoid overwatering to prevent issues like leaf spot.
  • Cold Sensitivity: In cooler climates, grow heliconias in containers and bring them indoors during winter.

Heliconia Color in Action: A Case Study

Project: Tropical Resort Landscape
Location: Florida, USA
Goal: Create a vibrant, low-maintenance garden that wows guests.

Solution:

  • Planted Heliconia Rostrata as a backdrop.
  • Used Heliconia Psittacorum in containers near walkways.
  • Added complementary plants like bird-of-paradise and bromeliads.

Result: The resort’s garden became a guest favorite, with many visitors snapping photos and asking about the plants.

Infographic: Heliconia Color Spectrum

Key Points:

  • Breakdown of heliconia varieties by color.
  • Tips for enhancing color through soil and sunlight.
  • Ideal pairings for garden design.

Conclusion: Bring the Magic of Heliconia Color to Your Garden

Heliconias are more than just plants—they’re a celebration of color, life, and tropical beauty. By understanding their needs and experimenting with design, you can create a garden that’s not only visually stunning but also a joy to maintain.

Ready to transform your space? Start by choosing your favorite heliconia variety and follow the tips in this guide. And don’t forget to share your heliconia journey with us—tag us in your garden photos or drop a comment below!

Continue Reading

Trending