Connect with us

Technology

Concealed Carry Comfort: The Benefits of Belly Band Holsters

Published

on

Belly Band Holsters

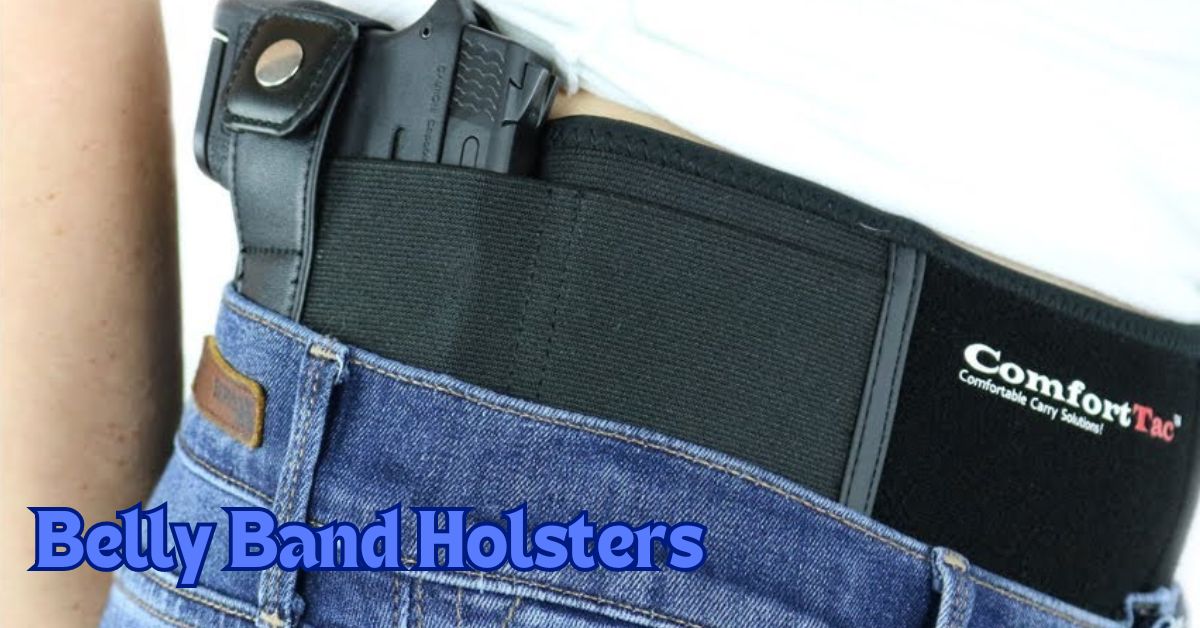
Understanding Belly Band Holsters

Belly band holsters have become increasingly popular among gun owners who prioritize comfort and versatility in their concealed carry options. Unlike traditional, belly band holsters are made from flexible, breathable materials that wrap around the waist, allowing easy and convenient concealed carry without needing a belt. This innovative design is why concealment belly bands have become a preferred choice for many seeking functionality and comfort.

One key feature of belly band holsters is their adaptability. Due to their elastic and often adjustable materials, they can accommodate various firearm sizes and types, making them suitable for small handguns and larger pistols. Their flexibility means they can be worn in various positions around the waist, providing options for the wearer to find the most comfortable and discreet way to carry their firearm.

The Advantages of Using Belly Band Holsters

One significant advantage of belly band holsters is their comfort. Because they are made from soft, flexible fabrics, these holsters conform to the body’s shape, reducing discomfort and pressure points. Moreover, belly bands are designed to distribute the weight of the firearm more evenly across the torso, preventing strain on any single part of the body.

Flexible Carry Options

Belly band holsters offer incredible flexibility when it comes to carrying your firearm. You can wear them high on your torso, around your midsection, or lower near your hips. This versatility allows wearers to find the most comfortable and discreet way to carry their weapon, regardless of their body shape or clothing. Additionally, belly band holsters can be worn under various types of clothing, from tight athletic wear to looser casual outfits, enhancing their appeal to a wide audience.

Enhanced Concealability and Easy Access

Another perk of belly band holsters is their superior concealability. Thanks to their design, they can be worn underneath various types of clothing, from athletic wear to casual outfits. This means you can carry your firearm discreetly, regardless of your clothing style. Additionally, the flexible design of the belly band holsters makes it easy to access your gun, which is essential in an emergency.

Discreet and Accessible

One of the major selling points of a belly band holster is the ability to carry your firearm discreetly. The snug fit against your body ensures the firearm doesn’t protrude or print onto your clothing, maintaining a low profile. At the same time, the stretchy material ensures you can draw your weapon swiftly when needed. Quick and reliable access to your firearm can make a significant difference in critical moments, offering peace of mind to the carrier.

Ideal for Different Body Types

Belly band holsters are excellent for individuals with different body shapes and sizes. Because they are adjustable, they can be customized to fit securely around your waist, ensuring your firearm is always in the right position. Whether you have a slender build or a more robust frame, a belly band holster can be adjusted for a secure and comfortable fit. This adaptability makes belly bands an inclusive option for many users.

Customizable Comfort

These holsters are particularly beneficial for those with unique body types. The adjustability of belly bands means they can accommodate various waist sizes without compromising comfort or security. This customization is advantageous for those who struggle to find traditional holsters that fit well. Additionally, belly band holsters are available in various sizes and materials, ensuring an option suitable for everyone.

Proper Usage and Maintenance

To ensure the longevity and safety of your belly band holster, it’s essential to use and maintain it properly. Always follow the manufacturer’s instructions for cleaning and maintenance. Regularly inspect your holster for signs of wear and tear, and replace it if necessary. Additionally, practice drawing and reholstering your firearm to become proficient in using your belly band holster. Consistent practice ensures you can access your firearm quickly and safely.

Maintenance Tips

  • Follow the care instructions provided by the manufacturer to prevent damage to the elastic materials.
  • Regularly check for wear and tear, particularly around the edges and seams.
  • Practice with an unloaded firearm to ensure you can draw smoothly and swiftly. This practice helps familiarize you with the holster and enhances your emergency response time.

Additional Resources and Recommendations

Consulting resources such as the U.S. Concealed Carry Association can provide valuable insights and recommendations if you are considering a belly band holster. They offer guides on proper use, safety tips, and product reviews to help you make an informed decision. Additionally, online forums and user reviews can offer firsthand insights from other belly band holster users, helping you understand different models’ practical benefits and potential drawbacks.

Final Thoughts

Belly band holsters provide a comfortable, versatile, and discreet option for concealed carry. By understanding these holsters’ advantages and proper usage, firearm owners can enhance their comfort and safety while carrying their weapons. Whether you lead an active lifestyle or must dress professionally, a belly band holster can offer you the necessary flexibility and concealment. Their adaptability and comfort make them a reliable choice for individuals seeking an effective and unobtrusive way to carry their firearms daily.

Continue Reading
Click to comment

Leave a Reply

Your email address will not be published. Required fields are marked *

Technology

ecvh0 dforce master how to: Unlock Its Benefits

Published

on

ecvh0 dforce master how to

Introduction

Struggling with ecvh0 dforce master setup? You’re not alone. Many users find its configuration tricky, but mastering it unlocks powerful automation and efficiency. This guide breaks down the process into simple steps, helping you harness its full potential quickly.

Why It Matters

Properly setting up ecvh0 dforce master ensures smoother workflows, reduces errors, and maximizes productivity. Whether for personal projects or enterprise use, mastering this tool can save hours of manual work.

Step-by-Step Guide

1. Install & Configure

  • Download the latest ecvh0 dforce master package from the official site.
  • Follow the installation wizard, ensuring all dependencies are met.

2. Set Up Permissions

  • Assign appropriate user roles (admin, editor, viewer).
  • Configure access controls to prevent unauthorized changes.

3. Integrate with Your System

  • Connect ecvh0 dforcemaster to your existing tools via API.
  • Test the connection to ensure seamless data flow.

4. Automate Key Tasks

  • Use built-in templates or create custom automation rules.
  • Schedule recurring tasks to minimize manual input.

5. Monitor & Optimize

  • Track performance metrics in the dashboard.
  • Adjust settings for better speed and efficiency.

Pro Tip

Use keyboard shortcuts to navigate ecvh0 dforcemaster faster. Press Ctrl + K (Windows) or Cmd + K (Mac) to open the command palette for quick actions.

Conclusion

Mastering ecvh0 dforce master simplifies complex tasks and boosts efficiency. By following these steps, you’ll optimize your workflow and get the most out of this powerful tool.

FAQ

Is ecvh0 dforcemaster free?

It offers a free tier with limited features; advanced options require a subscription.

Can I use it offline?

Some features work offline, but full functionality requires an internet connection.

How secure is ecvh0 dforcemaster?

It uses encryption and role-based access for security. For best practices, check our security guide.

Continue Reading

Technology

How to Disassemble a Sony KV-27S42 CRT TV: Complete Guide

Published

on

How to Disassemble a Sony KV-27S42 CRT TV

Introduction

The Sony KV-27S42 is a classic CRT television, and while it’s no longer in production, many enthusiasts still repair, modify, or salvage these sets. However, disassembling a CRT TV requires caution—high-voltage components and delicate electronics mean one wrong move could be dangerous.

This guide will walk you through the full disassembly process of the KV-27S42, covering:
✔ Safety precautions (CRT discharge, avoiding shocks)
✔ Tool requirements (what you’ll need)
✔ Step-by-step teardown (removing the case, tube, and boards)
✔ Salvaging useful parts (what to keep or discard)
✔ Reassembly tips (if needed)

Whether you’re repairing, modding, or recycling, this guide ensures you do it safely and efficiently.

Why Disassemble a KV-27S42?

Before diving in, it’s worth understanding why you might need to take apart this TV:

🔹 Repairs – Fixing power supply issues, bad capacitors, or video problems.
🔹 Modifications – RGB or component video mods for retro gaming.
🔹 Salvage – Reusing the CRT, speakers, or other parts for projects.
🔹 Safe Disposal – CRTs contain hazardous materials (lead, phosphors) and must be recycled properly.

Warning:
⚠ CRTs hold high voltage even when unplugged – improper handling can result in severe electric shock.
⚠ The tube is heavy and fragile – dropping it can cause implosion or injury.

Tools & Safety Gear You’ll Need

Before starting, gather these essentials:

Essential Tools

✔ Screwdrivers (Phillips & flathead)
✔ CRT discharge tool (or insulated screwdriver + wire)
✔ Needle-nose pliers (for small connectors)
✔ Anti-static wrist strap (optional but recommended)

Safety Precautions

✔ Work in a dry, well-lit area
✔ Discharge the CRT before touching anything
✔ Wear gloves & safety glasses (glass shards are sharp)
✔ Keep pets/kids away (CRTs are dangerous when mishandled)

Step-by-Step Disassembly Guide

Step 1: Unplug & Discharge the CRT

  1. Unplug the TV and wait at least 30 minutes for capacitors to discharge.
  2. Locate the anode cap (the large rubber suction cup on the CRT).
  3. Discharge the CRT:
    • Use a CRT discharge tool (best option).
    • Alternative: Clip one end of a wire to the TV’s metal frame and carefully slide a flathead screwdriver under the anode cap until you hear/see a small spark.

Step 2: Remove the Rear Cover

  1. Flip the TV face-down on a soft surface (blanket/towel).
  2. Remove all rear screws (some may be hidden under stickers).
  3. Gently pry the back cover off—plastic tabs may hold it in place.

Step 3: Disconnect Internal Cables

  1. Take photos of all connections before unplugging anything.
  2. Unplug:
    • Deflection yoke (two large plugs near the tube neck)
    • Anode cap (already discharged, but still be careful)
    • Speaker wires & control board connectors

Step 4: Remove the CRT Tube

  1. Unscrew the 4 CRT mounting brackets (they hold the tube to the frame).
  2. Carefully lift the tube out – it’s extremely heavy (get help if needed).
  3. Set it face-down on a soft surface to avoid scratches.

Step 5: Extract Circuit Boards & Other Components

  1. Mainboard – Remove screws and gently lift it out.
  2. Power supply – Disconnect all wires before removing.
  3. Speakers & tuner – Useful for retro projects if salvaging.

Pro Tips for Safe Disassembly

🔧 Label every wire and screw (masking tape + marker) to avoid confusion later.
🔧 Use a magnetic tray to keep screws organized.
🔧 If keeping the CRT, store it upright to avoid stress on the glass.

What Can You Salvage?

If you’re parting out the TV, these components are useful:
✅ CRT tube – Great for arcade builds or replacements.
✅ Speakers – Decent quality for DIY audio projects.
✅ Power supply & mainboard – Useful for electronics tinkering.
✅ Control knobs & buttons – Handy for retro mods.

How to Dispose of a CRT Safely

CRTs contain leaded glass and toxic phosphors, so never throw them in the trash. Instead:
♻ Check local e-waste recycling centers (many accept CRTs for free).
♻ Contact electronics repair shops – Some may take old TVs.
♻ Look for CRT buyback programs (some collectors pay for working tubes).

Conclusion: How to Disassemble a Sony KV-27S42 CRT TV

How to Disassemble a Sony KV-27S42 CRT TV,  requires patience and safety awareness, but it’s a rewarding project for retro tech enthusiasts. Whether you’re fixing, modding, or salvaging, following this guide ensures a smooth process.

FAQ About How to Disassemble a Sony KV-27S42 CRT TV

1. Can I get shocked if the TV has been unplugged for days?

Yes! CRTs can hold charge for weeks. Always discharge before working.

2. How heavy is the KV-27S42 CRT?

Around 50-60 lbs (23-27 kg)—lift carefully or get help.

3. Can I reuse the CRT in another TV?

Possibly, but tube swaps require matching specs (size, impedance, etc.).

4. What if I break the CRT?

The glass is under vacuum—if it cracks, it can implode. Wear safety gear!

5. Is it worth repairing a KV-27S42?

If you love CRTs, yes! These Sonys have great picture quality for retro gaming.


Continue Reading

Technology

How Much Does Window Tinting Cost? Save Money, Boost Comfort

Published

on

How Much Does Window Tinting Cost?

Introduction

Window tinting costs can vary widely, leaving many car owners unsure about fair pricing. Whether you want UV protection, privacy, or heat reduction, understanding the factors that influence cost helps you budget wisely. This guide breaks down pricing, so you get the best value without surprises.

Why It Matters

Window tinting isn’t just about style—it blocks harmful UV rays, reduces glare, and keeps your car cooler. But overpaying or choosing cheap options can lead to poor quality. Knowing the average costs ensures you invest in a tint that lasts and performs well.

Step-by-Step Guide to Window Tinting Costs

1. Understand the Pricing Factors

  • Film Quality: Basic dyed film starts at 50–150, while premium ceramic tints run 200–800.
  • Vehicle Size: Smaller cars cost less (100–300) vs. SUVs (200–600).
  • Number of Windows: Full-car tinting costs more than just side windows.

2. Compare Film Types

  • Dyed Film (50–150): Affordable but fades faster.
  • Carbon Film (150–350): Better heat rejection, matte finish.
  • Ceramic Film (200–800): Top-tier heat/UV protection, no signal interference.

3. Factor in Labor Costs

Professional installation adds 50–200, depending on complexity. DIY kits (20–100) are cheaper but risk bubbles/peeling.

4. Check Local Market Prices

Urban areas often charge more. Get 3+ quotes to avoid overpaying.

5. Consider Legal Limits

Some states restrict tint darkness (e.g., California bans <70% VLT on front windows). Non-compliant tints may require costly removal.

Pro Tip

“Ask for a warranty! Reputable shops offer 5–10-year guarantees against peeling or fading—saving you long-term costs.”

Conclusion: How Much Does Window Tinting Cost

Window tinting cost 50–800+, depending on film type, vehicle size, and labor. Investing in ceramic film or a trusted installer ensures durability and performance. Always check local laws and compare quotes to make a smart choice.

FAQ: How Much Does Window Tinting Cost

1. Is tinting worth the cost?
Yes—it reduces skin-damaging UV rays by 99% and lowers AC use, saving fuel.

2. How long does tint last?
High-quality tints last 10+ years; cheap ones fade in 2–3 years.

3. Can I tint my windshield?
Most states only allow a clear or light tint strip. Check your local laws.

4. Does tint affect visibility?
Not if you choose the right VLT (%)—go for 35% or higher for safety.

Continue Reading

Trending