Connect with us

Food And Drinks

Blackened Shrimp Bowls: A Flavor-Packed Meal in Minutes

Published

on

Blackened Shrimp Bowls

Ever crave a restaurant-quality meal that’s quick, healthy, and bursting with flavor? Blackened shrimp bowls deliver exactly that—a perfect balance of smoky, spicy shrimp, fresh veggies, and hearty grains. Whether you’re meal prepping or whipping up a fast weeknight dinner, this dish is a game-changer.

In this guide, you’ll learn:

  • The secret to perfectly blackened shrimp

  • How to build a balanced, nutrient-dense bowl

  • Customization ideas for every diet

  • Expert-backed tips for maximum flavor

Let’s dive in!

Why Blackened Shrimp Bowls Are a Must-Try

Blackened shrimp bowls combine bold Cajun-inspired spices with fresh, wholesome ingredients. The dish originated from blackening, a cooking technique popularized by Chef Paul Prudhomme in the 1980s. By searing shrimp in a hot skillet with a spice blend, you get a crispy, charred exterior while keeping the inside tender.

Key benefits of this dish:
✅ Quick & Easy – Ready in under 20 minutes
✅ Nutrient-Dense – Packed with protein, fiber, and healthy fats
✅ Versatile – Endless variations to suit any palate

How to Make Perfect Blackened Shrimp

1. Choosing the Best Shrimp

Opt for large or jumbo shrimp (21/25 or 16/20 count) for the best texture. Fresh or frozen (thawed) shrimp both work—just pat them dry to ensure a good sear.

2. The Essential Blackening Spice Blend

A classic blackening seasoning includes:

  • 2 tsp smoked paprika

  • 1 tsp garlic powder

  • 1 tsp onion powder

  • 1 tsp dried thyme

  • ½ tsp cayenne (adjust for heat)

  • ½ tsp salt & black pepper

Pro Tip: For extra depth, add a pinch of sugar to enhance caramelization.

3. Cooking Method for Maximum Flavor

  1. Season generously – Coat shrimp evenly in spice mix.

  2. Sear in a hot skillet – Use cast iron or stainless steel for the best crust.

  3. Cook 2-3 minutes per side – Avoid overcrowding to prevent steaming.

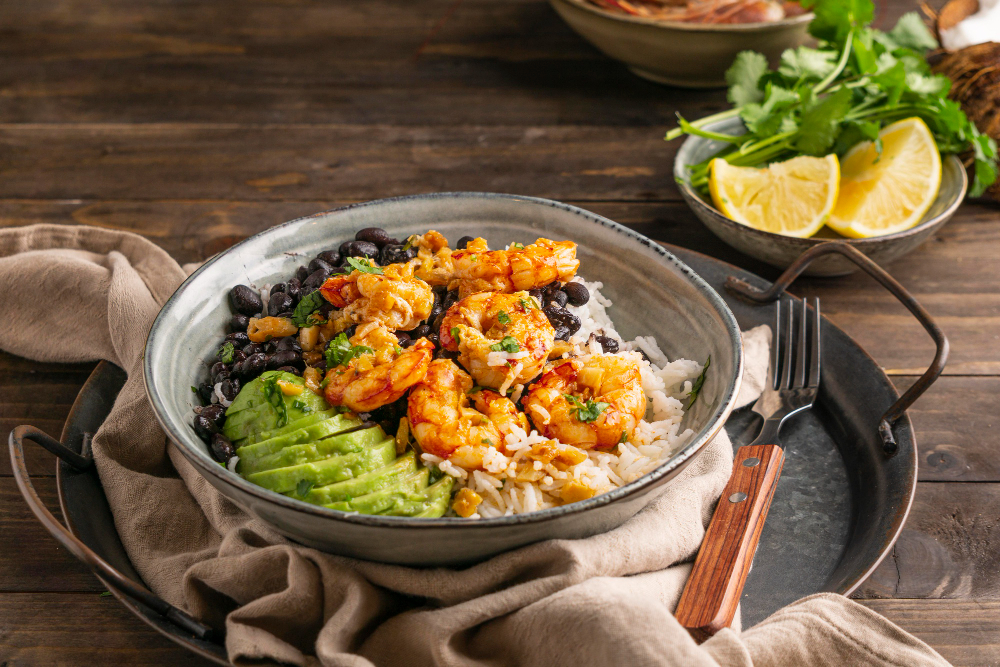
Building the Ultimate Blackened Shrimp Bowl

A well-balanced bowl includes:

1. Base (Pick One)

  • Grains: Cilantro lime rice, quinoa, or farro

  • Greens: Spinach, kale, or arugula

  • Veggie Noodles: Zucchini or sweet potato spirals

2. Fresh Veggies & Toppings

  • Avocado slices

  • Cherry tomatoes

  • Pickled red onions

  • Corn kernels

  • Cucumber ribbons

3. Sauce & Finishing Touches

  • Creamy: Chipotle mayo, garlic yogurt

  • Tangy: Lime crema, mango salsa

  • Crunchy: Toasted pepitas, crushed tortilla chips

Pro Tip: Add a squeeze of lime before serving for a bright finish.

5 Blackened Shrimp Bowl Variations

1. Southwest Style

  • Base: Cilantro lime rice

  • Toppings: Black beans, roasted corn, avocado

  • Sauce: Chipotle ranch

2. Mediterranean-Inspired

  • Base: Quinoa or couscous

  • Toppings: Cucumber, olives, feta

  • Sauce: Lemon tahini

3. Low-Carb Option

  • Base: Cauliflower rice

  • Toppings: Bell peppers, zucchini, guacamole

  • Sauce: Avocado lime dressing

4. Tropical Twist

  • Base: Coconut rice

  • Toppings: Mango, pineapple, jalapeños

  • Sauce: Spicy peanut drizzle

5. Spicy Cajun Bowl

  • Base: Dirty rice

  • Toppings: Andouille sausage, bell peppers

  • Sauce: Remoulade

Expert Tips for the Best Results

✔ Don’t skip the drying step – Pat shrimp dry for better searing.
✔ Use high heat – A smoking-hot pan ensures a crispy crust.
✔ Prep ahead – Make spice mix in bulk for quick meals.
✔ Customize heat levels – Reduce cayenne for milder shrimp.

Why You’ll Love This Dish

Blackened shrimp bowls are:
🔥 Fast – Ideal for busy weeknights
🌱 Adaptable – Gluten-free, keto, or vegan-friendly swaps available
🍤 Flavor Bomb – Satisfies spicy, smoky, and fresh cravings

Final Thoughts: Ready to Try It?

With crispy, spicy shrimp and endless topping combos, blackened shrimp bowls are a foolproof way to enjoy a healthy, restaurant-worthy meal at home. Whether you’re meal prepping or cooking for a crowd, this dish never disappoints.

Your turn! What’s your favorite way to enjoy blackened shrimp? Tag us in your creations or drop a comment below. Happy cooking! 🍤✨

Continue Reading
Click to comment

Leave a Reply

Your email address will not be published. Required fields are marked *

Food And Drinks

Float Dr Pepper: The Refreshing Drink Hack You Need to Try

Published

on

Float Dr Pepper

Why Is Everyone Raving About Float Dr Pepper?

Have you ever craved a drink that’s both nostalgic and refreshingly unique? Enter Float Dr Pepper—a fizzy, creamy, and utterly delicious twist on the classic soda float. Combining the bold, caramel-infused flavor of Dr Pepper with smooth vanilla ice cream creates a taste sensation that’s hard to resist.

But what makes this drink so special? Is it just a passing trend, or is there real magic in this combination? In this guide, we’ll explore:

  • The origins of the Dr Pepper float

  • Why the flavor profile works so well

  • Step-by-step instructions to make the perfect float

  • Creative variations to try

  • Expert tips for the best experience

Whether you’re a soda enthusiast or just looking for a fun new treat, this guide will help you master the art of the Float Dr Pepper.

The Origins of the Dr Pepper Float

A Brief History of Floats

The classic root beer float has been a beloved American treat since the late 1800s. But as soda flavors expanded, so did float variations. Dr Pepper, with its unique 23-flavor blend, became a natural candidate for a float—offering a more complex taste than traditional root beer or cola.

Why Dr Pepper Works So Well

Dr Pepper’s flavor is a mix of:

  • Fruity notes (cherry, blackberry)

  • Warm spices (vanilla, licorice, clove)

  • Caramel undertones

When paired with vanilla ice cream, the creaminess softens the soda’s sharpness while enhancing its sweetness. The result? A perfectly balanced, creamy, and effervescent drink.

How to Make the Perfect Float Dr Pepper

What You’ll Need

  • 1 can or bottle of Dr Pepper (chilled)

  • 2 scoops of high-quality vanilla ice cream

  • A tall glass (16 oz or larger)

  • A long spoon and straw (optional)

Step-by-Step Instructions

  1. Chill Your Glass – For extra frosty goodness, place your glass in the freezer for 5–10 minutes before making your float.

  2. Add the Ice Cream – Scoop 2 generous balls of vanilla ice cream into the glass.

  3. Pour Slowly – Gently pour Dr Pepper over the ice cream to prevent excessive fizzing.

  4. Let It Settle – Wait 10–15 seconds for the foam to rise, then top off with more soda if needed.

  5. Serve Immediately – Enjoy with a spoon and straw for the full experience!

Pro Tips for the Best Float

✔ Use real cane sugar Dr Pepper (if available) for a richer taste.
✔ Try Dr Pepper Cream Soda for an even creamier twist.
✔ Add a splash of heavy cream for extra decadence.

Creative Float Dr Pepper Variations

Want to take your float to the next level? Try these fun twists:

1. Chocolate Dr Pepper Float

  • Add a scoop of chocolate ice cream instead of vanilla.

  • Drizzle with chocolate syrup for extra indulgence.

2. Spiced Dr Pepper Float

  • Sprinkle cinnamon or nutmeg on top.

  • Use eggnog ice cream during the holidays.

3. Bourbon Dr Pepper Float (For Adults)

  • Mix in 1 oz of bourbon before adding soda.

  • Garnish with a cherry for a boozy twist.

4. Vegan Dr Pepper Float

  • Swap dairy ice cream for coconut or almond milk vanilla ice cream.

  • Use organic cane sugar Dr Pepper for a fully plant-based treat.

Why Float Dr Pepper Is a Crowd-Pleaser

Perfect for Any Occasion

  • Summer BBQs – A refreshing alternative to beer or lemonade.

  • Movie Nights – A fun, nostalgic snack.

  • Dessert Menus – Impress guests with a unique sweet treat.

A Viral Sensation?

Thanks to social media, #FloatDrPepper has gained traction on TikTok and Instagram, with users sharing their own takes on the drink. Some even layer it with whipped cream and sprinkles for extra flair.

Final Thoughts: Should You Try It?

If you love Dr Pepper and enjoy creamy, fizzy treats, the Float Dr Pepper is a must-try. It’s easy to make, endlessly customizable, and delivers a satisfying mix of flavors and textures.

Ready to give it a shot? Grab a cold Dr Pepper, your favorite vanilla ice cream, and get blending! Whether you stick to the classic or experiment with fun variations, this float is guaranteed to become a new favorite.

Continue Reading

Food And Drinks

Spain Butter: A Hidden Gem in the World of Dairy

Published

on

Spain Butter

Have you ever wondered what makes Spanish butter stand out in a world dominated by French and Irish varieties? While Spain might be famous for its olive oil and jamón, its butter is an underrated culinary treasure. Rich, creamy, and often infused with regional flavors, Spanish butter offers a unique taste experience worth exploring.

In this article, we’ll dive into:
✔ The history and tradition of Spanish butter
✔ What sets it apart from other European butters
✔ Top brands to try (and where to buy them)
✔ Creative ways to use Spanish butter in your cooking

Ready to discover why this dairy delight deserves a spot in your kitchen? Let’s get started.

The Rich Heritage of Spanish Butter

Unlike France or Ireland, Spain isn’t typically associated with butter—olive oil has long been the country’s fat of choice. However, northern regions like Galicia, Asturias, and the Basque Country have a deep dairy tradition, producing high-quality butter from grass-fed cows.

Historically, butter was a staple in these cooler, rainier regions where cows thrived. Artisanal methods, such as slow churning and minimal processing, have been preserved, giving Spanish butter its distinct texture and flavor.

What Makes Spanish Butter Unique?

  1. Grass-Fed Cows – Many Spanish dairy farms prioritize pasture-raised cows, resulting in butter with a richer, more complex taste.

  2. Lower Salt Content – Unlike heavily salted European butters, Spanish varieties often use minimal salt, letting the natural creaminess shine.

  3. Regional Variations – Some butters are smoked, infused with herbs, or blended with local ingredients like honey or truffles.

Top Spanish Butter Brands to Try

If you’re eager to taste authentic Spanish butter, here are some standout brands:

1. Leche Pascual (Mantequilla de Burgos)

A well-known dairy brand, Pascual produces smooth, slightly tangy butter perfect for baking and spreading.

2. Central Lechera Asturiana

Hailing from Asturias, this butter is ultra-creamy with a subtle sweetness, ideal for toast and pastries.

3. Mantequerías Arias (Galicia)

A premium artisanal brand, Arias uses traditional churning methods for a velvety texture and rich flavor.

4. Lurpak (Spanish Variant)

While Danish in origin, Lurpak’s Spanish-produced butter is tailored to local tastes—less salty and incredibly spreadable.

Where to Buy?

  • Specialty food stores (like La Tienda or Despaña in the US)

  • Online retailers (Amazon, Mercadona’s international delivery)

  • Local markets in Spain (Mercado de San Miguel in Madrid, La Boqueria in Barcelona)

How to Use Spanish Butter Like a Pro

Spanish butter isn’t just for spreading on bread—here are some delicious ways to enjoy it:

1. Paella Finishing Touch

A dollop of butter stirred into paella at the end adds a luxurious creaminess.

2. Herb-Infused Butter

Mix Spanish butter with smoked paprika, garlic, and parsley for a flavorful topping for grilled meats.

3. Basque-Style Butter Cake (Pastel Vasco)

This traditional dessert relies on high-quality butter for its rich, crumbly texture.

4. Seared Scallops with Brown Butter

Spanish butter’s high fat content makes it perfect for achieving a golden, nutty sear.

Why Spanish Butter Deserves More Recognition

While French and Irish butters dominate global markets, Spain’s offerings bring something different—subtle sweetness, artisanal craftsmanship, and regional diversity. Whether you’re a home cook, a professional chef, or just a butter enthusiast, exploring Spanish varieties can elevate your dishes in unexpected ways.

Final Tip:

Next time you’re in Spain (or browsing gourmet food shops), skip the usual souvenirs and grab a pack of locally made butter. Your taste buds will thank you!

Continue Reading

Food And Drinks

The Irresistible World of French Sweets: A Delicious Guide

Published

on

French Sweets

Have you ever bitten into a buttery, flaky croissant and wondered why French sweets are so incredibly addictive? From delicate macarons to rich chocolate éclairs, French desserts are a celebration of flavor, texture, and artistry. But what makes them so special? And how can you enjoy them like a true connoisseur?

In this guide, we’ll explore the most iconic French sweets, their fascinating history, and expert tips on how to savor them—whether you’re in Paris or your own kitchen.

Why French Sweets Are Universally Loved

French desserts are more than just sugar and flour—they’re a blend of precision, tradition, and innovation. Here’s why they stand out:

✔ Perfect Balance – French patisserie masters the harmony of sweet, salty, and buttery flavors.
✔ Artful Presentation – Every dessert is crafted like a miniature masterpiece.
✔ Time-Tested Techniques – Centuries of refinement result in flawless textures.

Now, let’s dive into the most beloved French sweets you need to try.Top 10 Must-Try French Sweets

1. Macarons

What Makes Them Special?
These colorful almond meringue cookies, filled with ganache or buttercream, are crisp on the outside and chewy inside.

Pro Tip: Look for macarons from Ladurée or Pierre Hermé in Paris—the pioneers of this iconic treat.

2. Croissant

The King of Breakfast Pastries
A perfectly baked croissant should be golden, with layers that shatter at the first bite. The secret? High-quality butter and precise lamination.

Fun Fact: The croissant actually originated in Austria but was perfected by the French.

3. Crème Brûlée

Creamy, Vanilla-Infused Perfection
This custard dessert, topped with a caramelized sugar crust, is a textural dream.

Expert Tip: Tap the top with a spoon—it should crack cleanly!

4. Éclair

Elegance in Every Bite
A choux pastry filled with pastry cream and topped with glossy chocolate ganache.

Best Flavor Variations: Coffee, pistachio, or salted caramel.

5. Tarte Tatin

The Upside-Down Apple Tart
Caramelized apples sit atop buttery pastry—best served warm with vanilla ice cream.

History Lesson: Created by accident in the 19th century by the Tatin sisters!

6. Madeleines

The Shell-Shaped Tea Cake
Soft, spongy, and lightly citrusy, these petite cakes are perfect with coffee.

Pro Baker’s Secret: Let the batter rest overnight for the best texture.

7. Pain au Chocolat

The Chocolate Lover’s Croissant
Flaky layers wrapped around dark chocolate batons—pure indulgence.

Where to Find the Best? Try Du Pain et des Idées in Paris.

8. Canelé

Caramelized & Custardy
A Bordeaux specialty with a crispy, rum-infused exterior and soft center.

Why It’s Unique: Baked in copper molds for the perfect crust.

9. Mille-Feuille (Napoleon)

Layers of Flaky Goodness
Puff pastry stacked with pastry cream and topped with icing—a true classic.

How to Eat It? Turn it sideways to avoid a mess!

10. Profiteroles

Cream Puffs with a Chocolate Finish
Choux pastry filled with vanilla ice cream or custard, drizzled with warm chocolate sauce.

Best Served: At Le Procope, Paris’ oldest café.

How to Enjoy French Sweets Like a Pro

Want the ultimate experience? Follow these expert-backed tips:

✔ Pair with the Right Drink – Macarons go with tea, croissants with coffee, and crème brûlée with dessert wine.
✔ Eat Them Fresh – French pastries are best consumed within hours of baking.
✔ Visit Local Boulangeries – Skip tourist spots and ask locals for hidden gems.
✔ Try Making Them at Home – Start with madeleines or crème brûlée—they’re beginner-friendly!

Final Thoughts: Why French Sweets Are Worth the Hype

French desserts aren’t just treats—they’re edible art. Whether you’re biting into a crisp macaron or savoring a warm pain au chocolat, each bite tells a story of tradition and craftsmanship.

So, which French sweet will you try first? Head to a patisserie, or better yet, bake your own and taste a piece of France at home.

Continue Reading

Trending