Home Empowerment
How to Assess the Need for Wind Damage Repair Services After a Storm?

Property owners must assess the extent of damage incurred in the aftermath of a storm, particularly one characterized by strong winds. Wind damage can be subtle or severe, ranging from minor cosmetic issues to significant structural impairments. Unfortunately, not all wind damage is immediately visible, which can lead to further complications if left unaddressed. We will explore the essential steps to assess wind damage and determine if reliable wind damage repair services in Duluth are necessary, helping homeowners protect their property investment and ensure their home’s safety and integrity.
Initial Visual Inspection
The first step in assessing wind damage after a storm is conducting a thorough visual inspection of the property. Start by walking around the exterior of your home, paying close attention to the roof, siding, windows, and doors. Roof damage is one of the most common issues after a windstorm, and it can range from missing shingles to more severe problems like lifted or broken shingles, which can lead to leaks. Look for any signs of damage, such as displaced roofing materials, cracks, or dents. It’s also essential to check for debris that may have struck the roof during the storm, as this can cause hidden damage.
Siding is another area that can suffer from wind damage. High winds can cause the siding to become loose or even rip it off completely. Inspect the siding for cracks, warping, or any sections that appear out of alignment. Additionally, check the windows and doors for cracks, broken glass, or any damage to the frames that may have been caused by flying debris. If you notice any of these signs, it indicates that wind damage has occurred, and repairs may be necessary to prevent further issues.
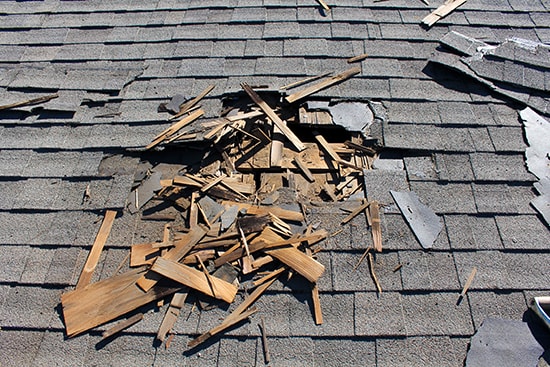
Inspecting the Roof for Hidden Damage
While a visual inspection can reveal some wind damage, not all damage is immediately apparent, especially regarding the roof. Wind can lift shingles, causing them to become loose, which may not be visible from the ground. These lifted shingles can lead to water infiltration during the next rainstorm, which can cause significant damage to the structure of your home over time. To thoroughly assess the roof, climbing onto it or hiring a professional may be necessary. If you inspect the roof, take all the required safety precautions.
When inspecting the roof, pay close attention to the edges and corners, as these areas are particularly vulnerable to wind damage. Look for any areas where shingles appear raised or out of place. Additionally, inspect the flashing around chimneys, vents, and skylights, as high winds can cause it to become loose or damaged. If you notice any issues, addressing them promptly is crucial, as they can lead to more significant problems if left unrepaired. In some cases, the damage may be severe enough to warrant the replacement of the entire roof or a section of it.
Checking for Structural Damage
In addition to inspecting the roof and exterior of the home, it’s essential to check for any structural damage that the storm may have caused. High winds can put a significant amount of pressure on the structure of a home, which can lead to issues such as cracks in the foundation, damage to load-bearing walls, or even a shift in the entire structure. Start by inspecting the home’s interior, looking for any signs of cracks in the walls, ceilings, or floors. Pay close attention to areas around windows and doors, as these are often the first places where cracks will appear.
If you notice any cracks or other signs of structural damage, it’s essential to have a professional assess the situation as soon as possible. Structural damage can compromise the safety of your home, and it may require extensive repairs to correct. Additionally, check for any doors or windows that are difficult to open or close, as this can indicate that the structure has shifted. It’s also a good idea to inspect the attic and basement for any signs of water infiltration or damage, as these areas can be particularly vulnerable to wind-driven rain.
Assessing the need for wind damage repair services after a storm is a critical task that should be considered. By conducting a thorough visual inspection of your property, checking for hidden damage on the roof, inspecting for structural issues, and assessing the condition of your trees and landscaping, you can determine the extent of the damage and whether professional repairs are necessary. Taking these steps will help you protect your property investment, ensure the safety of your home, and prevent further damage from occurring. If you notice any signs of damage, addressing them promptly is essential to avoid more significant issues.
Home Empowerment
How to Get Pee Smell Out of Couch: Solutions for a Fresh Home

Few household smells are as stubborn—or as embarrassing—as urine odor embedded in a couch. Whether it’s from a potty-training toddler, an elderly pet, or an unexpected accident, that lingering ammonia scent can make your living space feel unclean. The good news? With the right techniques, you can completely eliminate urine smells and restore freshness to your upholstery.
This comprehensive guide covers everything from immediate emergency response to deep-cleaning solutions for set-in odors. We’ll explore both DIY remedies and professional-grade solutions, ensuring you have options for every level of mess.
Why Proper Urine Odor Removal Matters
Ignoring urine smells doesn’t just create an unpleasant environment—it can lead to bigger problems:
- Bacterial growth: Urine breeds bacteria, which can cause health issues.
- Repeat accidents: Pets often remark the same spot if the scent remains.
- Long-term damage: Urine can degrade fabric and cushioning over time.
By acting quickly and using the right cleaning methods, you’ll protect your furniture and maintain a fresh, hygienic home.
Step-by-Step Guide to Remove Pee Smell from Couch
1. Act Fast: Blot Up Excess Liquid
Why it works: The sooner you remove urine, the less it soaks into fibers.
- Materials needed: Absorbent towels, paper towels, or a dry microfiber cloth.
- Technique:
- Press (don’t rub) firmly to soak up liquid.
- Replace towels as they become saturated.
- If the urine is already dry, skip to step 2.
2. Neutralize Odors with Vinegar Solution
Why it works: Vinegar’s acidity breaks down uric acid crystals, the main cause of lingering smells.
- Mix: 1 part white vinegar + 1 part cold water in a spray bottle.
- Application:
- Lightly mist the affected area (test on a hidden spot first).
- Let sit for 10-15 minutes.
- Blot dry with a clean cloth.
- Bonus: Add a few drops of essential oil (e.g., lavender) for a fresh scent.
3. Deep Clean with Baking Soda
Why it works: Baking soda absorbs odors and lifts remaining stains.
- Method:
- Sprinkle a generous layer over the damp area.
- For tough smells, mix baking soda with hydrogen peroxide (3%) to form a paste.
- Let sit for 6+ hours (overnight is best).
- Vacuum thoroughly.
4. Use an Enzyme Cleaner for Stubborn Stains
Why it works: Enzymes break down urine’s organic compounds, eliminating odors at the source.
- Top picks: Nature’s Miracle, Rocco & Roxie, or Simple Solution.
- How to apply:
- Follow product instructions (usually involves soaking the area).
- Allow to air-dry completely—don’t rinse!
5. Machine Wash Removable Covers (If Applicable)
- Best detergent: Use an enzyme-based or oxygen bleach formula.
- Drying: Air-dry in sunlight (UV rays help kill bacteria).
Pro Tips for Maximum Effectiveness
✅ Avoid Heat: Never use steam or hot water—it sets urine stains and odors.
✅ Blacklight Trick: Use a UV flashlight to find old, hidden urine spots.
✅ Prevent Residue: Rinse with cold water after vinegar treatment to avoid stickiness.
✅ For Leather Couches: Use a leather-safe enzymatic cleaner to avoid damage.
When to Call a Professional
If the smell persists after multiple treatments, consider:
- Professional upholstery cleaning (hot water extraction method).
- Ozone treatment (for severe, deep-set odors).
Final Thoughts
How to Get Pee Smell Out of Couch requires quick action, the right cleaners, and patience. By following these steps—especially using enzyme treatments for stubborn odors—you can restore your couch to a fresh, odor-free state.
FAQ: Your Top Questions Answered
Does vinegar discolor couch fabric?
It shouldn’t, but always test on a hidden area first.
Can I use bleach on my couch?
No! Bleach can damage fabric and react with urine, making smells worse.
How do I stop my pet from peeing on the couch again?
- Use a pet deterrent spray.
- Place a washable waterproof cover.
- Retrain with positive reinforcement.
Why does the smell come back after cleaning?
If urine reached the cushion foam, you may need a deep soak with enzyme cleaner or professional help.
Home Empowerment
How to Get Rid of German Roaches: The Ultimate Guide

German roaches (Blattella germanica) are among the most stubborn household pests. Unlike other roach species, they reproduce rapidly, hide in tight spaces, and quickly develop resistance to pesticides. If you’re dealing with an infestation, this guide will walk you through how to get rid of German roaches using proven, science-backed methods.
Why German Roaches Are So Hard to Eliminate
Before diving into solutions, it’s crucial to understand why these pests are so resilient:
✅ Rapid Reproduction – A single female can produce up to 400 offspring in her lifetime.
✅ Pesticide Resistance – They adapt quickly to chemical treatments.
✅ Nocturnal & Secretive – They hide in cracks, appliances, and electrical outlets.
Now, let’s tackle the problem systematically.
Step 1: Identify the Infestation
German roaches are small (½ inch), light brown, with two dark stripes behind their heads. Signs of infestation include:
🔍 Droppings (tiny black specks)
🔍 Egg cases (oothecae) – Small, brown, capsule-like
🔍 Musty odor – A sign of large infestations
Step 2: Sanitation – Cut Off Their Food Supply
Roaches thrive in dirty environments. To discourage them:
✔ Store food in airtight containers
✔ Clean spills immediately
✔ Take out trash daily
✔ Fix leaky pipes (roaches need water)
Step 3: Use German Roach-Specific Baits
Why baits work best:
German roaches eat dead roaches and feces, making baits highly effective. The poison spreads through the colony.
Top Bait Choices:
Product | Active Ingredient | Effectiveness |
---|---|---|
Advion Gel Bait | Indoxacarb | ★★★★★ |
Combat Max Roach Killing Gel | Hydramethylnon | ★★★★☆ |
Invict Gold Cockroach Gel | Abamectin | ★★★★★ |
How to Apply:
- Place pea-sized drops near hiding spots (under sinks, behind fridges).
- Avoid spraying insecticides—they’ll scatter roaches, worsening the problem.
Step 4: Apply Insect Growth Regulators (IGRs)
IGRs disrupt roach reproduction by preventing nymphs from maturing. Recommended brands:
✅ Gentrol Point Source (Hydroprene)
✅ NyGuard IGR Concentrate
Step 5: Seal Entry Points
Prevent re-infestation by:
🔧 Caulking cracks in walls
🔧 Installing door sweeps
🔧 Covering vents with fine mesh
Step 6: Monitor with Sticky Traps
Place sticky traps in hotspots to track remaining roaches. Brands like Harris Roach Traps work well.
Step 7: When to Call a Professional
If DIY methods fail after 4-6 weeks, consider hiring an exterminator. They use stronger treatments like:
💉 Fumigation
💉 Residual insecticide sprays
Prevention: Keep Roaches from Coming Back
🚫 Avoid cardboard storage (roaches love it)
🚫 Inspect groceries before storing
🚫 Regularly deep-clean kitchens & bathrooms
German Roach vs. Other Roaches (Comparison Chart)
Feature | German Roach | American Roach | Oriental Roach |
---|---|---|---|
Size | ½ inch | 1.5–2 inches | 1 inch |
Color | Light brown | Reddish-brown | Dark brown/black |
Preferred Habitat | Kitchens, bathrooms | Sewers, basements | Damp areas |
Reproduction Speed | Very fast | Moderate | Slow |
Final Verdict: How to Get Rid of German Roaches for Good
- Use gel baits (Advion, Invict Gold).
- Apply IGRs to stop reproduction.
- Maintain strict sanitation.
- Seal entry points.
- Monitor with traps.
Home Empowerment
Heliconia Color: Transform Your Garden with Tropical Beauty

Heliconias, often called “lobster claws” or “parrot flowers,” are the crown jewels of tropical gardens. Their bold, vibrant colors and unique shapes make them a favorite among gardeners and landscapers. But what makes heliconia color so captivating? And how can you harness their beauty to transform your outdoor space?
In this comprehensive guide, we’ll dive deep into the world of heliconias. From their origins and varieties to practical growing tips and design ideas, you’ll walk away with everything you need to know to make these tropical wonders the star of your garden.
Why Heliconia Color is a Game-Changer for Your Garden
Heliconias are more than just pretty flowers—they’re a statement. Their fiery reds, sunny yellows, and deep oranges can instantly elevate any garden or landscape. Here’s why heliconia color is so special:
- Unmatched Vibrancy: Heliconias boast some of the most intense hues in the plant kingdom.
- Tropical Appeal: They bring an exotic, vacation-like vibe to your space.
- Versatility: Whether in pots, borders, or as focal points, heliconias adapt to various garden styles.
The Science Behind Heliconia Color
Heliconias owe their stunning colors to a combination of pigments and environmental factors. The primary pigments responsible for their hues are:
- Anthocyanins: These produce red, purple, and blue shades.
- Carotenoids: Responsible for yellows and oranges.
- Chlorophyll: Adds a touch of green to the bracts and leaves.
Interestingly, heliconia color can vary depending on factors like soil pH, sunlight, and temperature. For instance, heliconias grown in slightly acidic soil often exhibit deeper reds, while those in alkaline soil may lean toward yellows.
Top Heliconia Varieties for Jaw-Dropping Color
With over 200 species, heliconias offer a rainbow of options. Here are some of the most popular varieties to consider:
Variety | Color | Height | Best For |
---|---|---|---|
Heliconia Rostrata | Red and Yellow | 6-15 ft | Backdrop or Focal Point |
Heliconia Psittacorum | Orange and Green | 3-6 ft | Borders and Containers |
Heliconia Caribaea | Deep Red and Gold | 10-20 ft | Tropical Landscapes |
Heliconia Wagneriana | Multicolored (Red, Yellow, Green) | 4-8 ft | Accent Planting |
How to Grow and Care for Heliconias: A Step-by-Step Guide
1. Choosing the Right Location
Heliconias thrive in warm, humid climates (USDA zones 10-12). They need:
- Full to Partial Sunlight: At least 6 hours of sunlight daily.
- Well-Draining Soil: Rich in organic matter.
- Space to Grow: Some varieties can reach up to 20 feet tall!
2. Planting Tips
- Dig a hole twice the size of the root ball.
- Mix compost or aged manure into the soil for added nutrients.
- Water thoroughly after planting.
3. Watering and Feeding
- Water: Keep the soil consistently moist but not waterlogged.
- Fertilizer: Use a balanced, slow-release fertilizer every 6-8 weeks during the growing season.
4. Pruning and Maintenance
- Remove dead or damaged leaves to encourage new growth.
- Divide overcrowded clumps every 2-3 years to maintain vigor.
Designing with Heliconia Color: Tips and Ideas
Heliconias are incredibly versatile in garden design. Here are some creative ways to use them:
- Tropical Oasis: Pair heliconias with palms, ferns, and orchids for a lush, jungle-like feel.
- Color Blocking: Use contrasting heliconia colors to create bold, eye-catching displays.
- Container Gardening: Grow smaller varieties like Heliconia Psittacorum in pots for patios or balconies.
- Cut Flowers: Heliconias make stunning floral arrangements that last up to two weeks.
Common Challenges and How to Overcome Them
While heliconias are relatively low-maintenance, they can face a few challenges:
- Pests: Watch out for aphids and spider mites. Use neem oil or insecticidal soap as a natural remedy.
- Fungal Diseases: Ensure proper air circulation and avoid overwatering to prevent issues like leaf spot.
- Cold Sensitivity: In cooler climates, grow heliconias in containers and bring them indoors during winter.
Heliconia Color in Action: A Case Study
Project: Tropical Resort Landscape
Location: Florida, USA
Goal: Create a vibrant, low-maintenance garden that wows guests.
Solution:
- Planted Heliconia Rostrata as a backdrop.
- Used Heliconia Psittacorum in containers near walkways.
- Added complementary plants like bird-of-paradise and bromeliads.
Result: The resort’s garden became a guest favorite, with many visitors snapping photos and asking about the plants.
Infographic: Heliconia Color Spectrum
Key Points:
- Breakdown of heliconia varieties by color.
- Tips for enhancing color through soil and sunlight.
- Ideal pairings for garden design.
Conclusion: Bring the Magic of Heliconia Color to Your Garden
Heliconias are more than just plants—they’re a celebration of color, life, and tropical beauty. By understanding their needs and experimenting with design, you can create a garden that’s not only visually stunning but also a joy to maintain.
Ready to transform your space? Start by choosing your favorite heliconia variety and follow the tips in this guide. And don’t forget to share your heliconia journey with us—tag us in your garden photos or drop a comment below!
-
Articles1 year ago
How Many Times Can You Regrow Green Onions
-
News7 months ago
Understanding HotLeaks: What You Need to Know
-
Fashion5 months ago
Opals in the USA: A Gemstone Transforming the Crystal Healing Market
-
Technology11 months ago
The Wonders of Oh Em Gee Blog
-
Entertainment11 months ago
Bare it All: Unforgettable Skinny Dipping Stories Shared
-
Health11 months ago
Can You Smoke Shrooms? Exploring the Myths and Realities
-
Articles2 months ago
WHAT IS THE DIFFERENCE BETWEEN SEED GARLIC AND FOOD GARLIC?
-
Fashion12 months ago
Make a Statement with Stunning Black Homecoming Dresses