Connect with us

Technology

The Key Role of Gutter Cleaning in Preventing Costly Home Repairs

Published

on

Gutter Cleaning

Introduction: The Hidden Guardian of Your Home

Gutters often go unnoticed, quietly performing their duty high above our heads. They may seem like a minor feature, but they play a crucial role in protecting your home from water damage. Properly functioning gutters channel rainwater away from your roof, walls, and foundation, preventing a cascade of problems that can lead to costly repairs. However, when neglected, clogged gutters can become a significant liability, leading to a host of issues, from foundation damage to mold growth. 

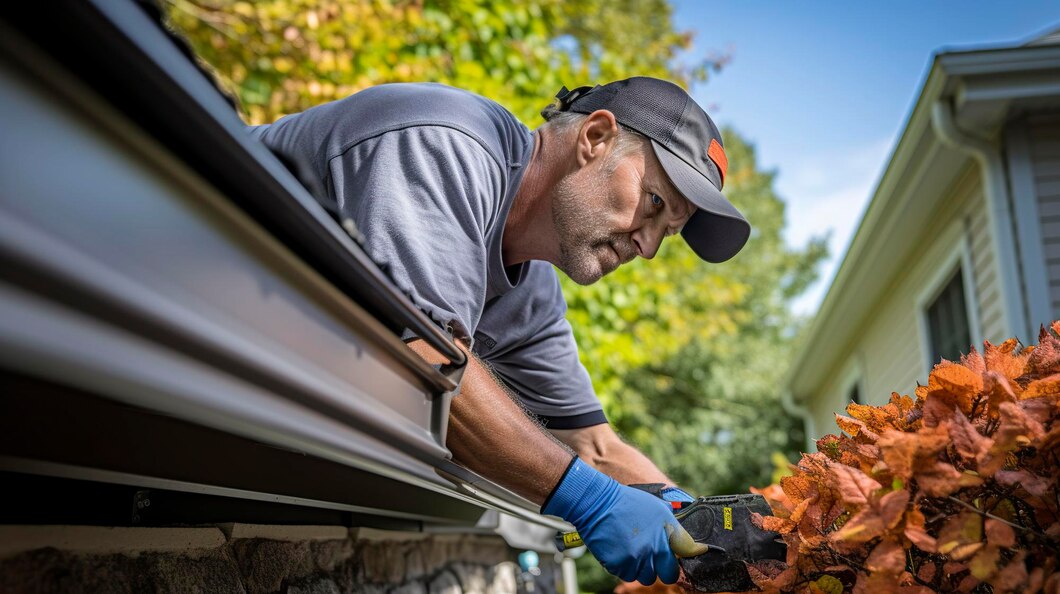
Regular gutter cleaning is crucial in safeguarding your home from potential water damage and costly repairs. Green and Cleaning Home Services offers professional gutter cleaning that ensures your gutters are clear and functioning properly, helping you protect your home from issues like foundation damage and roof leaks.

This article delves into the critical role of gutter cleaning in home maintenance, exploring how this simple task can save you from expensive and avoidable repairs.


The Silent Accumulation: What’s in Your Gutters?

1. The Usual Suspects: Leaves, Twigs, and Debris

Throughout the year, especially during fall, gutters become catchalls for a variety of debris.

  • Leaves and Twigs: Trees shed their leaves, which can easily accumulate in your gutters, particularly if your home is surrounded by foliage. These leaves, combined with twigs, seeds, and other organic matter, form dense clogs that prevent water from flowing freely.
  • Dirt and Silt: Over time, wind and rain can carry dirt and silt into your gutters. This material settles at the bottom, creating a sludge that can trap more debris and worsen blockages.

2. The Unwelcome Guests: Pests and Animals

Clogged gutters offer an inviting environment for various pests and animals, turning them into potential breeding grounds.

  • Insects: Stagnant water in clogged gutters is a perfect breeding ground for mosquitoes and other insects. These pests can become a nuisance and pose health risks to your family.
  • Birds and Rodents: Birds, squirrels, and even mice may see your clogged gutters as a safe place to build nests. These nests not only contribute to blockages but can also lead to more serious infestations within your home.

The Consequences of Neglect

3. Foundation Damage: The Costliest Risk

One of the most significant risks of neglecting gutter cleaning is the potential for foundation damage, which can lead to expensive repairs.

  • Water Overflow: When gutters are clogged, rainwater overflows and accumulates around the base of your home. This excess water can seep into the foundation, causing cracks and shifting the structure.
  • Soil Erosion: Water pooling around the foundation erodes the soil, undermining the stability of your home. This erosion can lead to uneven settling, cracked walls, and in severe cases, structural failure.

4. Roof and Siding Damage: An Unseen Menace

Clogged gutters can also wreak havoc on your roof and siding, leading to deterioration that isn’t immediately visible but can cause long-term damage.

  • Roof Leaks: Water trapped in clogged gutters can back up under the roof shingles, leading to leaks and water damage in your attic or ceiling. Over time, this can cause rot in the roof structure, compromising its integrity.
  • Siding Stains and Damage: Overflowing water from clogged gutters can run down the exterior walls of your home, staining and damaging the siding. This water exposure can lead to wood rot, peeling paint, and even mold growth on the siding.

5. Mold and Mildew: A Growing Concern

The presence of water where it shouldn’t be creates an ideal environment for mold and mildew to thrive, leading to health hazards and further damage.

  • Mold in the Attic and Walls: Water backing up from clogged gutters can seep into your attic and walls, creating damp conditions perfect for mold growth. Mold can spread quickly, damaging insulation, wood, and drywall, and posing serious health risks to your family.
  • Basement Flooding: When water is not properly directed away from your home, it can accumulate in the basement, leading to flooding. The damp conditions in a flooded basement are a breeding ground for mold and mildew, which can ruin belongings and create a hazardous environment.

The Preventive Power of Regular Gutter Cleaning

6. Protecting Your Home’s Foundation

Regular gutter cleaning is one of the most effective ways to protect your home’s foundation from water damage.

  • Channeling Water Away: By ensuring that your gutters are free from debris, you allow water to flow smoothly through the downspouts and away from your home’s foundation. This prevents the accumulation of water around the base, reducing the risk of cracks and erosion.
  • Avoiding Expensive Repairs: Foundation repairs can be among the most costly home repairs. By regularly cleaning your gutters, you avoid the circumstances that lead to foundation damage, saving you potentially thousands of dollars in repair costs.

7. Preserving Roof and Siding Integrity

Clean gutters play a critical role in preserving the integrity of your roof and siding.

  • Preventing Roof Rot: Regularly cleaned gutters prevent water from backing up under the roof shingles, thus avoiding rot and extending the life of your roof. A well-maintained roof not only protects your home but also enhances its value.
  • Maintaining Curb Appeal: Clean gutters prevent unsightly water stains and damage to your home’s siding. This not only preserves the aesthetic appeal of your home but also protects the underlying structure from moisture damage.

8. Reducing the Risk of Mold and Mildew

Regular gutter maintenance is a proactive step in reducing the risk of mold and mildew in your home.

  • Dry Basements: By keeping gutters clear and ensuring proper water drainage, you can prevent basement flooding and the associated risk of mold growth. A dry basement is a safer, healthier environment for your family.
  • Healthy Living Spaces: Preventing water from seeping into your walls and attic also means preventing mold from taking hold. This protects your family’s health and maintains the structural integrity of your home.

DIY vs. Professional Gutter Cleaning: Making the Right Choice

9. The DIY Approach: What You Need to Know

Gutter cleaning is a task that many homeowners can tackle on their own, but it’s important to do it safely and effectively.

  • Tools and Safety: DIY gutter cleaning requires a sturdy ladder, gloves, a scoop or trowel, and a hose to flush out the gutters. Safety is paramount—always use a ladder stabilizer and avoid overreaching, as falls from ladders can be dangerous.
  • Frequency: Depending on the amount of foliage around your home, gutters should be cleaned at least twice a year—once in the spring and once in the fall. However, if your home is surrounded by trees, you may need to clean them more frequently.

10. The Benefits of Professional Gutter Cleaning

For those who prefer to leave gutter maintenance to the experts, professional gutter cleaning offers several advantages.

  • Thoroughness: Professionals have the tools and experience to clean gutters more thoroughly than most homeowners can on their own. They can also identify potential issues, such as loose gutters or damage, before they become serious problems.
  • Safety: Hiring a professional eliminates the risks associated with ladder work, particularly for homes with multiple stories. Professionals are trained to work safely at heights and can handle even the most challenging gutter systems.
  • Time Savings: Gutter cleaning can be time-consuming, especially for larger homes. Hiring a professional saves you time and effort, allowing you to focus on other tasks while ensuring your gutters are properly maintained.

Conclusion:

Gutter cleaning may not be the most glamorous home maintenance task, but it is undoubtedly one of the most important. By keeping your gutters clean and free from debris, you protect your home from water damage, preserve its structural integrity, and avoid costly repairs. Whether you choose to do it yourself or hire a professional, regular gutter cleaning should be a non-negotiable part of your home maintenance routine. It’s a small investment of time and money that pays off in the long run, ensuring that your home remains safe, sound, and beautiful for years to come.

Continue Reading
Click to comment

Leave a Reply

Your email address will not be published. Required fields are marked *

Technology

ecvh0 dforce master how to: Unlock Its Benefits

Published

on

ecvh0 dforce master how to

Introduction

Struggling with ecvh0 dforce master setup? You’re not alone. Many users find its configuration tricky, but mastering it unlocks powerful automation and efficiency. This guide breaks down the process into simple steps, helping you harness its full potential quickly.

Why It Matters

Properly setting up ecvh0 dforce master ensures smoother workflows, reduces errors, and maximizes productivity. Whether for personal projects or enterprise use, mastering this tool can save hours of manual work.

Step-by-Step Guide

1. Install & Configure

  • Download the latest ecvh0 dforce master package from the official site.
  • Follow the installation wizard, ensuring all dependencies are met.

2. Set Up Permissions

  • Assign appropriate user roles (admin, editor, viewer).
  • Configure access controls to prevent unauthorized changes.

3. Integrate with Your System

  • Connect ecvh0 dforcemaster to your existing tools via API.
  • Test the connection to ensure seamless data flow.

4. Automate Key Tasks

  • Use built-in templates or create custom automation rules.
  • Schedule recurring tasks to minimize manual input.

5. Monitor & Optimize

  • Track performance metrics in the dashboard.
  • Adjust settings for better speed and efficiency.

Pro Tip

Use keyboard shortcuts to navigate ecvh0 dforcemaster faster. Press Ctrl + K (Windows) or Cmd + K (Mac) to open the command palette for quick actions.

Conclusion

Mastering ecvh0 dforce master simplifies complex tasks and boosts efficiency. By following these steps, you’ll optimize your workflow and get the most out of this powerful tool.

FAQ

Is ecvh0 dforcemaster free?

It offers a free tier with limited features; advanced options require a subscription.

Can I use it offline?

Some features work offline, but full functionality requires an internet connection.

How secure is ecvh0 dforcemaster?

It uses encryption and role-based access for security. For best practices, check our security guide.

Continue Reading

Technology

How to Disassemble a Sony KV-27S42 CRT TV: Complete Guide

Published

on

How to Disassemble a Sony KV-27S42 CRT TV

Introduction

The Sony KV-27S42 is a classic CRT television, and while it’s no longer in production, many enthusiasts still repair, modify, or salvage these sets. However, disassembling a CRT TV requires caution—high-voltage components and delicate electronics mean one wrong move could be dangerous.

This guide will walk you through the full disassembly process of the KV-27S42, covering:
✔ Safety precautions (CRT discharge, avoiding shocks)
✔ Tool requirements (what you’ll need)
✔ Step-by-step teardown (removing the case, tube, and boards)
✔ Salvaging useful parts (what to keep or discard)
✔ Reassembly tips (if needed)

Whether you’re repairing, modding, or recycling, this guide ensures you do it safely and efficiently.

Why Disassemble a KV-27S42?

Before diving in, it’s worth understanding why you might need to take apart this TV:

🔹 Repairs – Fixing power supply issues, bad capacitors, or video problems.
🔹 Modifications – RGB or component video mods for retro gaming.
🔹 Salvage – Reusing the CRT, speakers, or other parts for projects.
🔹 Safe Disposal – CRTs contain hazardous materials (lead, phosphors) and must be recycled properly.

Warning:
⚠ CRTs hold high voltage even when unplugged – improper handling can result in severe electric shock.
⚠ The tube is heavy and fragile – dropping it can cause implosion or injury.

Tools & Safety Gear You’ll Need

Before starting, gather these essentials:

Essential Tools

✔ Screwdrivers (Phillips & flathead)
✔ CRT discharge tool (or insulated screwdriver + wire)
✔ Needle-nose pliers (for small connectors)
✔ Anti-static wrist strap (optional but recommended)

Safety Precautions

✔ Work in a dry, well-lit area
✔ Discharge the CRT before touching anything
✔ Wear gloves & safety glasses (glass shards are sharp)
✔ Keep pets/kids away (CRTs are dangerous when mishandled)

Step-by-Step Disassembly Guide

Step 1: Unplug & Discharge the CRT

  1. Unplug the TV and wait at least 30 minutes for capacitors to discharge.
  2. Locate the anode cap (the large rubber suction cup on the CRT).
  3. Discharge the CRT:
    • Use a CRT discharge tool (best option).
    • Alternative: Clip one end of a wire to the TV’s metal frame and carefully slide a flathead screwdriver under the anode cap until you hear/see a small spark.

Step 2: Remove the Rear Cover

  1. Flip the TV face-down on a soft surface (blanket/towel).
  2. Remove all rear screws (some may be hidden under stickers).
  3. Gently pry the back cover off—plastic tabs may hold it in place.

Step 3: Disconnect Internal Cables

  1. Take photos of all connections before unplugging anything.
  2. Unplug:
    • Deflection yoke (two large plugs near the tube neck)
    • Anode cap (already discharged, but still be careful)
    • Speaker wires & control board connectors

Step 4: Remove the CRT Tube

  1. Unscrew the 4 CRT mounting brackets (they hold the tube to the frame).
  2. Carefully lift the tube out – it’s extremely heavy (get help if needed).
  3. Set it face-down on a soft surface to avoid scratches.

Step 5: Extract Circuit Boards & Other Components

  1. Mainboard – Remove screws and gently lift it out.
  2. Power supply – Disconnect all wires before removing.
  3. Speakers & tuner – Useful for retro projects if salvaging.

Pro Tips for Safe Disassembly

🔧 Label every wire and screw (masking tape + marker) to avoid confusion later.
🔧 Use a magnetic tray to keep screws organized.
🔧 If keeping the CRT, store it upright to avoid stress on the glass.

What Can You Salvage?

If you’re parting out the TV, these components are useful:
✅ CRT tube – Great for arcade builds or replacements.
✅ Speakers – Decent quality for DIY audio projects.
✅ Power supply & mainboard – Useful for electronics tinkering.
✅ Control knobs & buttons – Handy for retro mods.

How to Dispose of a CRT Safely

CRTs contain leaded glass and toxic phosphors, so never throw them in the trash. Instead:
♻ Check local e-waste recycling centers (many accept CRTs for free).
♻ Contact electronics repair shops – Some may take old TVs.
♻ Look for CRT buyback programs (some collectors pay for working tubes).

Conclusion: How to Disassemble a Sony KV-27S42 CRT TV

How to Disassemble a Sony KV-27S42 CRT TV,  requires patience and safety awareness, but it’s a rewarding project for retro tech enthusiasts. Whether you’re fixing, modding, or salvaging, following this guide ensures a smooth process.

FAQ About How to Disassemble a Sony KV-27S42 CRT TV

1. Can I get shocked if the TV has been unplugged for days?

Yes! CRTs can hold charge for weeks. Always discharge before working.

2. How heavy is the KV-27S42 CRT?

Around 50-60 lbs (23-27 kg)—lift carefully or get help.

3. Can I reuse the CRT in another TV?

Possibly, but tube swaps require matching specs (size, impedance, etc.).

4. What if I break the CRT?

The glass is under vacuum—if it cracks, it can implode. Wear safety gear!

5. Is it worth repairing a KV-27S42?

If you love CRTs, yes! These Sonys have great picture quality for retro gaming.


Continue Reading

Technology

How Much Does Window Tinting Cost? Save Money, Boost Comfort

Published

on

How Much Does Window Tinting Cost?

Introduction

Window tinting costs can vary widely, leaving many car owners unsure about fair pricing. Whether you want UV protection, privacy, or heat reduction, understanding the factors that influence cost helps you budget wisely. This guide breaks down pricing, so you get the best value without surprises.

Why It Matters

Window tinting isn’t just about style—it blocks harmful UV rays, reduces glare, and keeps your car cooler. But overpaying or choosing cheap options can lead to poor quality. Knowing the average costs ensures you invest in a tint that lasts and performs well.

Step-by-Step Guide to Window Tinting Costs

1. Understand the Pricing Factors

  • Film Quality: Basic dyed film starts at 50–150, while premium ceramic tints run 200–800.
  • Vehicle Size: Smaller cars cost less (100–300) vs. SUVs (200–600).
  • Number of Windows: Full-car tinting costs more than just side windows.

2. Compare Film Types

  • Dyed Film (50–150): Affordable but fades faster.
  • Carbon Film (150–350): Better heat rejection, matte finish.
  • Ceramic Film (200–800): Top-tier heat/UV protection, no signal interference.

3. Factor in Labor Costs

Professional installation adds 50–200, depending on complexity. DIY kits (20–100) are cheaper but risk bubbles/peeling.

4. Check Local Market Prices

Urban areas often charge more. Get 3+ quotes to avoid overpaying.

5. Consider Legal Limits

Some states restrict tint darkness (e.g., California bans <70% VLT on front windows). Non-compliant tints may require costly removal.

Pro Tip

“Ask for a warranty! Reputable shops offer 5–10-year guarantees against peeling or fading—saving you long-term costs.”

Conclusion: How Much Does Window Tinting Cost

Window tinting cost 50–800+, depending on film type, vehicle size, and labor. Investing in ceramic film or a trusted installer ensures durability and performance. Always check local laws and compare quotes to make a smart choice.

FAQ: How Much Does Window Tinting Cost

1. Is tinting worth the cost?
Yes—it reduces skin-damaging UV rays by 99% and lowers AC use, saving fuel.

2. How long does tint last?
High-quality tints last 10+ years; cheap ones fade in 2–3 years.

3. Can I tint my windshield?
Most states only allow a clear or light tint strip. Check your local laws.

4. Does tint affect visibility?
Not if you choose the right VLT (%)—go for 35% or higher for safety.

Continue Reading

Trending