Articles
Exploring the Art of Collagin: Techniques and Inspiration

Introduction to Collagin and its History
Art of Collagin is more than just cutting and pasting; it’s a vibrant expression of creativity that has captured the hearts of artists for centuries. This versatile art form invites you to blend textures, colors, and images in ways that tell your unique story. With roots tracing back to ancient times, collaging has evolved into various styles and techniques, allowing anyone with a spark of imagination to participate.
Whether you’re an experienced artist or a curious beginner, there’s so much to explore in the world of collage. The beauty lies not only in the final piece but also in the process—the thrill of combining unexpected elements can lead to surprising outcomes. So grab your scissors and get ready as we dive deep into this fascinating art form!
Different Types of Collage Techniques
Collage techniques are as varied as the artists who create them. One popular method is photomontage, which combines photographs to form a single image. This technique can evoke powerful emotions and tell compelling stories.
Another approach is mixed media collage, where artists incorporate materials like fabric, paint, or found objects. This adds texture and depth to the artwork, making each piece unique.
Digital collaging has gained popularity with technological advancements. Artists use software to combine images seamlessly. It allows for endless experimentation without the mess of traditional methods.
There’s paper cutting or decoupage. Here, pieces of paper are cut out and layered onto surfaces or canvases. The result can be whimsical or sophisticated depending on the selection of elements used.
Each technique offers its own charm and challenges, inviting creativity in diverse ways.
Materials and Tools Needed for Collaging
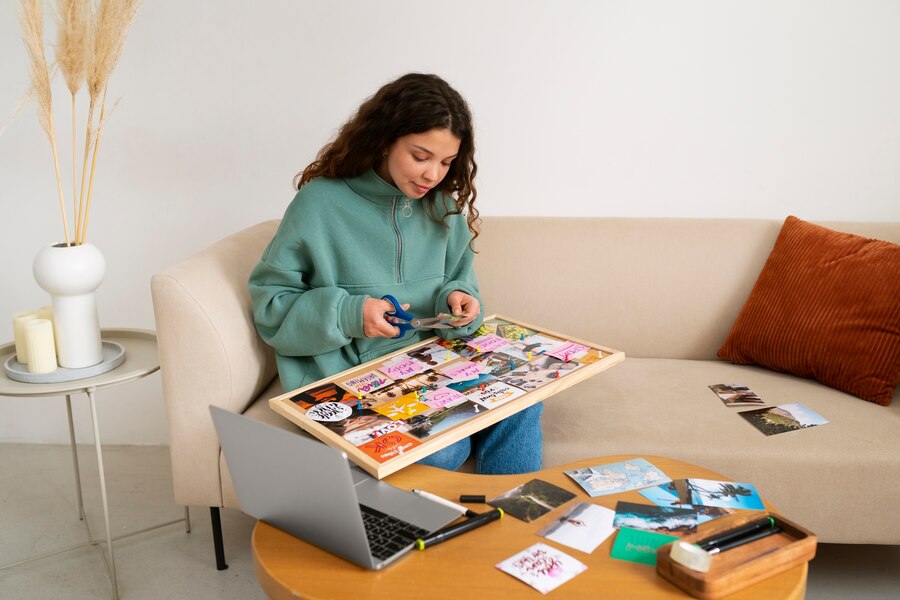
Creating a stunning collage requires a variety of materials and tools. Start with the basics: paper, scissors, and glue. These essentials set the foundation for your artistic expression.
Consider different types of paper, such as magazines, newspapers, or colored sheets. Each brings its own texture and vibe to your work.
Don’t forget about cutting tools like craft knives for precision cuts. A good pair of scissors can make all the difference in achieving clean lines.
Adhesives are crucial too—try glue sticks for easy application or mod podge for a glossy finish that seals everything together beautifully.
For added flair, incorporate unique items like fabric scraps, photographs, or even natural elements like leaves and flowers.
And finally, gather some protective gear—a cutting mat can save surfaces from damage while keeping your workspace organized.
Step-by-Step Guide to Creating a Collage
Start by gathering your materials. You’ll need a sturdy base, such as cardboard or canvas. Collect images from magazines, newspapers, or printouts that resonate with you.
Next, lay out your chosen pieces without gluing them down just yet. This allows for experimentation and rearrangement until the composition feels right. Play with overlapping elements to create depth.
Once satisfied with the layout, begin adhering each piece using glue or mod podge. Apply it evenly to avoid bubbles or wrinkles.
Add embellishments if desired—think ribbon, stickers, or textured paper—to enhance visual interest. Remember to work in layers; this adds complexity and richness.
Let everything dry completely before displaying your masterpiece proudly on a wall or shelf. Enjoy the process of bringing together different visuals into one cohesive art form that reflects your creativity!
Finding Inspiration for your Collages
Finding inspiration for your collages can be an exhilarating journey. Nature often serves as a perfect muse. A walk through the park, observing textures and colors, can spark fresh ideas.
Art museums are treasure troves of visual stimuli. Take note of how different artists layer their work or use contrasting materials to convey emotion.
Look around your home too; old magazines, postcards, and photographs hold hidden potential waiting to be transformed into something new.
Social media platforms like Instagram and Pinterest connect you with a vibrant community sharing their artistic endeavors. Exploring hashtags related to collage art may lead you down fascinating rabbit holes.
Don’t forget music or literature! Sometimes lyrics or book covers ignite concepts that blossom into beautiful pieces when put together on canvas. Embrace spontaneity; let your imagination roam free without boundaries or rules.
The Impact of Digital Collaging
Digital collaging has revolutionized the way artists approach this timeless craft. With just a click, you can access an endless array of images, textures, and graphics from around the world. The possibilities are virtually limitless.
This medium allows for precision that traditional methods sometimes lack. You can easily resize, layer, and manipulate elements to achieve your desired look without the mess of glue or scissors.
Moreover, digital platforms foster collaboration among artists globally. Online communities share their work and techniques in real-time. This exchange not only inspires creativity but also builds connections across borders.
Digital tools enable experimentation without fear of making mistakes. If something doesn’t work out as planned? Just hit ‘undo.’ Artists can take risks that might feel daunting in physical collages.
The blend of technology with artistry opens doors to new styles and expressions while maintaining collage’s core essence—storytelling through visuals.
Tips and Tricks for Perfecting Your Collage Skills
Start with a clear vision. Before you dive into your materials, sketch out a rough design. This will help guide your choices and keep your collage cohesive.
Experiment with different textures. Mix paper types, fabrics, and even natural elements like leaves or flowers to create depth in your work. Don’t shy away from layering; it adds richness.
Use unexpected color combinations for striking visuals. Complementary colors can make certain elements pop while creating an overall harmony in the piece.
Pay attention to balance but allow for asymmetry. Embrace the beauty of imperfection—sometimes the most captivating collages come from breaking traditional rules.
Don’t hesitate to step back frequently during creation. A few moments away can provide fresh perspectives on what works and what needs tweaking. Keep pushing boundaries; that’s where true artistry lies!
Conclusion: Art of Collagin
Art of Collagin is more than just cutting and gluing. It’s a celebration of creativity, inviting you to explore multiple narratives within a single frame. Each piece tells its own story while contributing to the whole.
This versatile medium encourages experimentation. You can mix textures, colors, and themes that resonate with your unique vision. The possibilities are endless.
Whether you’re creating for fun or aiming for deeper artistic expression, collaging provides an accessible outlet for self-discovery. Don’t shy away from mistakes; they often lead to unexpected beauty in your work.
As you embrace this art form, remember that it reflects your personal journey. Every collage is a snapshot of thoughts and feelings waiting to be shared with the world. Let each creation inspire both yourself and others along the way.
FAQs
What is Art of Collagin?
Art of Collagin is an art form where various materials like paper, photographs, fabric, and other items are combined on a surface to create a new composition.
- Do I need special tools for collaging?
While basic scissors and glue will suffice, advanced tools like craft knives or cutting mats can help achieve more precise cuts. You might also enjoy using decorative papers or mixed media elements to elevate your designs. - Can I create digital collages?
Absolutely! Digital collaging has become increasingly popular with software like Adobe Photoshop and apps designed specifically for this purpose. It allows limitless experimentation without the mess of physical materials. - How do I find inspiration for my collages?
Inspiration can come from anywhere: nature, magazines, online platforms like Pinterest or Instagram, even personal experiences. Keep an inspiration board handy to collect ideas that resonate with you. - Are there any common mistakes beginners make in collaging?
Many newcomers struggle with overthinking their designs or trying too hard to match colors perfectly. Remember that imperfections often add character; allow yourself creative freedom! - Is it necessary to have prior experience in art before starting collage work?
Not at all! Collage welcomes artists of all skill levels—it’s about expressing yourself rather than adhering strictly to technical rules.
Articles
How to Repair a Ripped Plate Carrier: A Quick & Durable Fix

A ripped plate carrier isn’t just an inconvenience—it’s a potential safety hazard. Whether the damage comes from rigorous training, field use, or long-term wear, a compromised carrier can fail when you need it most. Fortunately, with the right tools and techniques, you can restore its strength and reliability. This guide covers everything from quick field fixes to heavy-duty repairs, ensuring your plate carrier remains mission-ready.
Why Repairing Your Plate Carrier Matters
A plate carrier is a critical piece of tactical gear, designed to hold armor plates and distribute weight efficiently. When torn, its structural integrity weakens, leading to:
- Reduced ballistic protection (if plates shift or become exposed).
- Increased strain on seams and straps, accelerating further damage.
- Poor load distribution, causing discomfort and mobility issues.
Ignoring small tears can turn them into catastrophic failures. A proper repair extends your gear’s lifespan, saving money and ensuring performance when it counts.
Step-by-Step Guide to Repairing a Ripped Plate Carrier
1. Assess the Damage
Before starting, determine the extent of the tear:
- Seam Rip: Common in high-stress areas like shoulder straps or side seams.
- Fabric Tear: Often in Cordura or nylon panels due to abrasion.
- MOLLE Webbing Damage: Can affect pouch attachment points.
Check for:
✔️ Loose threads or fraying edges.
✔️ Weak spots near the tear that may need reinforcement.
2. Gather the Right Tools
For a field-expedient repair, you’ll need:
- Ripstop tape (like Gear Aid Tenacious Tape)
- Fabric glue (such as Seam Grip or Shoe Goo)
- Lighter (to melt frayed edges and prevent further unraveling)
For a permanent, heavy-duty fix, use:
- Bonded polyester or nylon thread (avoid cotton—it rots over time).
- Sewing awl or heavy-duty needle (for thick fabrics).
- Cordura or ballistic nylon patch (for large tears).
- Bar tack stitching (reinforced stitching used in military gear).
3. Prepare the Torn Area
- Trim loose threads with scissors.
- Use a lighter to carefully melt frayed edges (prevents further tearing).
- If using a patch, cut it slightly larger than the tear for full coverage.
4. Sewing the Repair (Best for Long-Term Durability)
For Seam Repairs:
- Use a backstitch for maximum strength.
- Sew at least ¼ inch from the edge to prevent pull-through.
- Double-stitch high-stress areas (shoulders, side buckles).
For Fabric Tears:
- Place a fabric patch behind the tear (glue it first for stability).
- Use a box stitch (X-pattern) to secure the patch.
- Seal edges with fabric glue for waterproofing.
For MOLLE Webbing:
- Re-stitch using a zigzag pattern to maintain flexibility.
- Add a reinforcing bar tack at stress points.
5. Field-Expedient Fixes (When You Can’t Sew)
- Ripstop Tape: Apply on both sides of the tear for an instant bond.
- Zip Ties or Paracord: Temporarily secure loose straps or webbing.
- Super Glue + Fabric: Works for small tears but isn’t as flexible.
6. Stress-Test the Repair
- Load the carrier with plates and gear.
- Tug firmly on the repaired area to check for weak points.
- Adjust stitching or reinforcement if needed.
Pro Tip: Preventing Future Damage
🔥 Rotate Your Carriers: If used daily, alternate between two to reduce wear.
🔥 Wash Properly: Hand-wash with mild soap; avoid harsh detergents that weaken fibers.
🔥 Inspect Regularly: Check stitching and fabric after each use.
Conclusion: How to Repair a Ripped Plate Carrier
A ripped plate carrier doesn’t have to mean the end of its service life. With How to Repair a Ripped Plate Carrier—whether a quick field fix or a reinforced stitch—you can restore its strength and reliability. For more on extending tactical gear lifespan, check our Ultimate Tactical Gear Maintenance Guide.
FAQ About How to Repair a Ripped Plate Carrier
1. Can I use a regular sewing machine for plate carrier repairs?
Yes, but only if it’s heavy-duty (like a Sailrite or industrial machine). Most home machines struggle with thick nylon webbing.
2. How long will a fabric glue repair last?
Temporary fixes (like glue or tape) hold for weeks, but stitching is the only permanent solution.
3. What’s the strongest stitch for tactical gear?
Bar tacking (used in military gear) or a triple-stitched box pattern provides the best durability.
4. Can I repair a torn plate carrier strap?
Yes—either re-stitch it with a patch or replace the strap entirely if too damaged.
5. Does duct tape work for emergency repairs?
It’s a last-resort option—duct tape loses adhesion quickly under movement and sweat.
Articles
How Much Paint to Paint a Car: Estimating Paint Quantity

Repainting your car can transform its appearance, but one of the biggest challenges is figuring out how much paint you’ll need. Use too little, and you risk an uneven, patchy finish. Use too much, and you’re wasting money on excess material. This comprehensive guide will walk you through every factor that affects paint quantity—from car size to paint type—so you can budget accurately and achieve professional results.
Why Calculating Paint Quantity Correctly Matters
Getting the right amount of paint isn’t just about saving money—it’s about ensuring a smooth, long-lasting finish. Running out of paint mid-job can lead to color mismatches, while excess paint may go to waste. Proper estimation helps you:
- Avoid costly mistakes (uneven coats, color inconsistencies).
- Save money by buying only what you need.
- Ensure durability (correct paint thickness prevents premature peeling).
Step-by-Step Guide to Calculating How Much Paint You Need
1. Determine Your Car’s Size & Surface Area
The larger your vehicle, the more paint it will require. Here’s a general breakdown:
Vehicle Type | Approx. Paint Needed (Gallons) | Surface Area (Sq. Ft.) |
---|---|---|
Compact Car (e.g., Honda Civic) | 1–1.5 gallons | 150–175 sq ft |
Mid-Size Sedan (e.g., Toyota Camry) | 1.5–2 gallons | 175–200 sq ft |
Full-Size SUV/Truck (e.g., Ford F-150) | 2–3 gallons | 200–250 sq ft |
Large Van/Commercial Vehicle | 3+ gallons | 250+ sq ft |
Pro Tip: If you’re painting only certain sections (like a hood or fender), measure their square footage separately.
2. Choose the Right Paint System
Different paint systems require varying amounts of product:
- Single-Stage Paint: Combines color and clear coat in one layer (requires less paint—about 1 gallon for a small car).
- Basecoat + Clearcoat: Needs multiple layers (basecoat: 1–1.5 gallons, clearcoat: 0.5–1 gallon).
- Metallic/Pearl Finishes: Often need extra coats for even coverage (add 10–20% more paint).
3. Factor in the Application Method
How you apply paint affects how much you’ll use:
- HVLP (High Volume Low Pressure) Spray Gun: Most efficient (minimal overspray, 90% transfer rate).
- Conventional Spray Gun: Wastes more paint (30–40% overspray).
- Brush/Roller (Rare for cars): Uses more paint but is harder to apply smoothly.
4. Don’t Forget Primer & Clearcoat
- Primer: Essential for adhesion (1 gallon typically covers a car).
- Clearcoat: Adds gloss and protection (0.5–1 gallon depending on layers).
5. Adjust for Paint Brand & Coverage Rate
Different brands have varying coverage rates (check the label). For example:
- 1 Gallon of Standard Automotive Paint ≈ Covers 100–150 sq ft per coat.
- High-Solid Paints (better coverage) may require 10–15% less.
Pro Tip: Always Buy Extra (The 10–20% Rule)
Even with careful measuring, unexpected issues can arise:
- Overspray waste
- Mistakes requiring reapplication
- Inconsistent coverage on certain panels
Ordering 10–20% more paint than calculated ensures you won’t run out mid-project.
How Much Does It Cost to Paint a Car Yourself?
- Paint Only: 100–500 (depending on quality).
- Primer & Clearcoat: 50–200.
- Supplies (Spray gun, sandpaper, masking): 200–500.
- Total DIY Cost: 300–1,500 (vs. 2,000–10,000 for professional work).
Conclusion: Smart Planning = Flawless Paint Job
Estimating paint correctly ensures a smooth, professional finish without overspending. Small cars typically need 1–1.5 gallons, while trucks may require 3+ gallons. Always check manufacturer specs, account for primer/clearcoat, and buy a little extra for safety.
FAQ – Your Paint Quantity Questions Answered
1. Can I paint a whole car with just 1 gallon?
Yes, for a small car with single-stage paint, but 1.5 gallons is safer to avoid running out.
2. Does color affect how much paint I need?
- Darker colors (black, navy): May need extra coats for full coverage.
- Metallic/pearl paints: Require more careful application (add 10–20% more).
3. How many coats of paint does a car need?
- Basecoat: 2–3 coats.
- Clearcoat: 2 coats (for durability).
4. Can I mix different paint brands?
Not recommended—stick to one brand/system to avoid adhesion or color-matching issues.
5. How long does a gallon of car paint last?
Unopened: 2–3 years (stored properly). Once opened: 6–12 months (sealed tightly).
Articles
How Much Is a Private Investigator: Costs & Key Factors

Introduction
Hiring a private investigator (PI) can feel overwhelming, especially with unclear pricing. Costs vary based on case complexity, location, and experience—typically 50–150/hour or 500–5,000+ per case. This guide breaks down pricing factors to help you budget wisely and avoid surprises.
Why Private Investigator Costs Matter
Whether you need surveillance, background checks, or legal support, understanding PI fees ensures you hire the right professional without overspending. Hidden costs or inexperienced investigators can derail your case, so transparency is key.
Step-by-Step Guide to PI Pricing
1. Understand Common Pricing Models
- Hourly Rates: 50–150/hour (e.g., surveillance or interviews).
- Flat Fees: 500–3,000 for simple cases (like locating a person).
- Retainers: Upfront payments (e.g., 2,000–5,000) for long-term cases.
2. Identify Cost Factors
- Case Type: Cheating spouse (75–125/hour) vs. corporate fraud (100–200/hour).
- Location: Urban areas (higher demand = higher rates).
- Expertise: Ex-law enforcement/PIs with niche skills charge premium rates.
3. Get Quotes & Compare
- Ask for itemized estimates (e.g., travel fees, report writing).
- Verify licenses and reviews (NAPIA is a trusted resource).
4. Budget for Extras
- Court testimony (150–300/hour) or database access fees (50–200).
5. Negotiate Smartly
- Bundle services (e.g., surveillance + background check) for discounts.
Pro Tip: Avoid PIs who demand full payment upfront. Reputable investigators bill incrementally or offer payment plans.
Conclusion
Private investigator costs depend on your needs, but research and clear contracts prevent overpaying. Prioritize experience over low rates—quality evidence saves time and money long-term.
FAQ
1. What’s the cheapest PI service?
Basic background checks start at $200, but complex cases (e.g., missing persons) cost more.
2. Are online PIs legit?
Some are, but verify licenses and avoid those refusing in-person consultations.
3. Can I deduct PI costs legally?
Sometimes (e.g., child custody cases); consult a tax professional.
-
Articles1 year ago
How Many Times Can You Regrow Green Onions
-
News7 months ago
Understanding HotLeaks: What You Need to Know
-
Fashion5 months ago
Opals in the USA: A Gemstone Transforming the Crystal Healing Market
-
Technology11 months ago
The Wonders of Oh Em Gee Blog
-
Entertainment11 months ago
Bare it All: Unforgettable Skinny Dipping Stories Shared
-
Health11 months ago
Can You Smoke Shrooms? Exploring the Myths and Realities
-
Articles2 months ago
WHAT IS THE DIFFERENCE BETWEEN SEED GARLIC AND FOOD GARLIC?
-
Fashion12 months ago
Make a Statement with Stunning Black Homecoming Dresses