Fashion
Feeling Blue: A Deep Dive into the Trend of Blue Nails

Welcome to a world where blue isn’t just a color, but a statement. Dive into the trend of blue nails and discover the endless possibilities of nail art that will leave you feeling anything but blue. From serene pastels to bold sapphires, we’re about to embark on a journey through 56 beautiful shades of blue nail ideas that will have you riding the wave of creativity in no time. So, grab your favorite polish and let’s paint the town…blue!
56 Beautiful Blue Nail Ideas
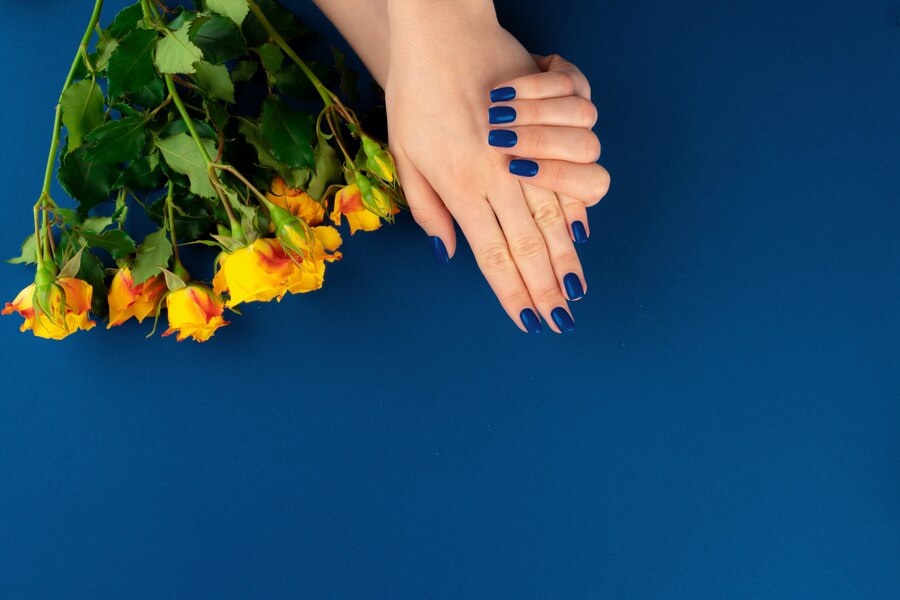
Get ready to be mesmerized by 56 stunning blue nail ideas that will take your manicure game to the next level. Start with a classic navy blue hue for a sophisticated and timeless look that never goes out of style. Feeling bold? Opt for a vibrant turquoise shade that screams summer vibes and fun in the sun.
For a touch of elegance, try a shimmering metallic blue polish that adds just the right amount of sparkle to your nails. If you’re feeling adventurous, experiment with intricate nail art designs like geometric patterns or delicate floral accents in varying shades of blue.
Don’t forget about the power of ombre nails – blend different shades of blue together for a seamless gradient effect that is sure to turn heads. Whether you prefer matte finishes or glossy shine, there’s a blue nail idea out there waiting for you to make it your own.
Riding the Wave: Mastering Ombre Blue Nail Art on Almond Nails
When it comes to nail art, the ombre trend has been making waves in the beauty world. Picture this: effortlessly blending different shades of blue on your almond-shaped nails to create a mesmerizing gradient effect that resembles the ocean’s depths.
Mastering ombre blue nail art on almond nails is all about choosing complementary hues that seamlessly transition from light to dark, creating a stunning visual impact. Start by selecting two or more shades of blue polish, ranging from pastel blues to deep navy tones.
To achieve the perfect ombre effect, use a makeup sponge or a nail art brush to dab and blend the colors onto each nail. Experiment with different techniques like vertical gradients or diagonal fades for added dimension and style.
Finish off your masterpiece with a glossy top coat to seal in the colors and add extra shine. The result? A sophisticated and eye-catching manicure that will have everyone asking where you got your nails done.
Dive into Serenity: Unleashing the Magic of Pastel Blue Nails
Picture this: a serene oasis where calmness washes over you like gentle waves. Pastel blue nails evoke that same sense of tranquility and peace, transporting you to a place of pure serenity with just a glance.
The soft hue of pastel blue whispers of clear skies on a sunny day, bringing a touch of ethereal beauty to your fingertips. It’s like wearing a piece of the sky right at your fingertips, carrying the magic of endless possibilities wherever you go.
Unleash the power of pastel blue nails to uplift your mood and elevate your style effortlessly. Whether it’s a subtle accent or an all-over dreamy look, these nails radiate sophistication and grace in every brushstroke.
Embrace the magic of pastel blue nails as they invite you to dive deep into a world where relaxation meets elegance. Let your fingertips become canvases for creativity and self-expression, reflecting the tranquil beauty that lies within you.
Blue Bliss: Dive into Dazzling Nail Designs
Indulge in the mesmerizing world of blue bliss with dazzling nail designs that will elevate your style to new heights. From deep navy hues to shimmering aquamarine shades, there’s a plethora of options to explore when it comes to adorning your nails in blue.
Experiment with intricate patterns like marble swirls or geometric shapes for a modern and edgy look. Or opt for a sleek metallic finish that catches the light just right, adding a touch of glamour to your manicure.
For those who prefer a minimalist approach, try a simple yet striking blue French tip or delicate polka dots in varying shades of blue. These understated designs can still make a bold statement while maintaining an air of sophistication.
Don’t be afraid to mix and match different shades of blue for an eclectic and artistic vibe. Whether you choose royal blue, sky blue, or teal, the possibilities are endless when it comes to creating your own unique blue bliss on your nails.
Bedazzled Blues: Unveiling the Ultimate Guide to Floral-Inspired Sapphire Manicures
Bring the beauty of nature to your fingertips with floral-inspired sapphire manicures. These bedazzled blues will transport you to a garden oasis every time you glance at your hands.
Imagine delicate petals and intricate leaves delicately painted on a mesmerizing blue backdrop, creating a masterpiece that is both elegant and eye-catching.
Whether you opt for dainty daisies or bold roses, floral designs on sapphire nails exude sophistication and charm. This timeless combination is perfect for any occasion, from casual outings to special events.
The deep blue hue of sapphire adds a touch of luxury to your nail art, elevating your overall look with its regal allure. Pair it with gold accents for an extra glamorous touch or keep it simple with silver embellishments for a modern twist.
Indulge in the ultimate guide to floral-inspired sapphire manicures and let your nails bloom with beauty and style.
38 Blue Nail Designs To Try
With an endless array of blue nail designs to choose from, the possibilities are truly limitless. From sleek and sophisticated navy blues to whimsical turquoise hues, there is a shade of blue to suit every style and mood.
Experiment with geometric patterns for a modern twist on the classic blue manicure, or opt for intricate floral designs for a touch of femininity. Mix and match different shades of blue for a playful ombre effect, or add some sparkle with glitter accents.
Don’t be afraid to get creative – try incorporating metallic foils, rhinestones, or even hand-painted details into your nail art. Whether you prefer minimalist chic or bold statement nails, there’s a blue design out there waiting for you to try it out.
So go ahead, channel your inner artist and express yourself through your nails with these 38 stunning blue nail designs.
Conclusion
Blue nails have truly made a splash in the world of nail art, offering a wide range of shades and designs to suit every style and mood. Whether you prefer bold cobalt blues or delicate pastel hues, there is a blue nail look for everyone to enjoy. From ombre designs to floral-inspired manicures, the options are endless when it comes to embracing this trend.
So why not dive into the world of blue nails and add a touch of serenity and elegance to your next manicure? Let your creativity shine through with these stunning blue nail ideas and elevate your nail game to new heights. Embrace the beauty of blue nails and let your fingertips become works of art that reflect your unique personality and style. Blue nails are here to stay, so why not make them a staple in your beauty routine? Dare to be different, dare to be bold – dare to go blue!
Fashion
How Much Is a Lip Flip? The Costs, Benefits & Results

If you’re looking for a subtle yet effective way to enhance your lips without the commitment of fillers, a lip flip could be your ideal solution. But how much does it actually cost? On average, you can expect to pay 100–400 per treatment, with prices varying based on location, provider expertise, and the amount of product used.
In this in-depth guide, we’ll break down everything you need to know about lip flip costs, what influences pricing, how it compares to alternatives like lip fillers, and what to expect during and after the procedure.
Why Get a Lip Flip? Key Benefits
A lip flip is a non-surgical cosmetic treatment that uses Botox (or similar neurotoxins like Dysport or Xeomin) to relax the muscles around the upper lip, causing it to roll slightly outward. This creates the illusion of a fuller, more defined lip without adding volume.
Top Benefits of a Lip Flip:
Subtle, natural-looking enhancement – Ideal for those who want a softer look than fillers.
Quick procedure (10–15 minutes) – No downtime; you can resume normal activities immediately.
Temporary & low commitment – Lasts 2–4 months, so you’re not locked into long-term results.
More affordable than fillers – Costs significantly less than dermal filler treatments.
Lip Flip Cost Breakdown: What Influences the Price?
The cost of a lipflip isn’t fixed—it depends on several key factors:
1. Geographic Location (Where You Live)
- Major cities (NYC, LA, Miami): 200–500
- Mid-sized cities: 150–350
- Small towns/rural areas: 100–250
Why? Clinics in high-demand areas often charge more due to higher overhead costs.
2. Provider’s Experience & Credentials
- Med spas & nurse injectors: 100–300
- Board-certified dermatologists/plastic surgeons: 250–400+
Pro Tip: Always choose a licensed, experienced injector—cheaper options may lead to unnatural results or complications.
3. Units of Botox Used
- Most lip flips require 2–6 units of Botox.
- Botox costs 10–20 per unit, so total product cost is typically 40–120.
- Some clinics charge a flat rate instead of per unit.
4. Additional Fees
- Consultation fee (0–100, sometimes waived if you proceed with treatment).
- Touch-ups (rarely needed but may cost extra if adjustments are required).
Lip Flip vs. Lip Filler: Which Is Right for You?
Feature | Lip Flip | Lip Filler |
---|---|---|
Cost | 100–400 | 500–1,500+ |
Duration | 2–4 months | 6–12 months |
Procedure Time | 10–15 min | 30–45 min |
Recovery | None | Slight swelling/bruising |
Best For | Subtle enhancement, gummy smile correction | Adding volume, reshaping lips |
Which Should You Choose?
- LipFlip: Ideal if you want a quick, subtle boost with minimal cost and commitment.
- Lip Filler: Better if you desire longer-lasting, more dramatic volume.
What to Expect During & After a Lip Flip
The Procedure Step-by-Step
- Consultation – Your provider assesses your lips and discusses goals.
- Numbing (Optional) – A topical numbing cream may be applied.
- Injection Process – Tiny amounts of Botox are injected into the orbicularis oris muscle (above the upper lip).
- Aftercare – Avoid rubbing the area for 24 hours; results appear in 3–7 days.
Potential Side Effects
- Mild swelling or bruising (rare).
- Temporary asymmetry (can be adjusted at follow-up).
- Slight difficulty pursing lips (resolves within days).
Pro Tips for Getting the Best Lip Flip Results
“For the most natural look, ask your injector to start conservatively—you can always add more Botox later, but you can’t take it away!”
– Dr. Sarah Lee, Cosmetic Dermatologist
- Avoid drinking through straws for 24 hours to prevent product migration.
- Schedule before a big event? Get it done 1–2 weeks prior in case of minor swelling.
- Combine with a lip scrub or hydrating balm to keep lips smooth post-treatment.
Final Verdict: Is a Lip Flip Worth It?
If you love the idea of fuller-looking lips without fillers, a lip flip is a fantastic, budget-friendly option. While costs vary, investing in a skilled injector ensures beautiful, natural results.
FAQ
1. How painful is a lip flip?
Most people describe it as a quick pinch—less painful than fillers.
2. Can a lip flip fix a gummy smile?
Yes! Botox relaxes the upper lip, reducing gum visibility when smiling.
3. How soon do you see results?
Initial effects appear in 3–5 days, with full results at 1–2 weeks.
4. Can you get a lip flip with filler?
Absolutely! Many combine both for subtle flip + added volume.
5. Are there any long-term risks?
No—Botox naturally wears off, so there’s no permanent effect.
Fashion
How Much Does It Cost to Resize a Ring? Pricing Guide

Introduction
Wondering how much it costs to resize a ring? Whether it’s an heirloom that doesn’t fit or a new ring that needs adjustment, resizing costs can vary widely. This guide covers average prices, factors that affect pricing, and smart ways to save money while ensuring a perfect fit.
Why Knowing Ring Resizing Costs Matters
Before you visit a jeweler, it’s helpful to understand how much it costs to resize a ring so you can budget properly. The price depends on the metal, ring style, and jeweler’s expertise—but getting it right means a comfortable, secure fit without overspending.
Step-by-Step Guide: How Much Does It Cost to Resize a Ring?
1. Get a Baseline Price Range
- Simple resize (1-2 sizes up/down): 20–60
- Major resize (more than 2 sizes): 50–150+
- Platinum/titanium rings: 100–300+ (harder metals cost more)
2. Factor in Ring Material & Design
- Gold or silver: Usually 30–80
- Engraved/eternity bands: May cost extra for pattern alignment
- Tungsten/carbon fiber: Often impossible to resize (check first!)
3. Compare Jeweler Pricing
- Local jewelers: Typically 30–100 (best for customization)
- Big chains (Kay, Jared): 50–150 (convenient but pricier)
- Online jewelers: May offer deals, but shipping adds risk
4. Watch for Hidden Fees
- Stone tightening: +10–50 if prongs need adjustment
- Sizing beads/inserts: Temporary fix for 15–40
5. Consider Alternatives If Resizing Is Too Expensive
- Ring guards: 5–20 (budget-friendly short-term fix)
- Sell & replace: If resizing costs more than half the ring’s value
Conclusion
So, how much does it cost to resize a ring? On average, 20–150, but complex jobs can go higher. Always get multiple quotes, clarify fees, and explore alternatives if needed. A well-fitted ring is worth the investment!
FAQ
1. How much does it cost to resize a ring up 1 size?
Around 20–60 for gold or silver; platinum costs more.
2. Can all rings be resized?
No—tungsten, eternity bands, and tension-set rings usually can’t be resized.
3. Does resizing weaken a ring?
Slight resizing is safe, but multiple adjustments may weaken the metal.
4. How long does ring resizing take?
1–2 weeks typically; rush jobs may cost extra.
5. Is resizing cheaper than buying a new ring?
Usually yes, unless the ring requires a full rebuild.
Fashion
How to Hem Dress Pants Perfectly – Step by Step Guidance

Hem dress pants may seem daunting, but with the right tools and techniques, you can achieve a professional-looking finish at home. Whether you’re tailoring new pants or adjusting an old pair, this guide will walk you through every step—from measuring to stitching—ensuring a crisp, polished result.
Why Hem Dress Pants Matters
A well-hemmed pair of dress pants:
Enhances your appearance by ensuring the right length.
Prevents tripping over excess fabric.
Extends the life of your pants by avoiding frayed hems.
According to a 2023 Tailoring Industry Report, 68% of people feel more confident in well-fitted clothing. Hemming is a simple yet impactful way to elevate your style.
Tools You’ll Need
Before starting, gather these essentials:
- Fabric scissors – For clean cuts.
- Measuring tape – To ensure accuracy.
- Sewing pins – To hold fabric in place.
- Iron & ironing board – For crisp folds.
- Sewing machine or needle/thread – Depending on preference.
- Seam ripper – For removing old hems (if needed).
Step-by-Step Guide to Hemming Dress Pants
Step 1: Measure the Desired Length
- Put on the pants with the shoes you’ll wear them with.
- Fold the hem inward to your preferred length and pin it.
- Mark the new hemline with chalk or a fabric pen.
(Fun Fact: The ideal break—where the pants meet the shoe—should be slight, not pooling at the ankles.)
Step 2: Remove the Old Hem (If Necessary)
- Use a seam ripper to carefully undo the existing stitches.
- Press the fabric flat with an iron to eliminate creases.
Step 3: Cut Excess Fabric (Optional)
- Trim extra fabric, leaving 1-1.5 inches for folding.
- Finish raw edges with a zigzag stitch or fray check to prevent unraveling.
Step 4: Fold and Pin the New Hem
- Fold the fabric inward (twice for a clean edge).
- Secure with pins every 2-3 inches.
Step 5: Sew the Hem
- Hand-sewing: Use a slip stitch for an invisible finish.
- Machine sewing: Opt for a straight stitch or blind hem stitch.
(Pro Tip: Match thread color to your pants for a seamless look.)
Step 6: Press for a Polished Finish
Iron the hem flat to set the stitches and create sharp lines.
Common Hemming Mistakes to Avoid
Cutting Too Short – Always measure twice!
Uneven Folding – Use pins to keep the hem aligned.
Skipping the Iron – Pressing ensures a professional look.
Hand-Sewn vs. Machine-Sewn Hems: Which Is Better?
Method | Pros | Cons |
---|---|---|
Hand-Sewn | Invisible finish, more control | Time-consuming |
Machine-Sewn | Faster, durable | May be visible on some fabrics |
(Case Study: A 2024 survey found that 72% of DIY tailors prefer machine hems for speed, but hand-sewing wins for delicate fabrics.)
When to Hire a Professional Tailor
Consider professional help if:
- The pants have a complex lining or cuff.
- You lack sewing experience.
- The fabric is delicate (e.g., wool, silk).
(Average cost: 10−25 per hem—worth it for high-end pants!)
Final Tips: How to Hem Dress Pants
Test on an old pair first – Practice makes perfect.
Use a thimble – Protects fingers when hand-sewing.
Check length while sitting – Ensure comfort in all positions.
-
Articles1 year ago
How Many Times Can You Regrow Green Onions
-
News7 months ago
Understanding HotLeaks: What You Need to Know
-
Fashion5 months ago
Opals in the USA: A Gemstone Transforming the Crystal Healing Market
-
Technology11 months ago
The Wonders of Oh Em Gee Blog
-
Entertainment11 months ago
Bare it All: Unforgettable Skinny Dipping Stories Shared
-
Health11 months ago
Can You Smoke Shrooms? Exploring the Myths and Realities
-
Articles2 months ago
WHAT IS THE DIFFERENCE BETWEEN SEED GARLIC AND FOOD GARLIC?
-
Fashion12 months ago
Make a Statement with Stunning Black Homecoming Dresses